
Amazon Web Services RDS with MySQL & MySQL Workbench
- What is Amazon RDS
- How to create a MySQL RDS
- Connecting to your RDS: Terminal + MySQL Workbench
- Importing local database into new RDS
If you had a chance to read my post Using MySQL with R, you’ll see that I like to use MySQL to store larger datasets for open-source projects. I found myself with access issues when trying to use MySQL as the database for a shiny app that I was looking to deploy. After googling around a bit, the best solution was to utilize Amazon RDS (Relational Database Service) to properly provide access to the database on my shiny app.
Amazon RDS is another amazing service provided by AWS (Amazon Web Services) that is designed to set up, manage, and scale a relational database such as MySQL, PostgreSQL, Oracle, SQL Server, and more in the cloud. Not only that, but Amazon RDS assumes the day-to-day management tasks associated with MySQL such as backups, failure detections, recovery, and scaling. I decided to make the switch onto Amazon RDS using the free tier so I could make my database easily accessible for my shiny app. In this post, I will provide two ways for you to make this necessary switch and why you should.
At the minimum, you will need an Amazon Web Services account to create an RDS. When you create an RDS, you are provided with an endpoint URL which we will use as the host when connecting through SSH or on MySQL Workbench. See below on how to create an RDS after you log in to AWS.
#Creating Security Group for RDS
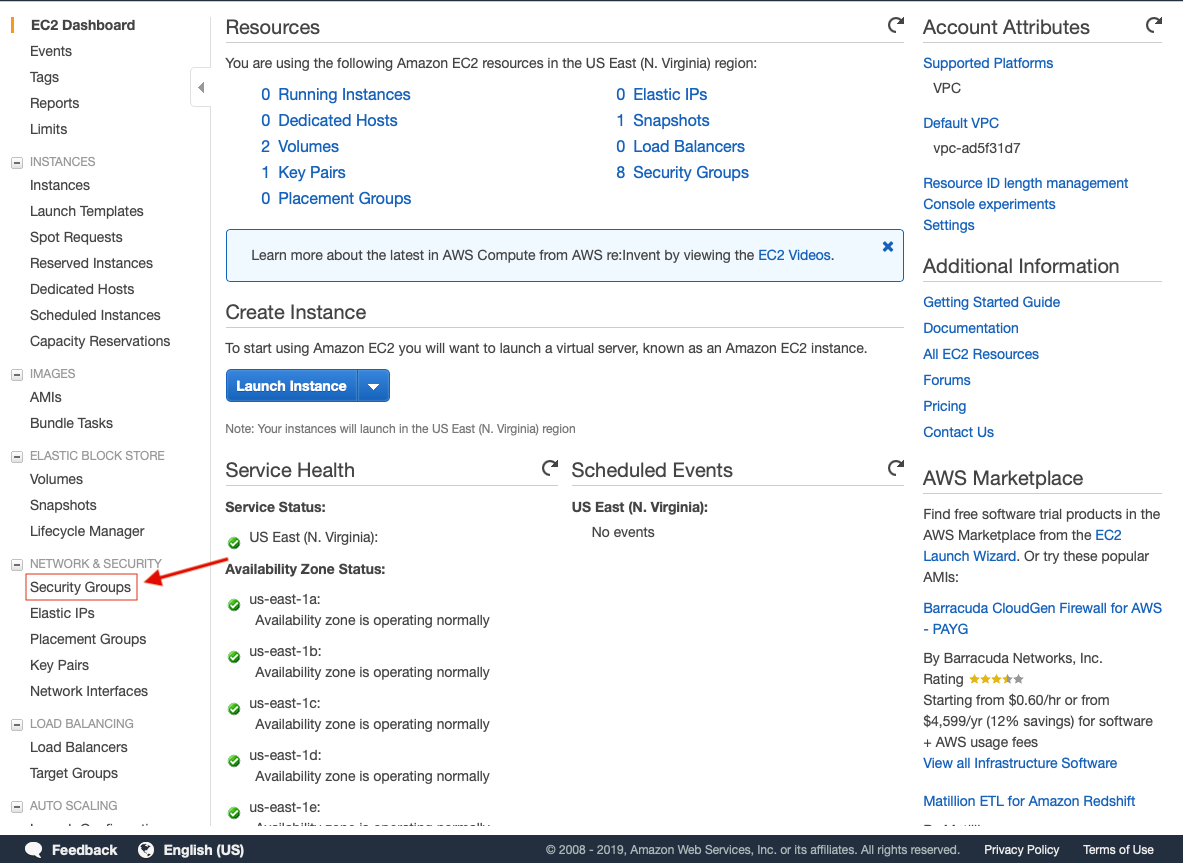
The first thing we will want to do is configure a security group so we can have access to our RDS database. Go to the services tab and select EC2 then navigate to “Security Groups” under Network & Security on the left navigation bar.
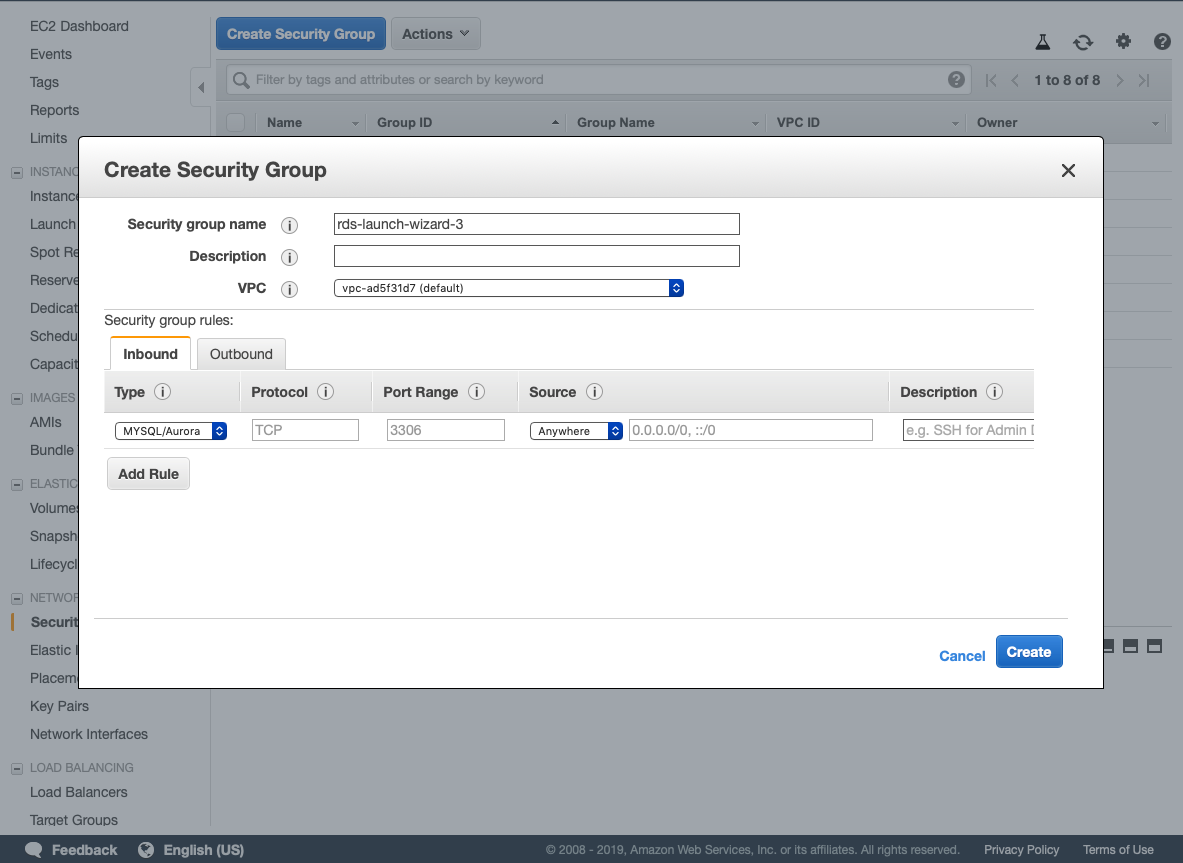
Click Create Security Group, and then enter a name for your security group, and select the appropiate VPC (it will suually be default if this is your first RDS instance). Select add rule, and choose “MYSQL/Aurora” under the Type drop-down. Change Source to “Anywhere” and click Create.
Launching a AWS RDS Instance to run MySQL
To start, select the services tab, RDS under database, and then click create database. There are plenty of configuration settings, but leave them to default unless stated below.
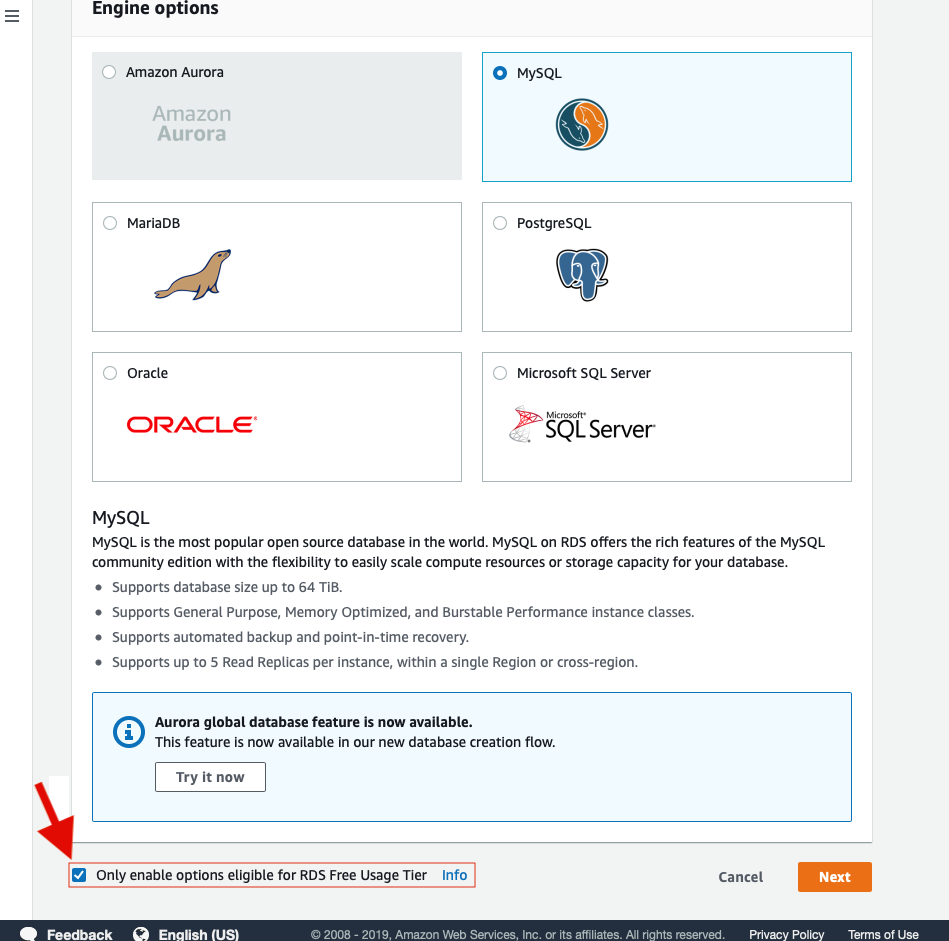
Step 1
Select the DB Engine. We will select MySQL and make sure to check the box that says “Only enable options eligible for RDS free Usage Tier.” Click Next.
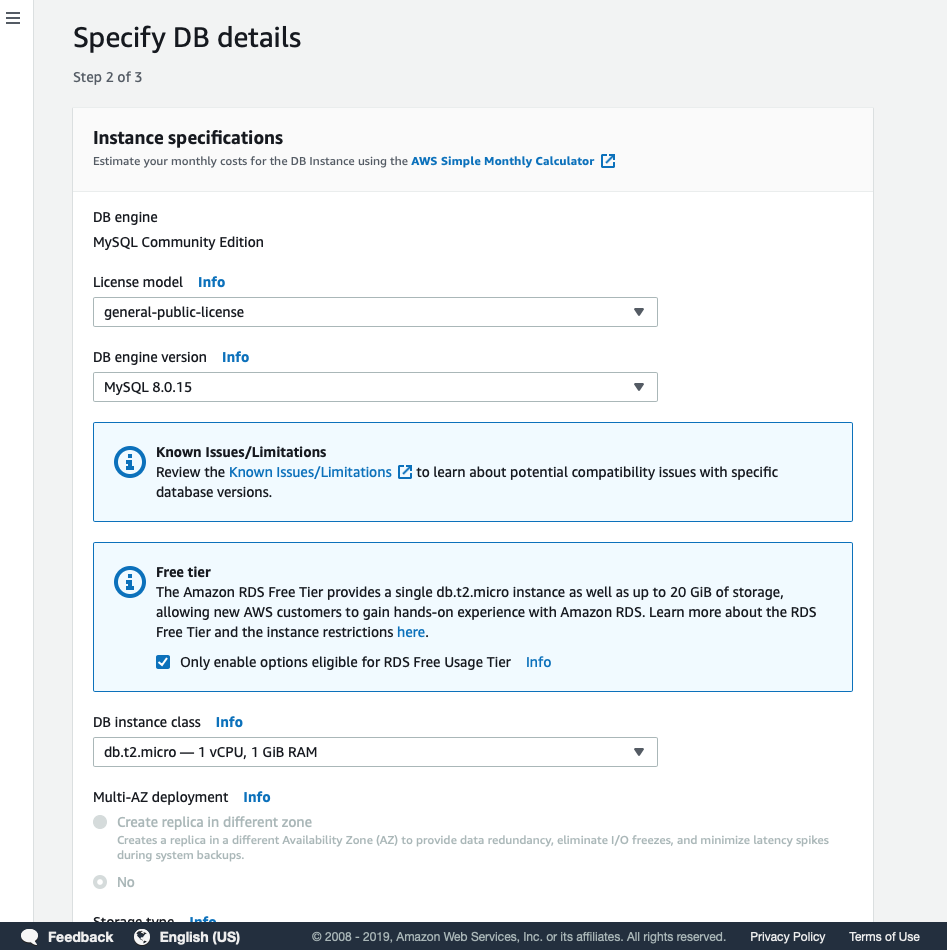
Step 2
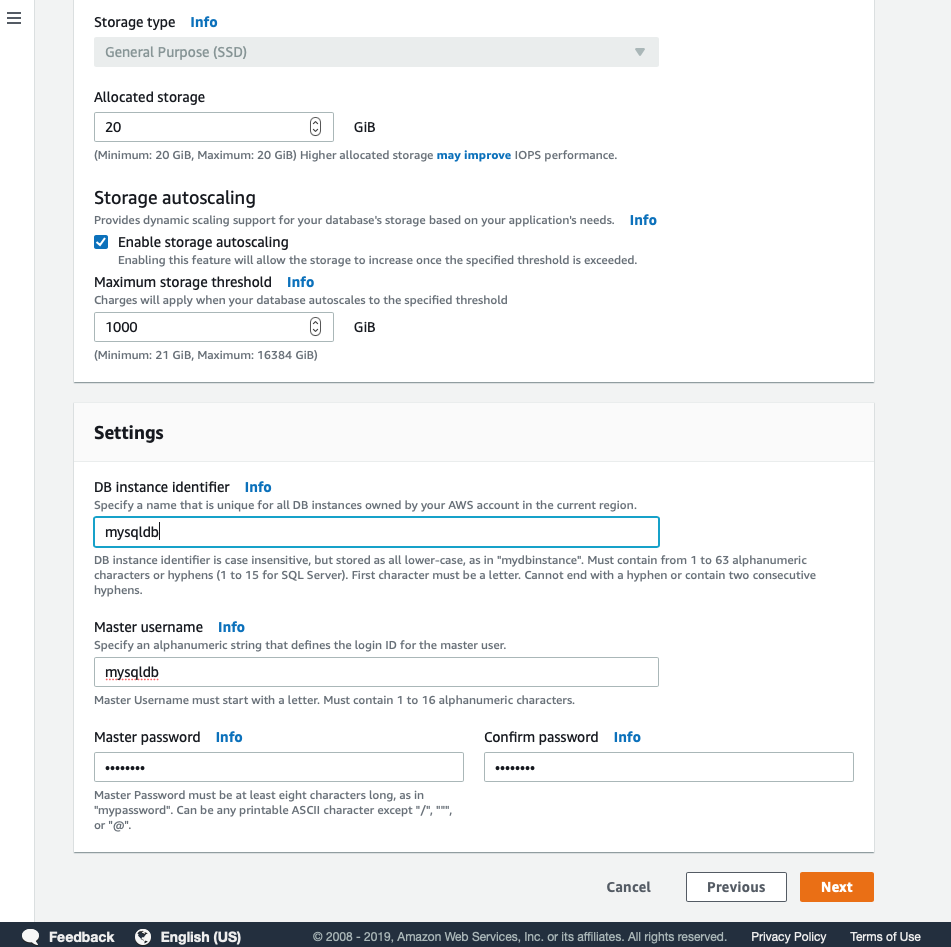
Select the DB engine version. I’m selecting MySQL 8.0.15 since I have the same engine on my local desktop. Since we selected the Free Tier, our only DB Instance Class option is the “db.t2.micro - 1vCPU, 1GiB RAM” and our Allocated storage will be set to 20GiB.
Scroll down the page to Settings and add your DB identifier, master username, and master password. Set and remember your password since you will be prompted for it multiple times. Click Next.
Step 3
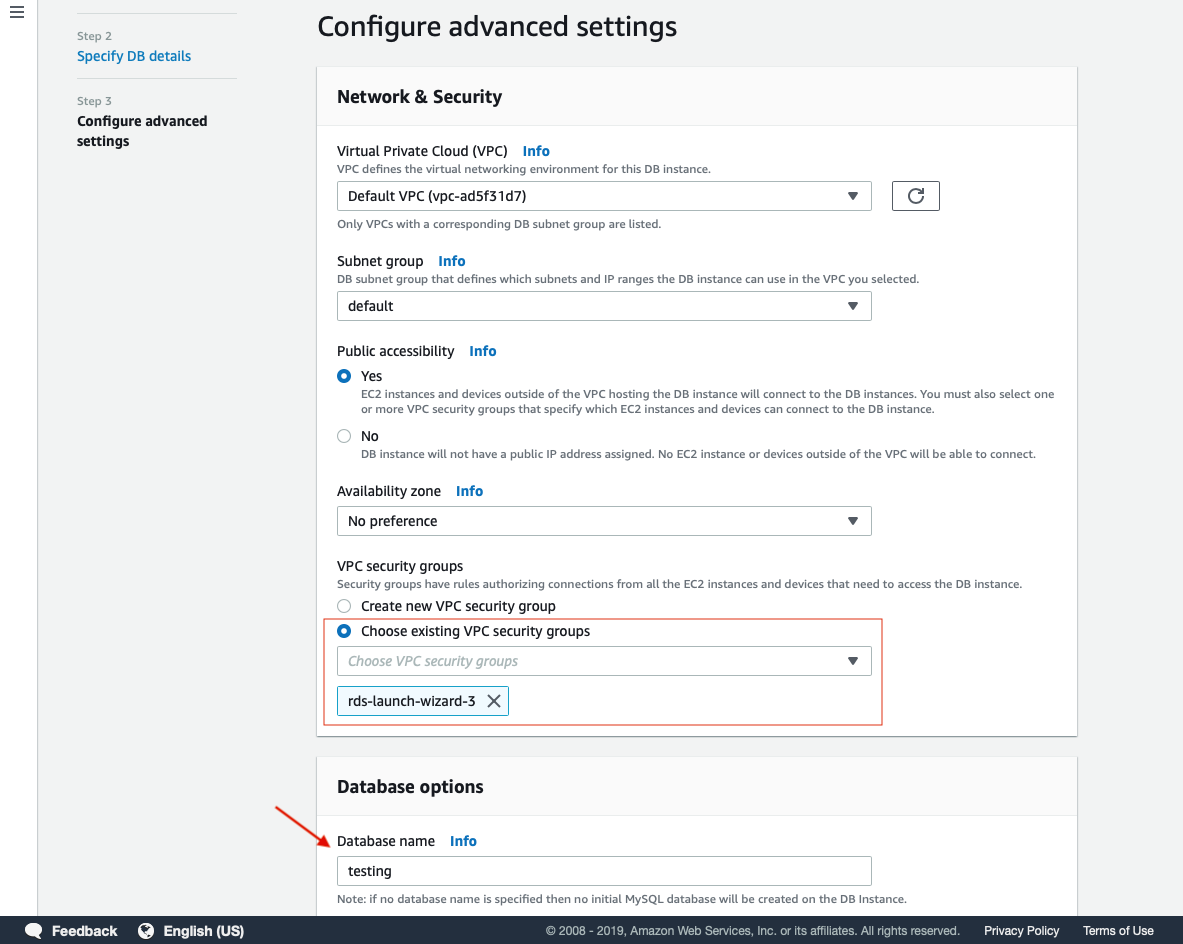
Make sure your public accessibility is set to “Yes” or else our instance will not have a public IP address assigned. Also, please make sure “Choose exisiting VPC secuirty groups” is selected so we can choose the RDS secuirty group we initially created. If you are storing sensitive data then you will need to configure the security group settings or subnet groups which is beyond this scope. I am only looking for easy ways to access non-sensitive data seamlessly at any location.
Under Database options, just enter a database called “testing” so we can ensure everything was loaded correctly once we connect to our DB Instance. Leave the rest of the settings to default unless you’d like to snoop a little more. For these purposes, we do not need to change any settings so click create database. It will take ~10 minutes to launch the database and back it up so be patient :)
Step 4
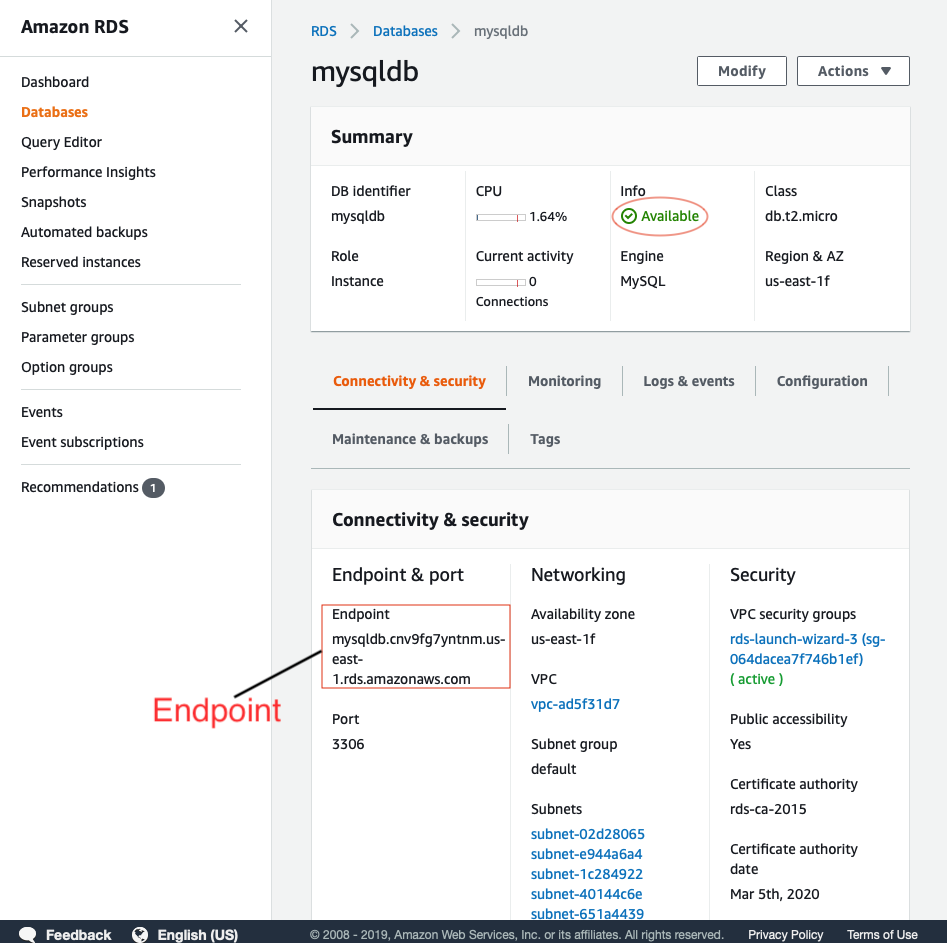
Wait for our RDS to finish launching. Under the Summary tab for our new RDS, you will see it turn to “Available” (Please keep note of where your endpoint is located as we will later need it).
Let’s quickly check if the secuirty group settings look correct. It should read “0.0.0.0/0” for both Inbound & Outbound.
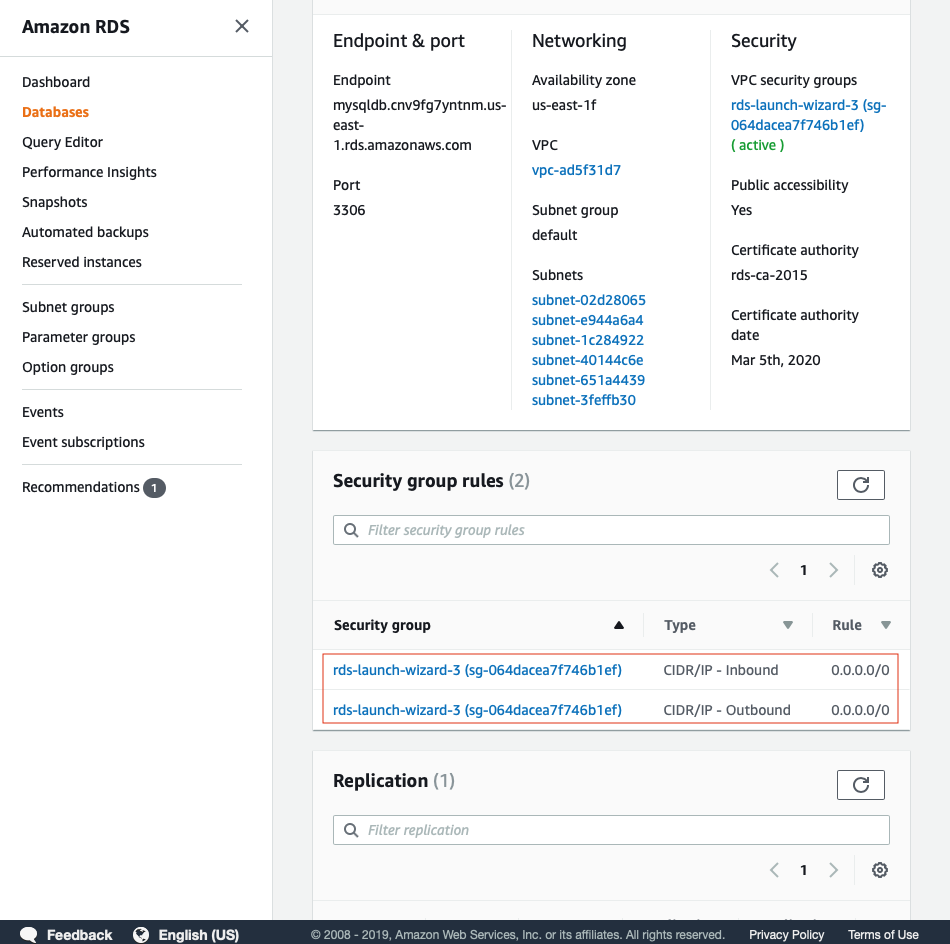
Great, the security group setting is set to the one we initially created. Its now time to connect to your new MySQL RDS Instance!
Connecting Through Terminal and MySQL Workbench
I’m going to show two ways to connect to our new AWS RDS Instance. If you have no interest in using the terminal to connect, then you can click here to learn how to connect your Instance to MySQL Workbench.
Terminal
You must already have a version mysql installed into your computer before you can call mysql. Please see MySQL Installation and choose the instructions for the appropiate operating system. For Mac users installing mysql 8.0 or higher, see Installing MySQL on macOS Using Native Packages
Install MySQL on Mac - Quick & Easy using HomeBrew
If you dont have Homebrew, then do this first:
/usr/bin/ruby -e "$(curl -fsSL https://raw.githubusercontent.com/Homebrew/install/master/install)"
Then install MySQL client to your Mac:
brew install mysql-client
#MySQL Installed
Copy and paste your Endpoint which you will find under “Connectivity and security”. To connect through your local terminal, enter the below command with your appropriate values.
mysql -h <Endpoint> -u <Master Username> -p
Then it will prompt you for a password which is the master password you created with your username. Once you entered everything correctly, you will be logged into your MySQL DB that is hosted on Amazon RDS. Let’s see if the “testing” database was loading correctly during the initial set up.

We can see our testing database so we’ve configured Mysql correctly! Now we are up and running through the local terminal. Let’s see how we can do this through MySQL Workbench.
MySQL Workbench
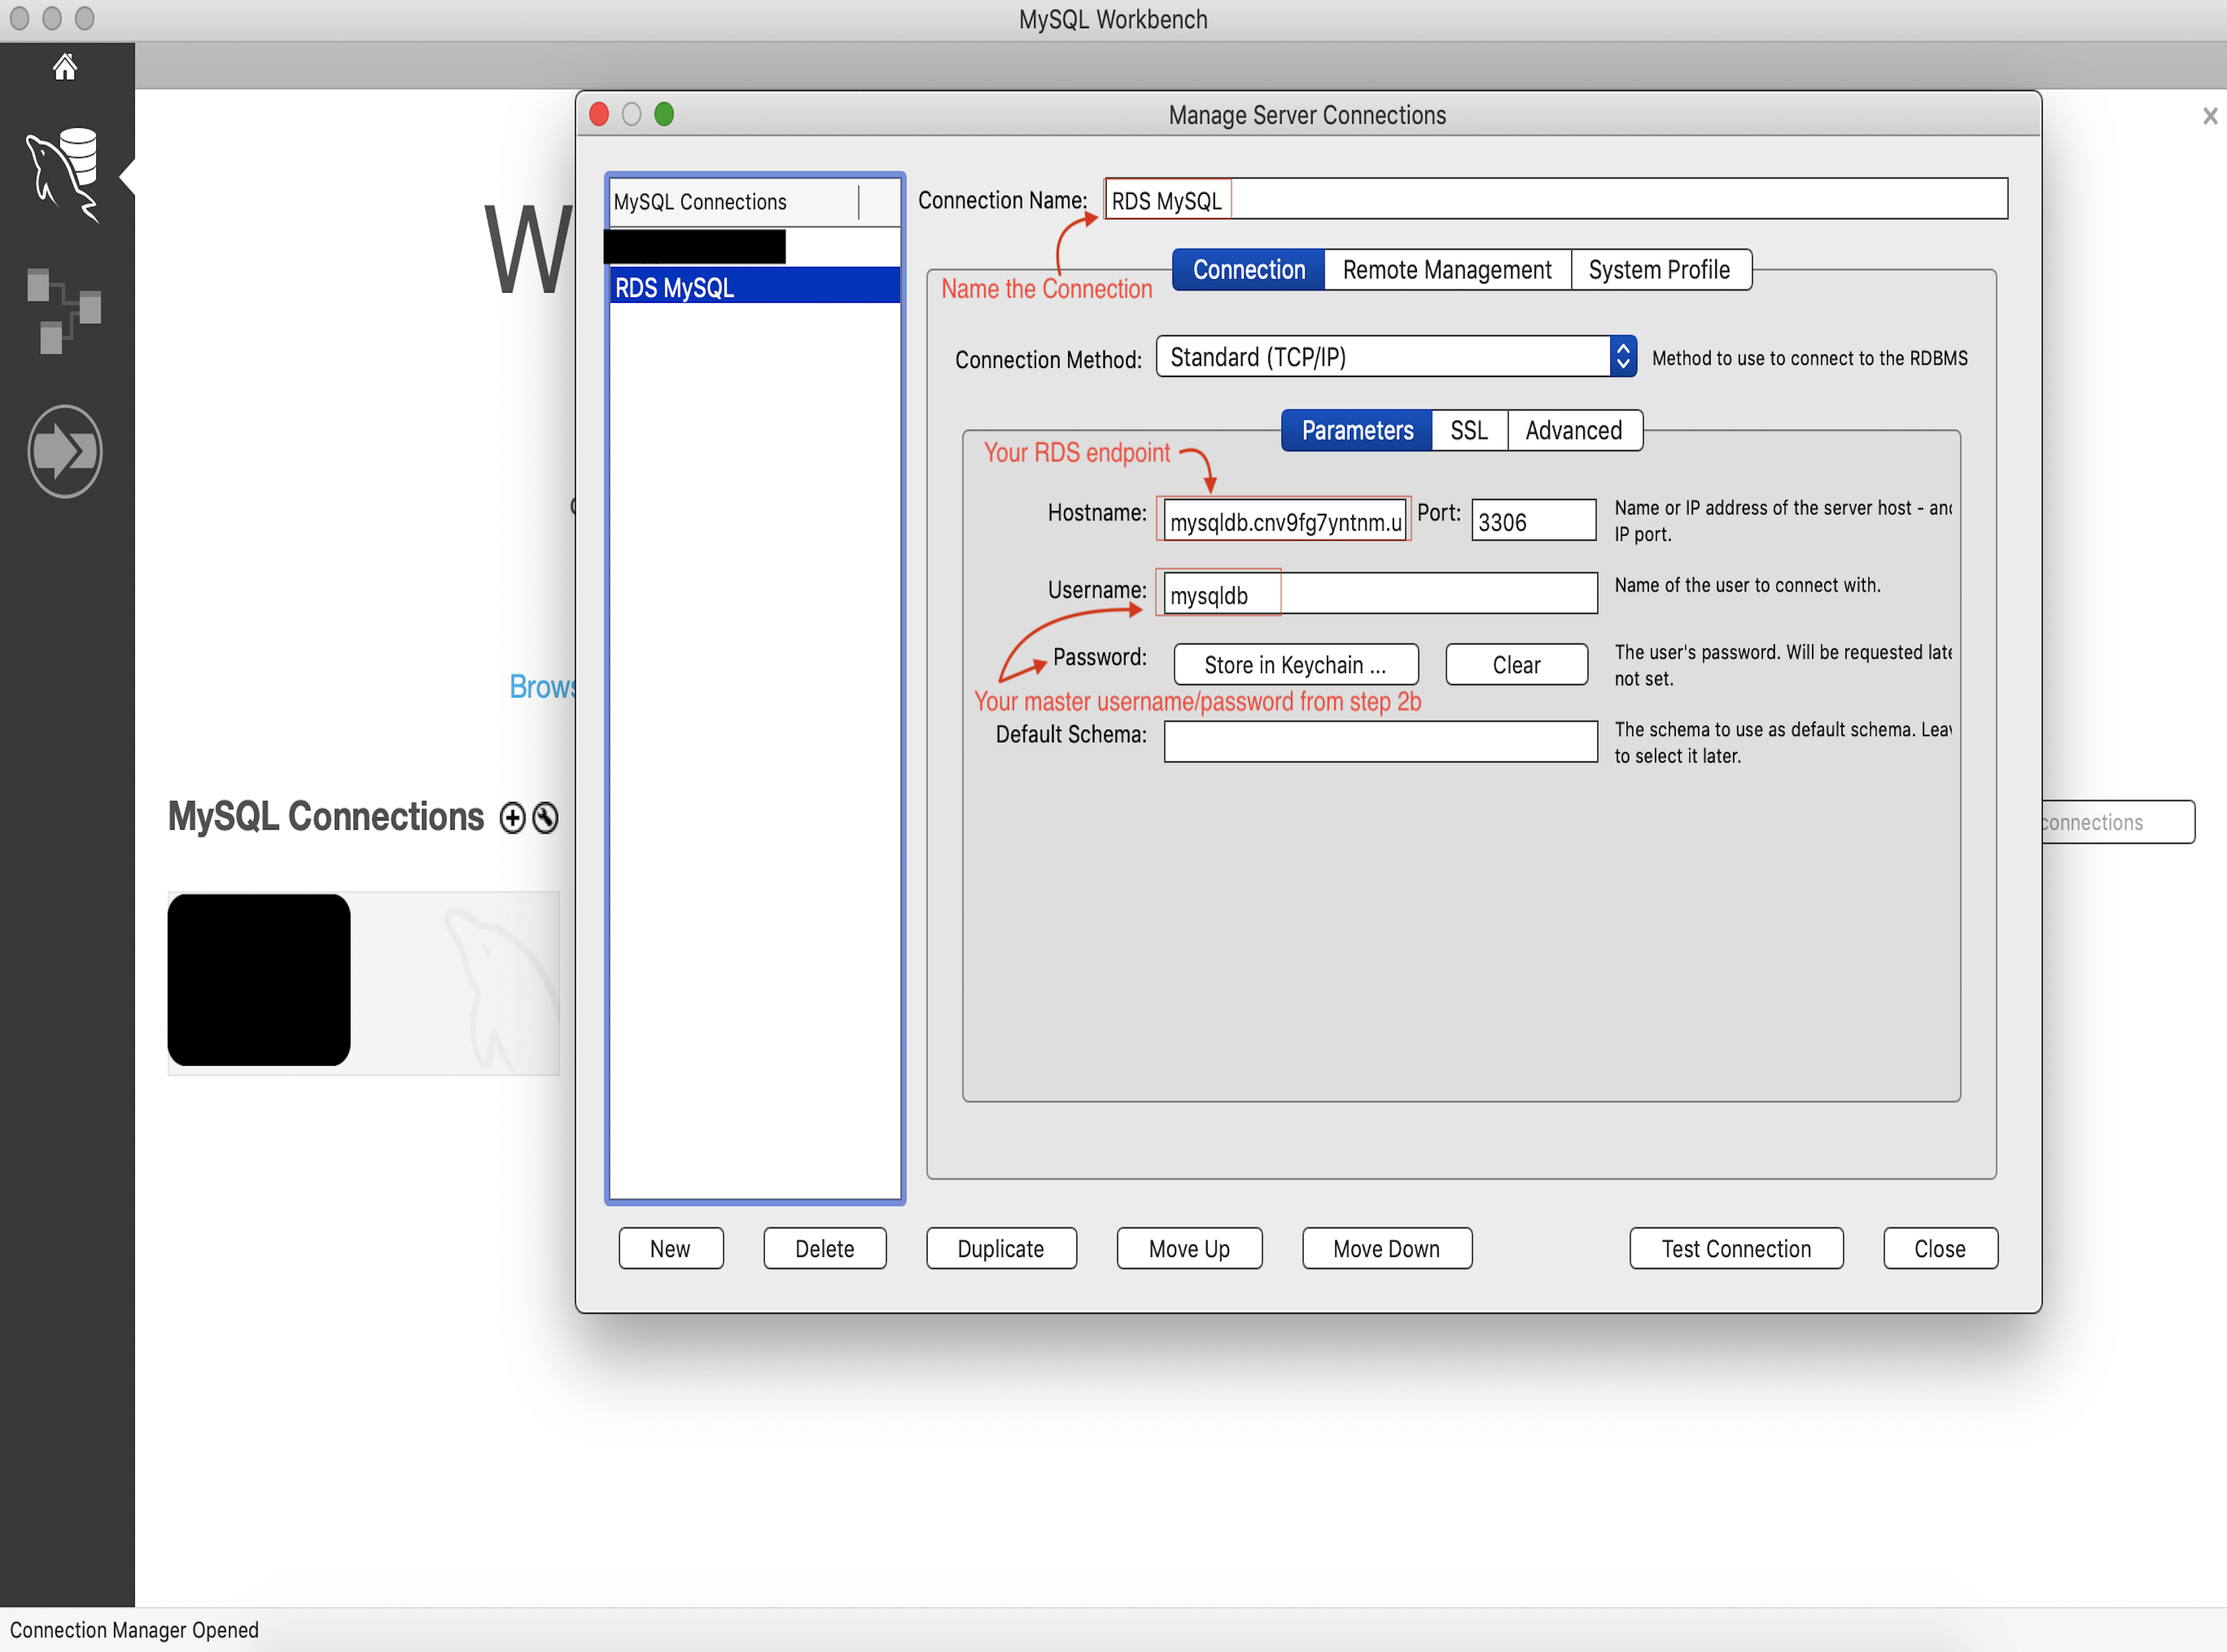
Launch MySQL Workbench and click + next to MySQL Connections. You will then be prompted to enter some details about the host, user, password, port, etc.
Give your connection a name. I named mine RDS MySQL. Enter your RDS Instance Endpoint as the Hostname. Add “3306” to the port, and your master username and master password under Username and Password. Store your password so you do not need to enter it each time. Click OK once you’re done and then click your new connection.
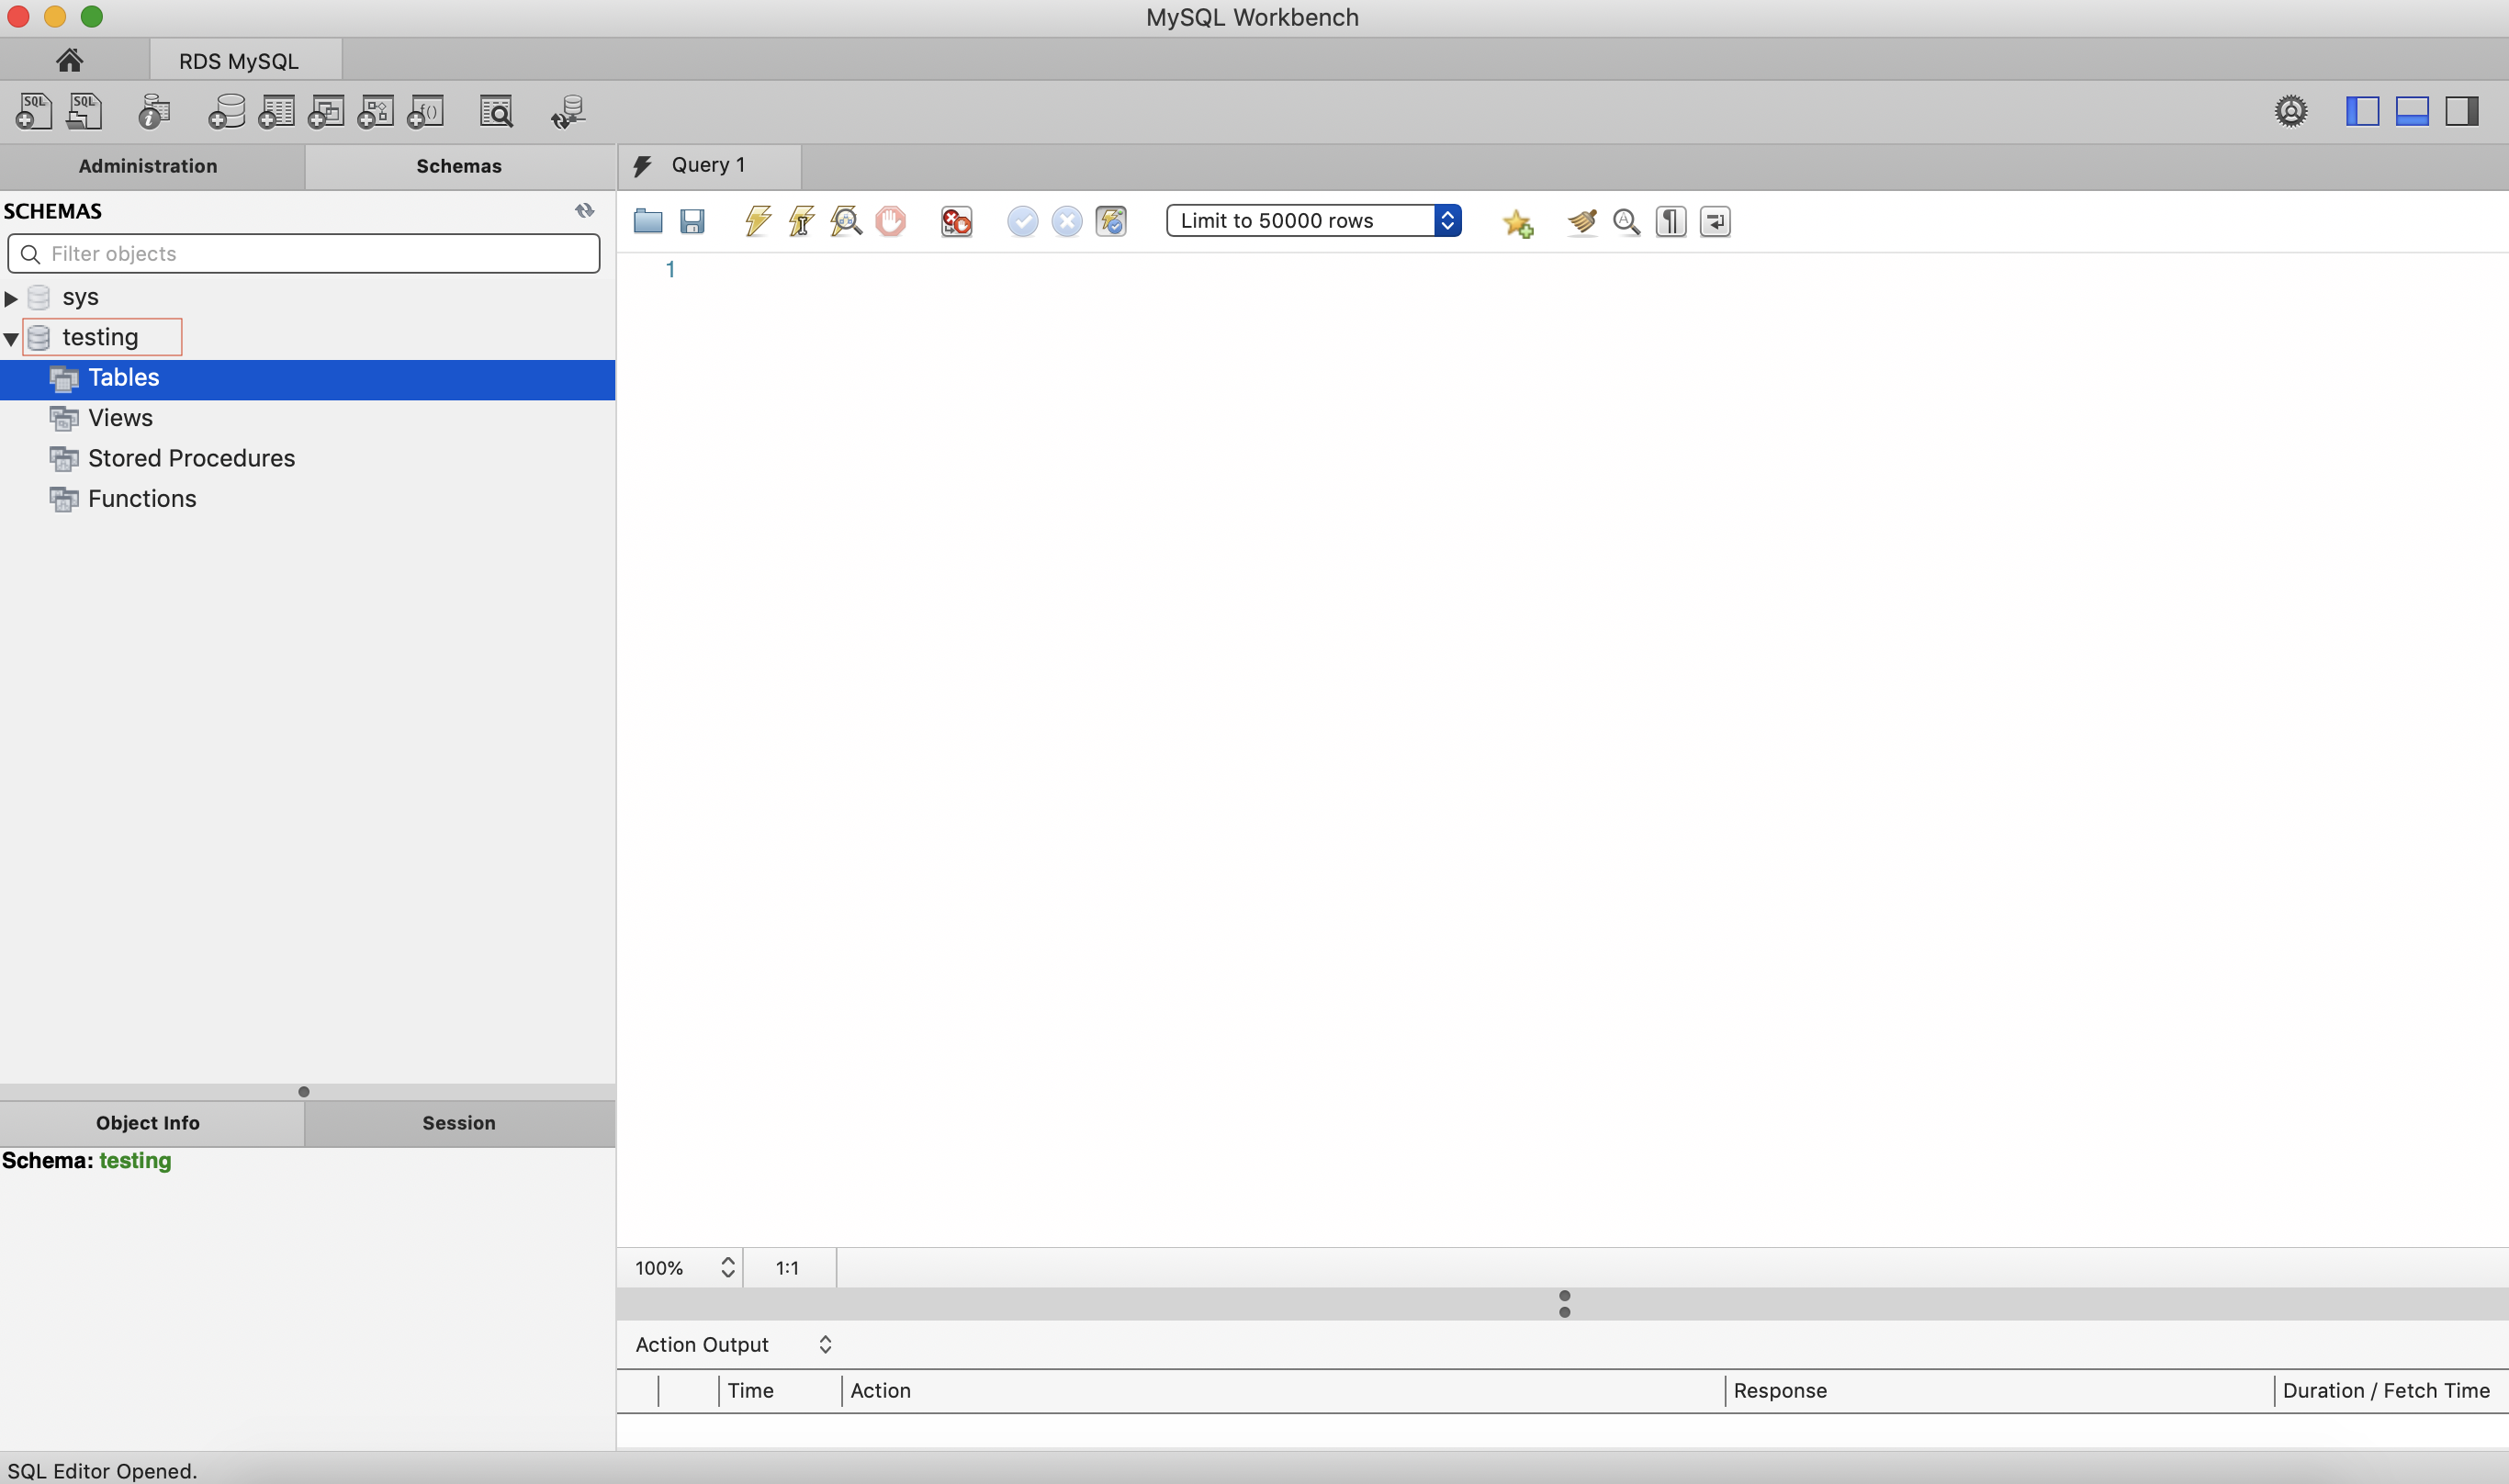
If successful, you will be logged in and should see our “testing” database.
Everything looks great! Now let’s add some data. If you want to put your current local database onto the new RDS, it is very using the MySQL Workbench interface.
#Importing Local MySQL to your new Remote MySQL
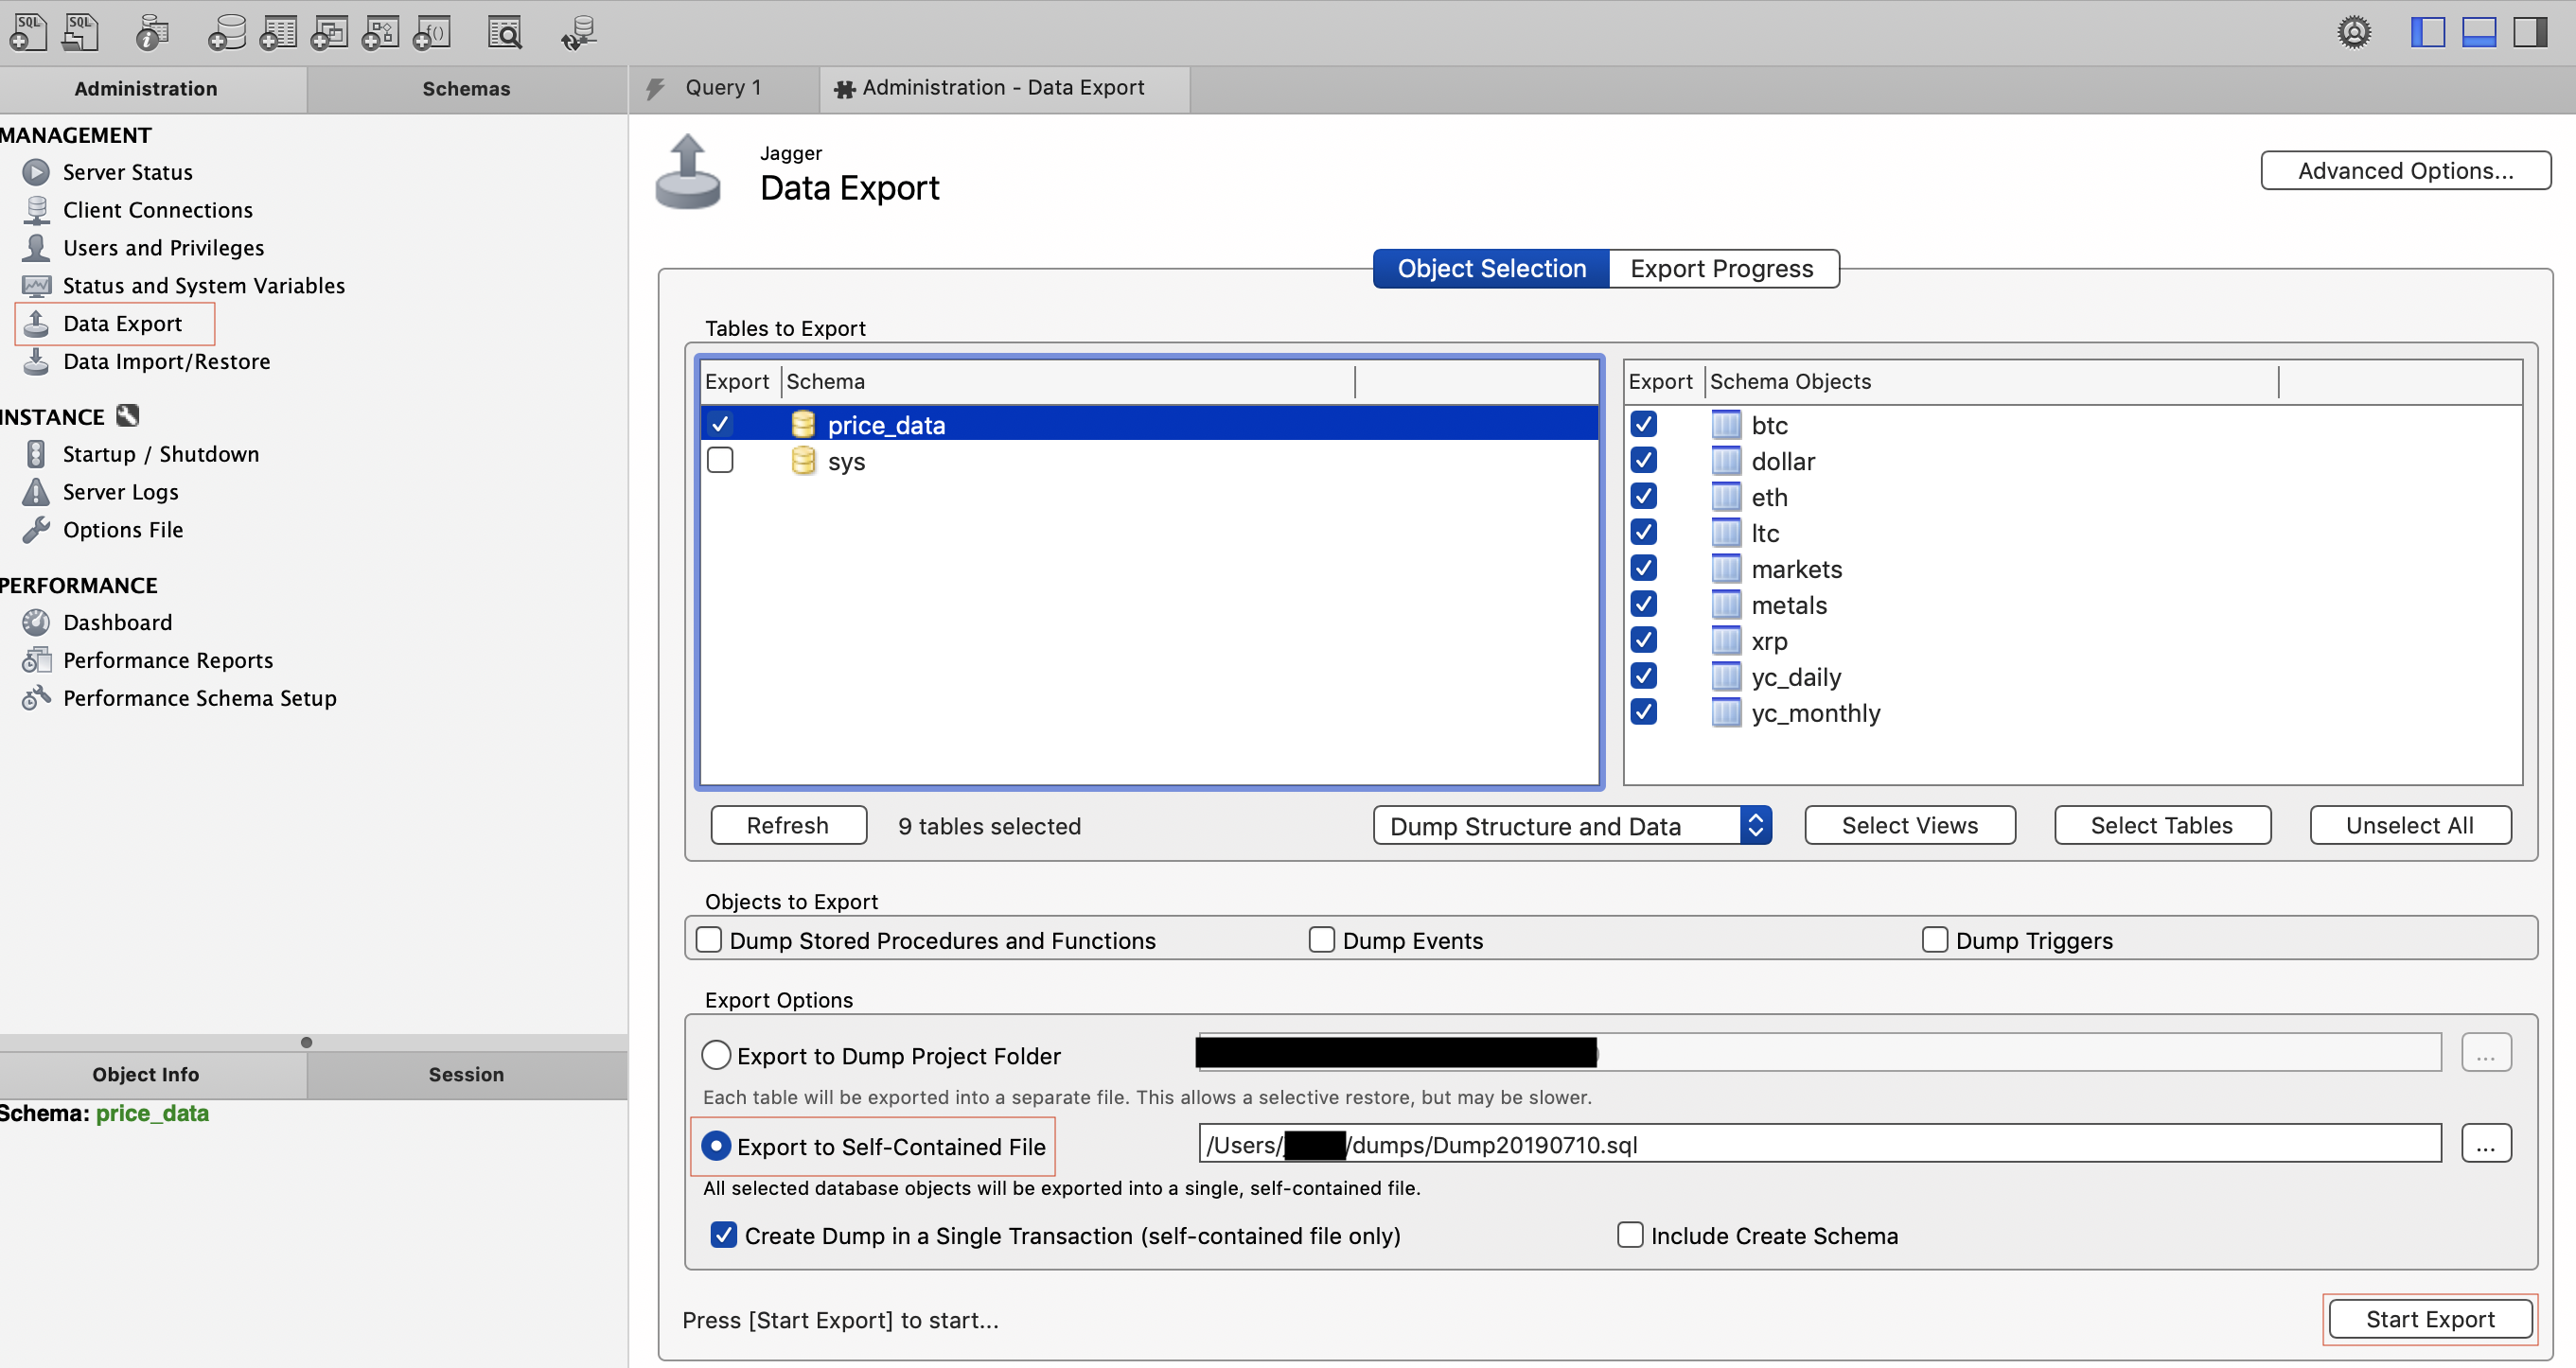
Log into your local root user MySQL DB and navigate to the Administration tab and click Data Export. Select the database you want to export and select “Export to Self-contained File” then click Start Export.
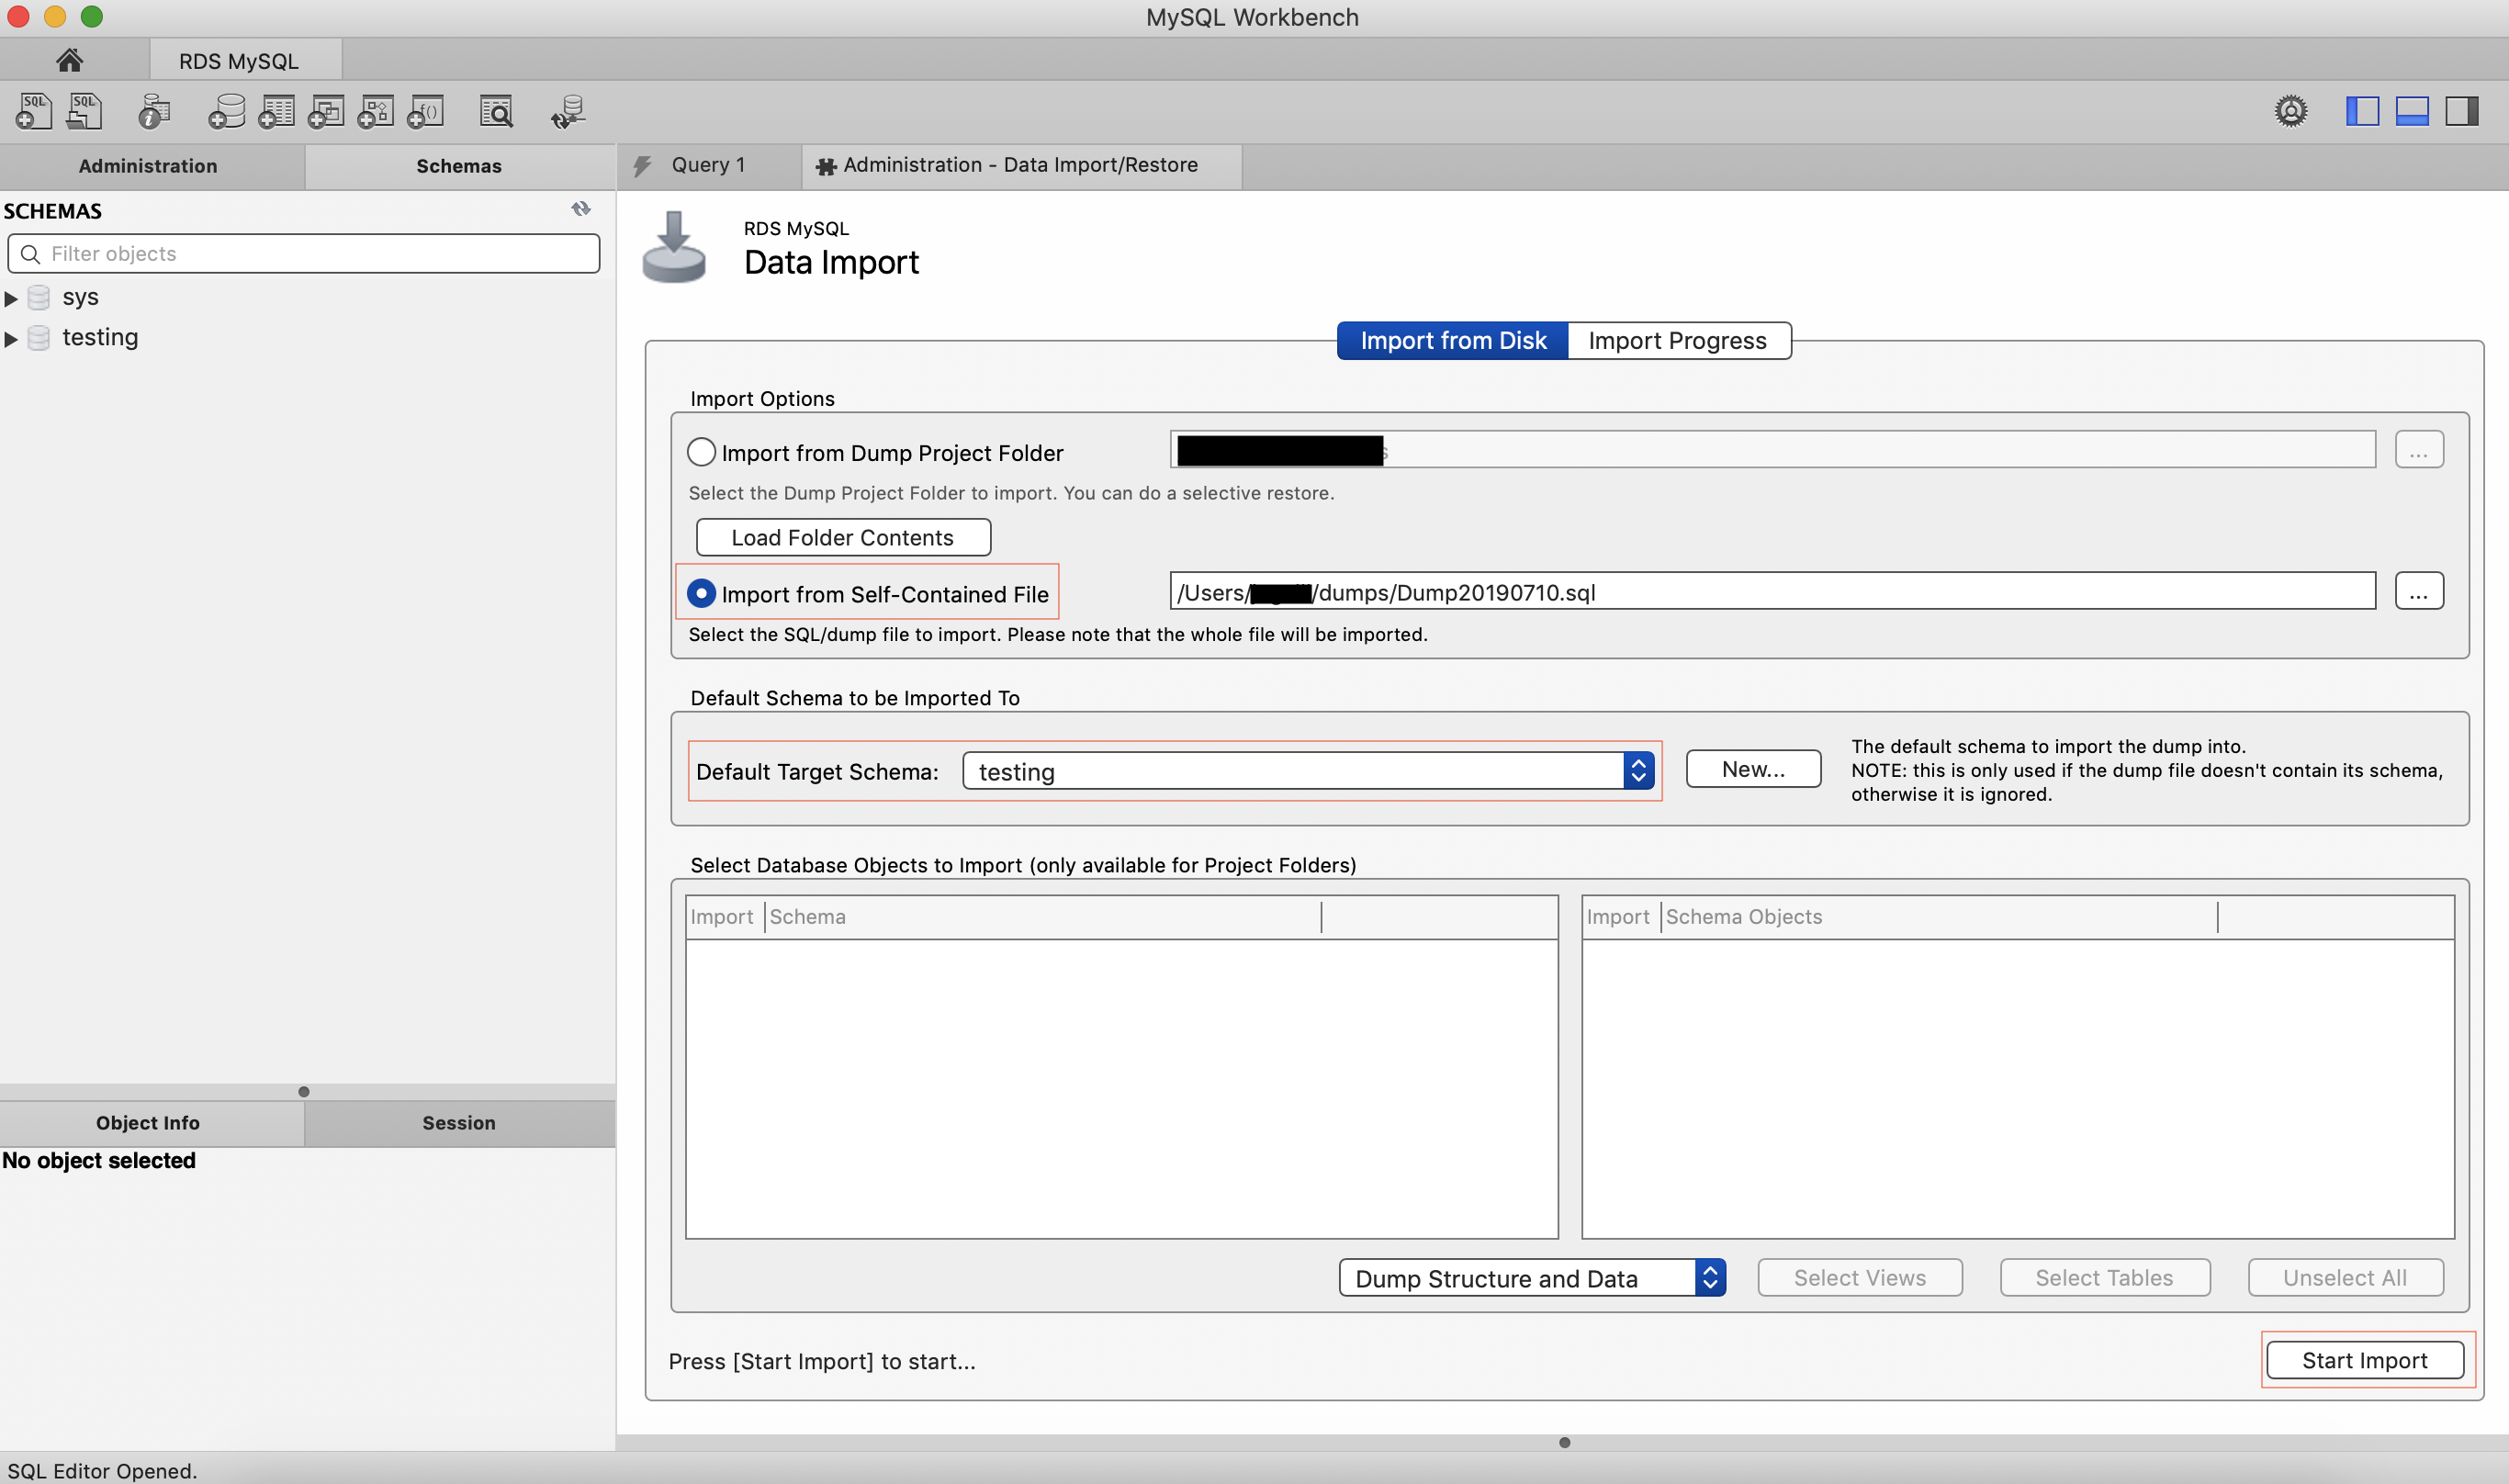
Log into your remote AWS RDS Instance and navigate to the Administration tab and click Data Import/Restore. Check “Import from Self-Contained file” and navigate to the file to add the path. Then, we will select the database we want to import it to which in our example will be the testing database. Now we can hit Start Import and after a minute or two we can see all of the data was imported successfully.
Let’s run a simple sql command to see the last 10 rows of one of the tables that were imported.
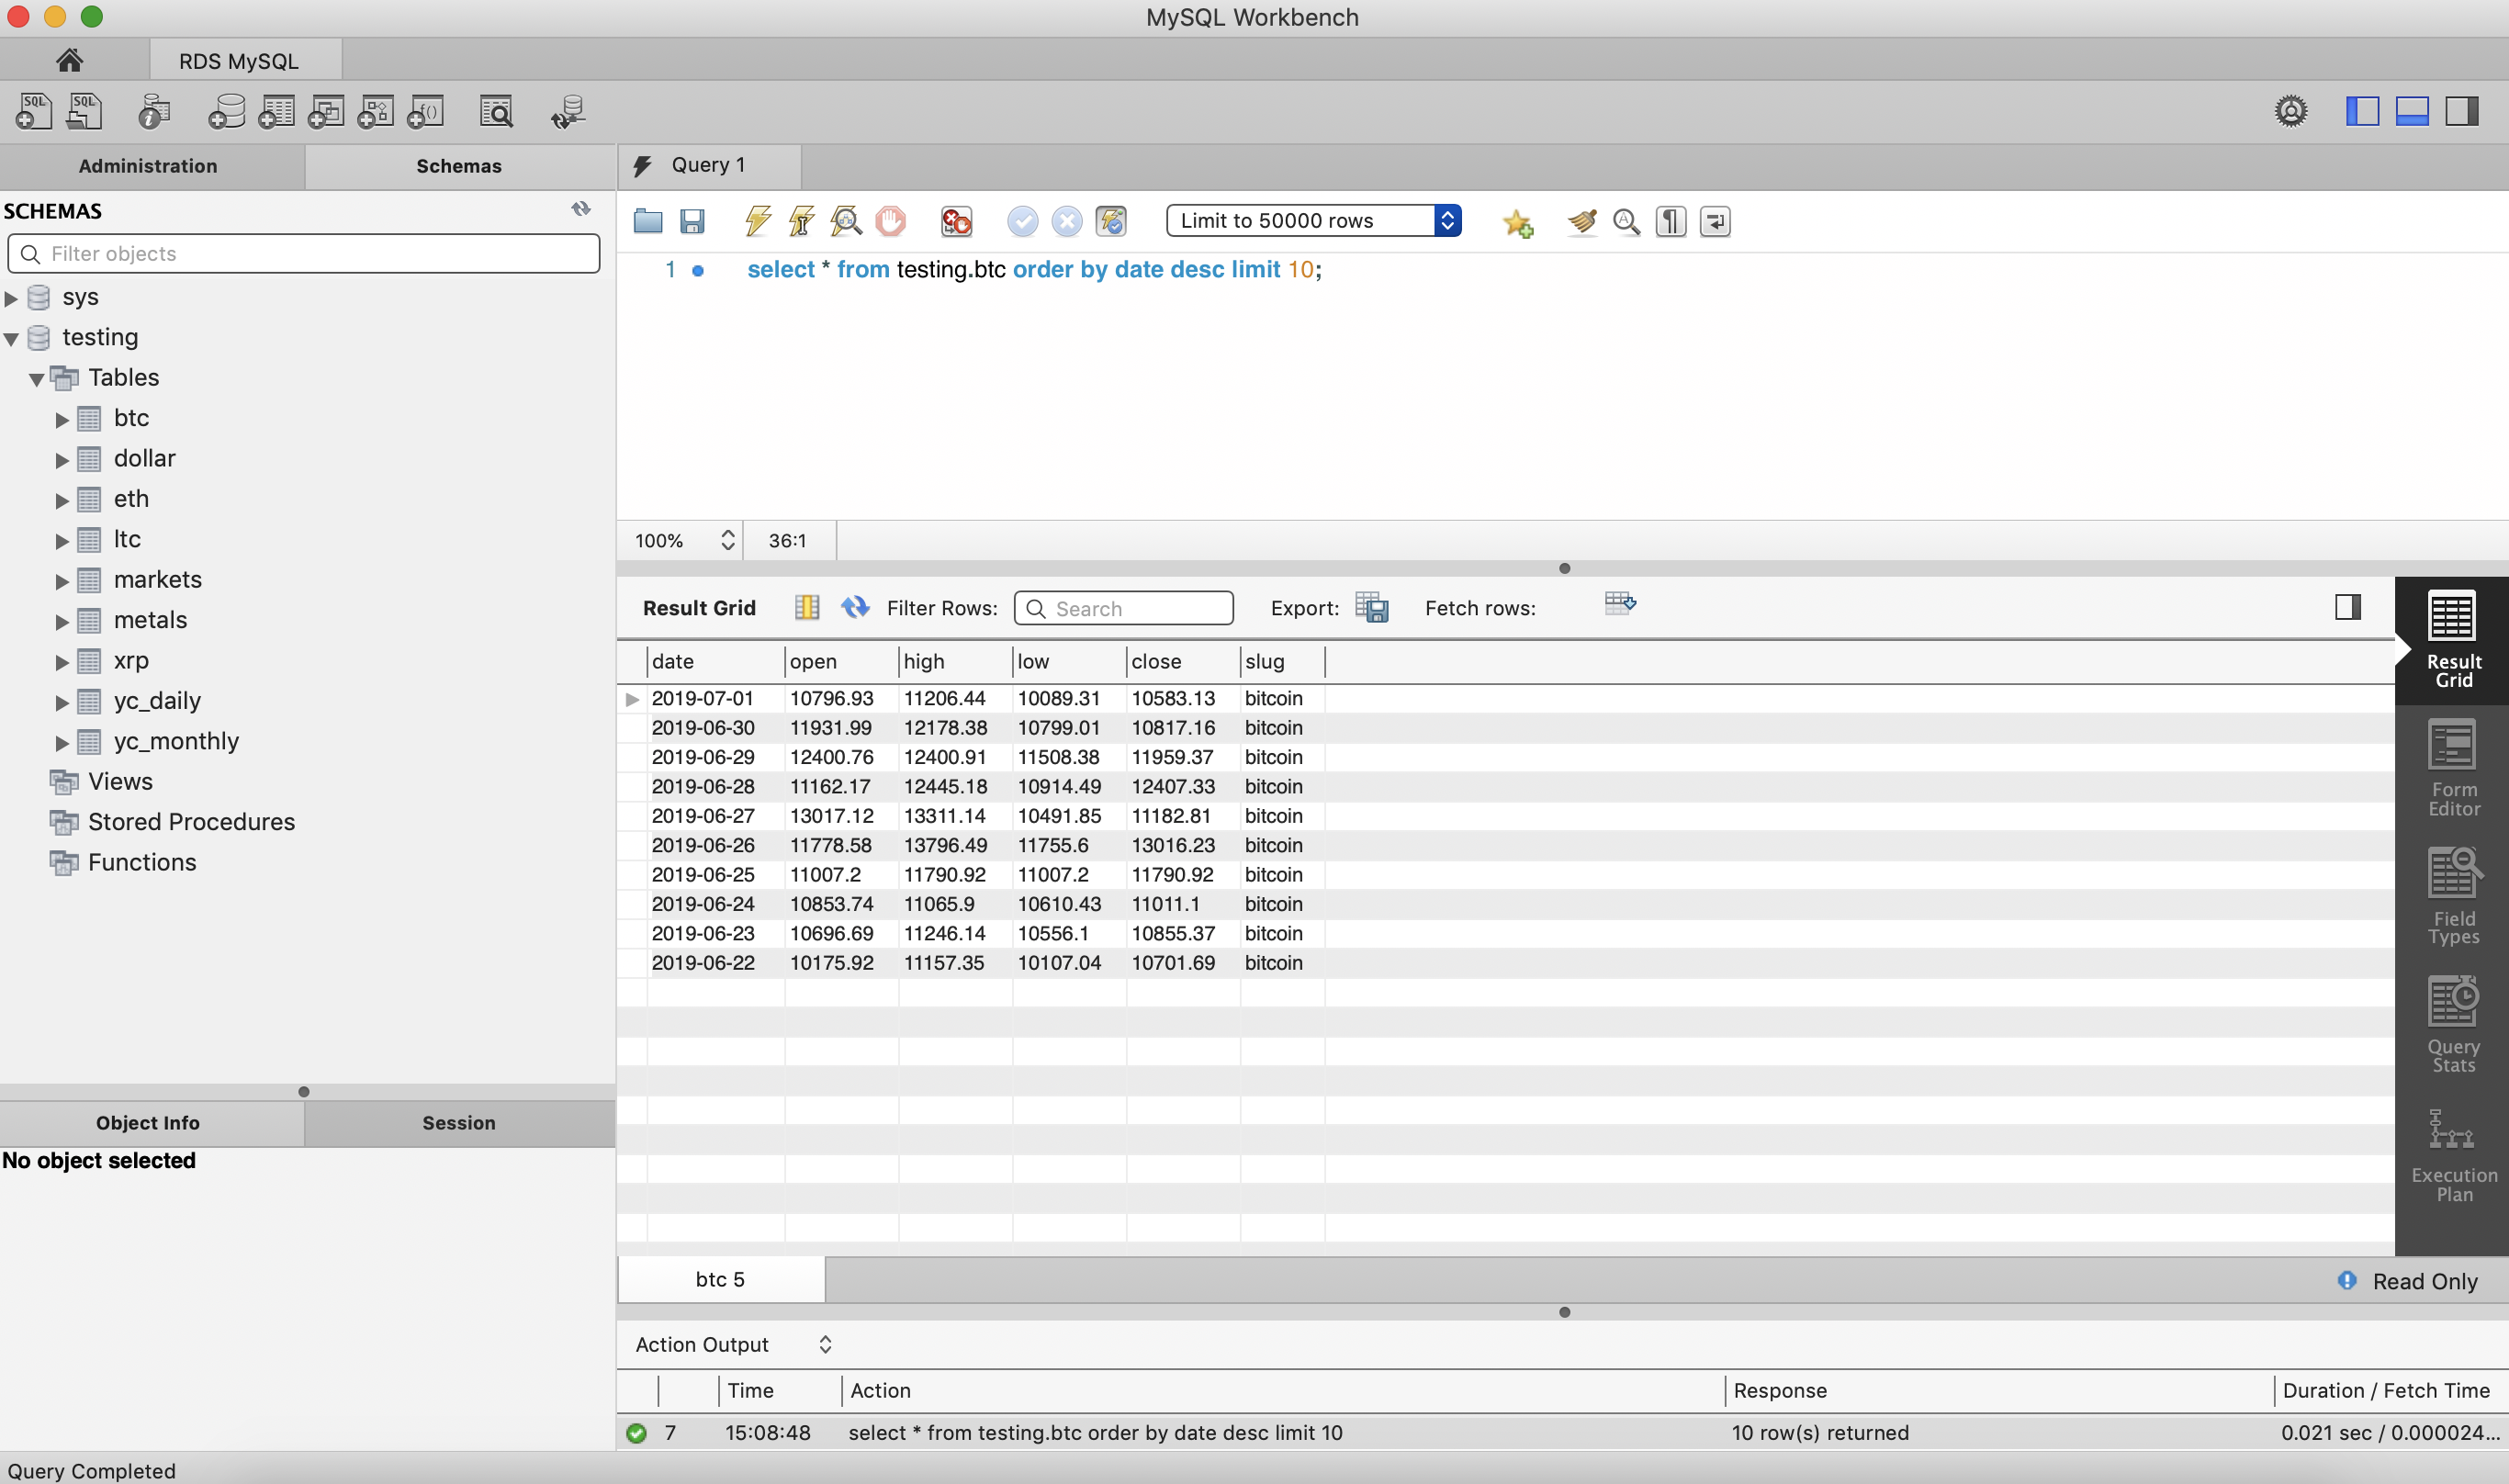
After importing the data, we can see 9 new tables in our testing database. Now we can access the data using the endpoint as the host on any device. This also means I can easily integrate this database to my public applications such as any Shiny Apps.
#Conclusion
We went over how to create an RDS using Amazon Web Services and how to deploy a MySQL Database to the cloud. Creating a MySQL RDS can make all of the data easily accessible. With just a minor security setting, the database can be reached via the internet through the shiny app. Amazon RDS uses a feature called Multi-AZ which provides an up-time of at least 99.95% and contains “standby” replica’s of your database in another “zone” to ensure a database is always up and running. Creating backups and scaling your database to easily handle user traffic could not be any easier using RDS.
Next, I will go over different options for creating EC2 instances that can run R, RStudio, and MySQL using our free-tier (Rstudio provides EC2 instances but require “Paid” instance types). This is great for many reasons, but just like Amazon RDS, two of the greatest benefits is scalability and accessibility. For now, go ahead and use this article to start switching your small project DBs to the cloud using AWS!
