
HTTPS to Secure Your RStudio + Shiny App Work Environment
Click any link in list below to jump to topic
- Creating a Friendly URL
- Route 53 to Host Domain and Create Subdomains
- AWS Certificate Manager for SSL keys
- AWS Elastic Load Balancers: HTTPS Redirection
- Installing Nginx & Creating Configuration Files
I wanted to create this post as an addition to my previous post Running R on AWS EC2 and Logging into RStudio from Anywhere to show how to secure your AWS environment. Hopefully, these articles can help others save time and learn to avoid hours spent reading documentation guides. My purpose for learning about the AWS environment is to securely create and ship shiny apps to share my analysis projects in a better fashion. Setting up the security group of your instance is dependent on the use case for your instances. After looking through some of the basic ways hackers can get into your EC2, most of the vulnerabilities came from storing private keys in the wrong places, and open port scans.
Open Ports
After sharing my previous post to various outlets, a Reddit user suggested to whitelist IP address to limit access to your web applications instead of keeping it open to the world. After reading about port scans, database takeover tools sqlmap, and brute force tools like gobuster, I quickly realized why keeping port 22 closed is so important.
The result was I ended up whitelisting port 22 (used for ssh) to only my IP address rather than leaving it open to the world.
HTTP & HTTP(S)
Another thing was that I needed to secure my website through HTTPS if I wanted to deploy it live and avoid allowing HTTP traffic. Most of this was new to me, so I spent a lot of time learning the basics to understand why all of this was necessary. HTTPS stands for “HTTP Secure”, or Hyper(t)ext Transfer Protocol Secure. The “Secure” part of the name comes from the encryption added to the requests sent and received by the browser. HTTPS also lets the browser check that it has opened the correct website and hasn’t been redirected to a malicious site. Currently, most browsers use the TLS protocol to provide encryption; TLS is sometimes referred to as SSL.
Details of HTTPS, TLS, and SSL are beyond the scope of this article, but if you want to learn more, the below resources are a good place to start.
- Wikipedia HTTPS - https://en.wikipedia.org/wiki/HTTPS
- Wikipedia TLS - https://en.wikipedia.org/wiki/Transport_Layer_Security
- Khan Academy Cryptography course - https://www.khanacademy.org/computing/computer-science/cryptography
- TLS chapter in High Performance Browser Networking by Ilya Grigorik - https://hpbn.co/transport-layer-security-tls/
Many Services, One Open Port
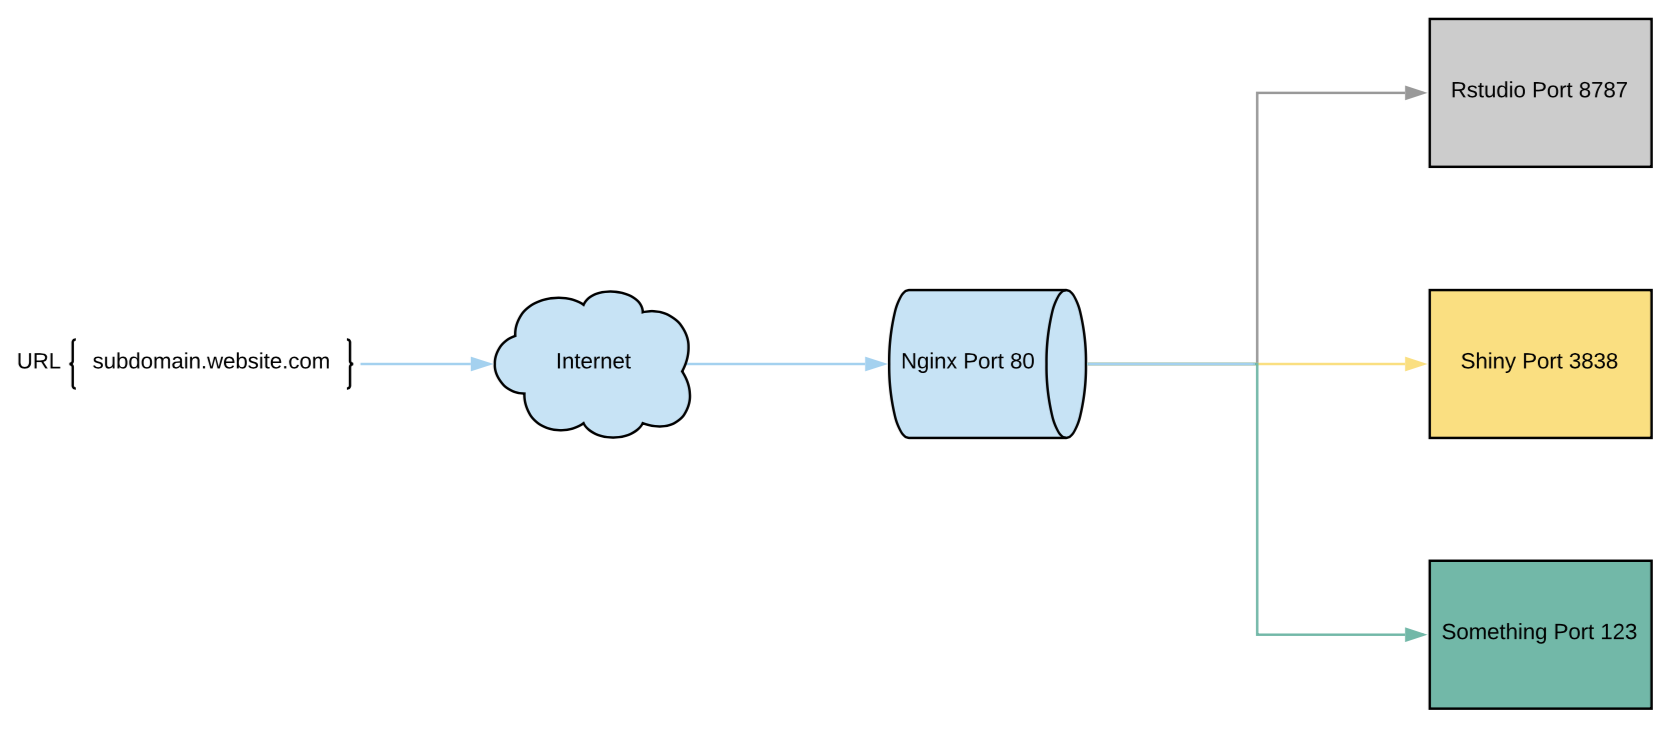
I also need to make sure that both of my servers running on different ports (rstudio 8787 and shiny 3838) all end up on port 80. The issue is that only one service can run on a single port, so this is when I was introduced to Nginx. Nginx is a web server which can also be used as a reverse proxy, load balancer, mail proxy, and HTTP cache.
My purpose for nginx will be to utilize it as a reverse proxy. This is important because it also allows us to redirect everything to port 80 (where HTTP lives) where we can set a rule to convert everything on port 80 to the secure port 443 (HTTPS) using amazons load balancer. I plan on using subdomains to host my servers (that will be our next step), so when I type “app.website.com” the nginx redirects shiny port 3838 to port 80. Below is an example of what nginx does when utilized as a reverse proxy.
Getting Started
If you already have an EC2 instance with a shiny server and rstudio server running, then your first step would be to find a free domain name (unless you would like to pay for one) from freenom.com by clicking here. If not, then please launch an EC2 instance similar to the one from my my previous post and continue here.
I selected freenom because it’s very easy to use and free. Once you have your domain selected, then you can host it on Route 53 from AWS (not free but only costs 50 cents a month for 1 host zone). After, we can finally install nginx and begin configuring our reverse proxy.
How to Create a Friendlier URL - Freenom
Right now, using the public DNS that amazon provides does not look so pretty. If we want the URL to look like “www.coolname.com”, then we need to get a domain name and use another AWS service called Route 53.
As much as I tried staying within the free tier for AWS, creating a hosted zone in Route 53 will cost $0.50/month, which is worth the ease of use in my opinion. Also, let’s use freenom.com and choose a free 12-month domain. You won’t find a free “.com” domain, but you can still find something cool like “.ml”.
First, we will choose our domain from freenom, then create a Route 53 host zone, quickly create and copy an Elastic IP and paste it into your Route 53 record set.
Search for Domain Name
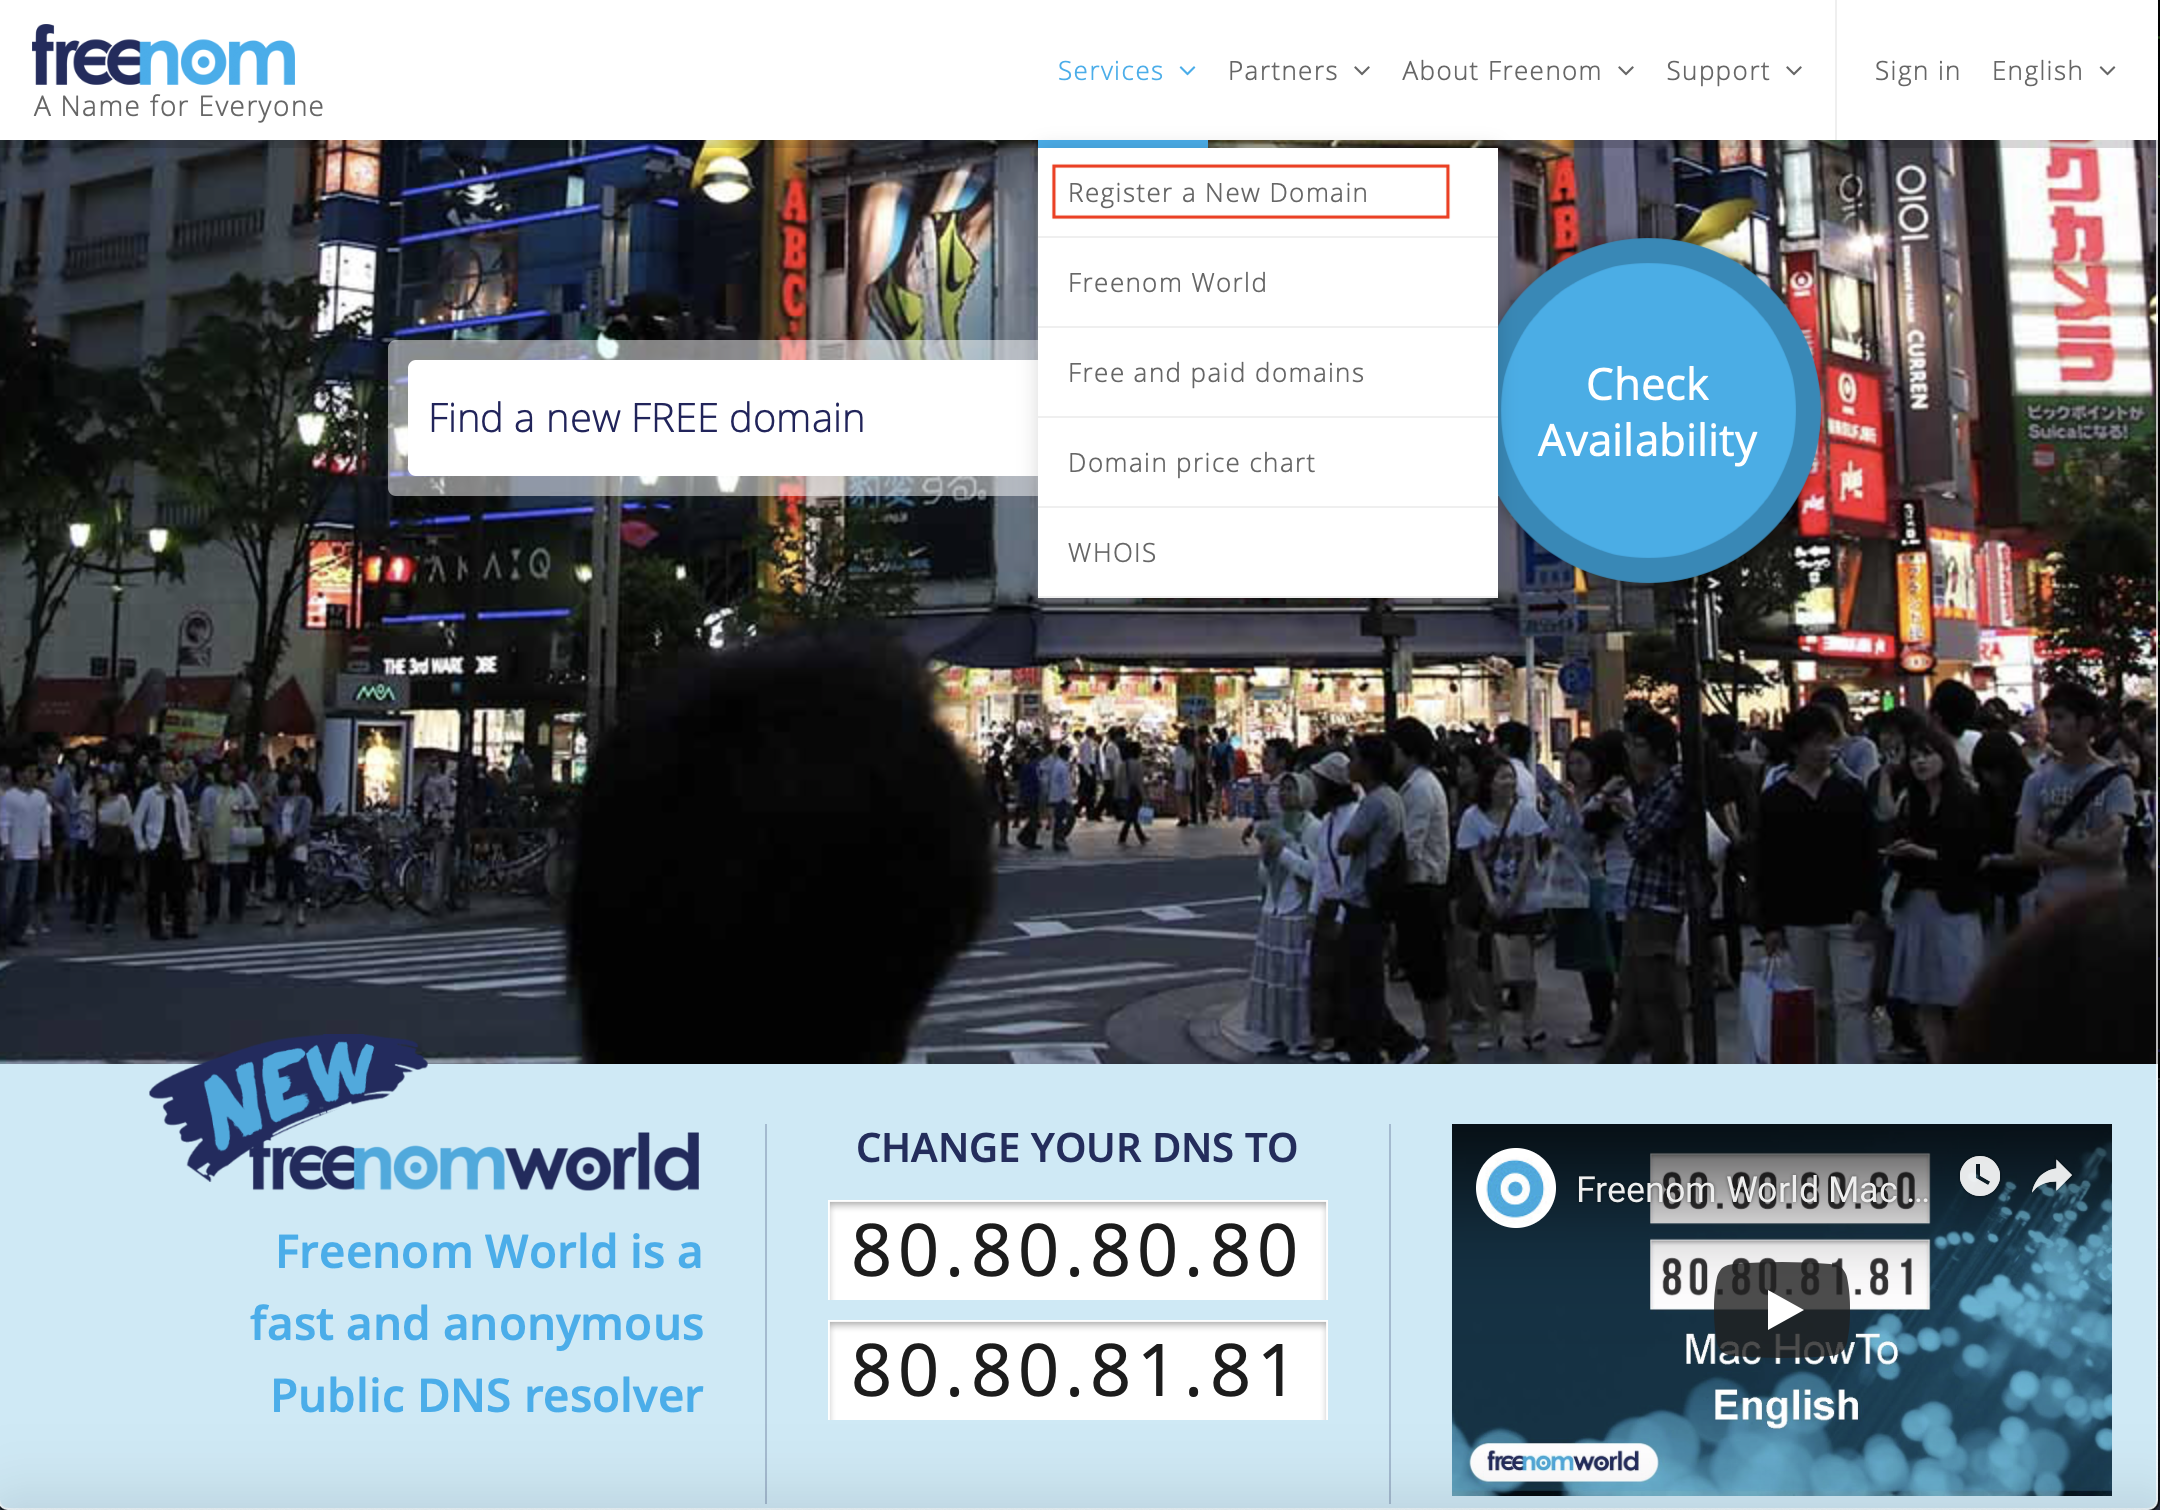
Once you’re on freenom.com, select the services dropdown and select “Register a New Domain”.
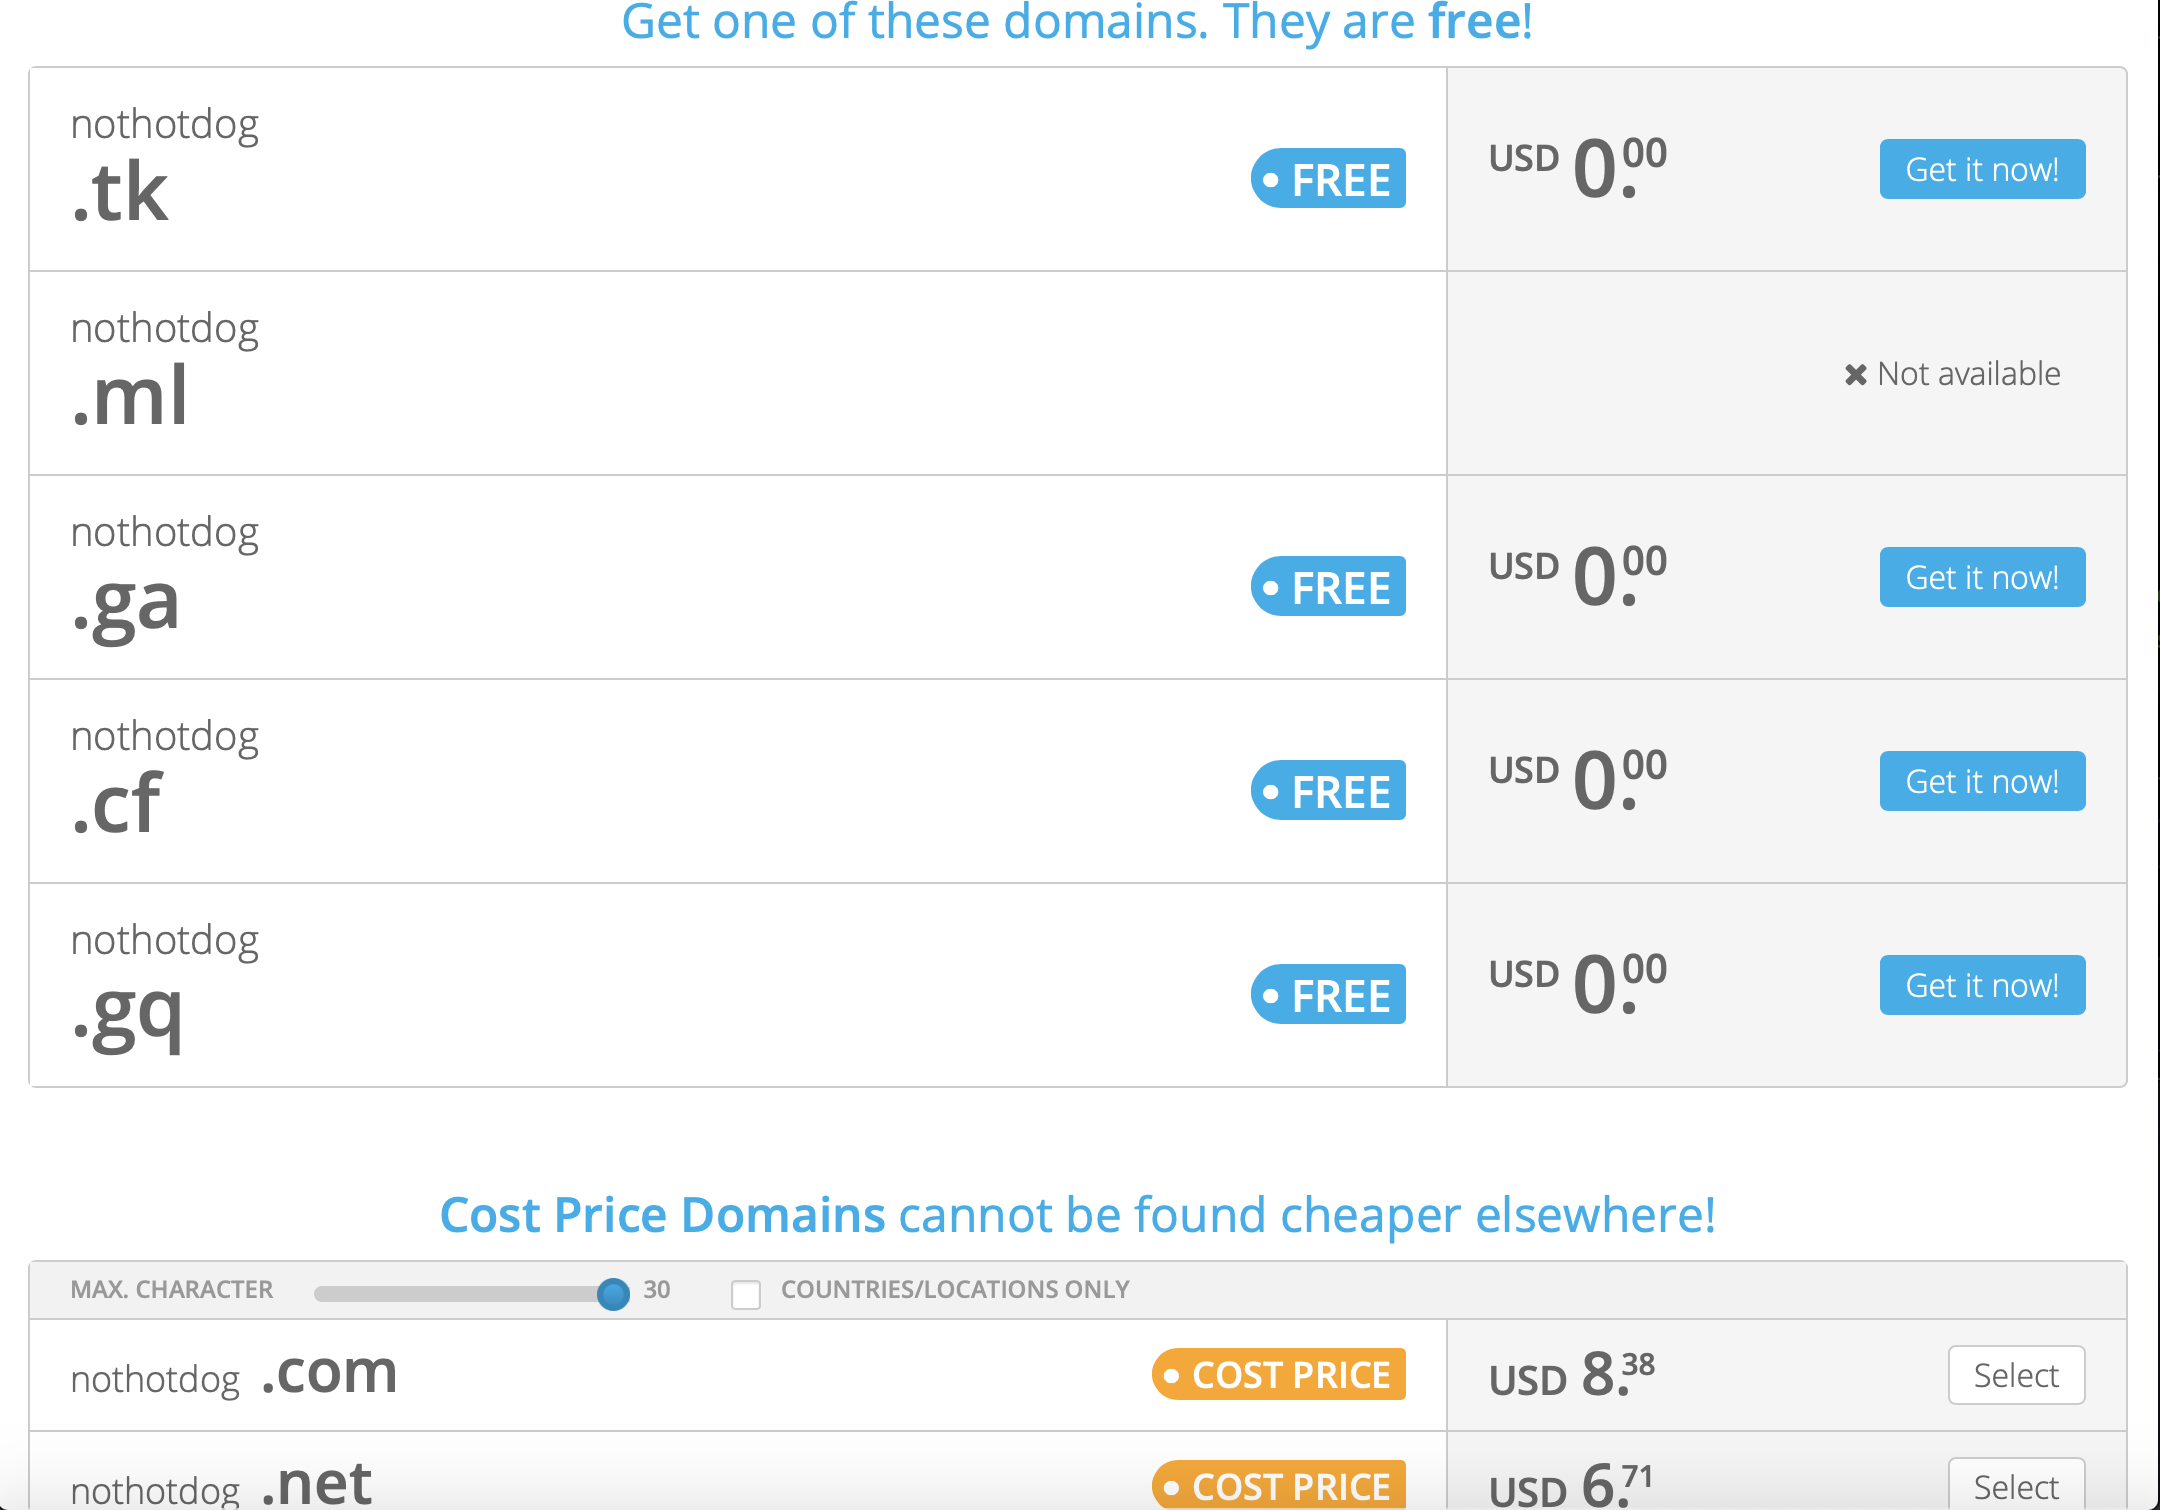
Searched Results
Then, search for a domain name you’d like. Since it is free, I will choose some random name to use as practice.
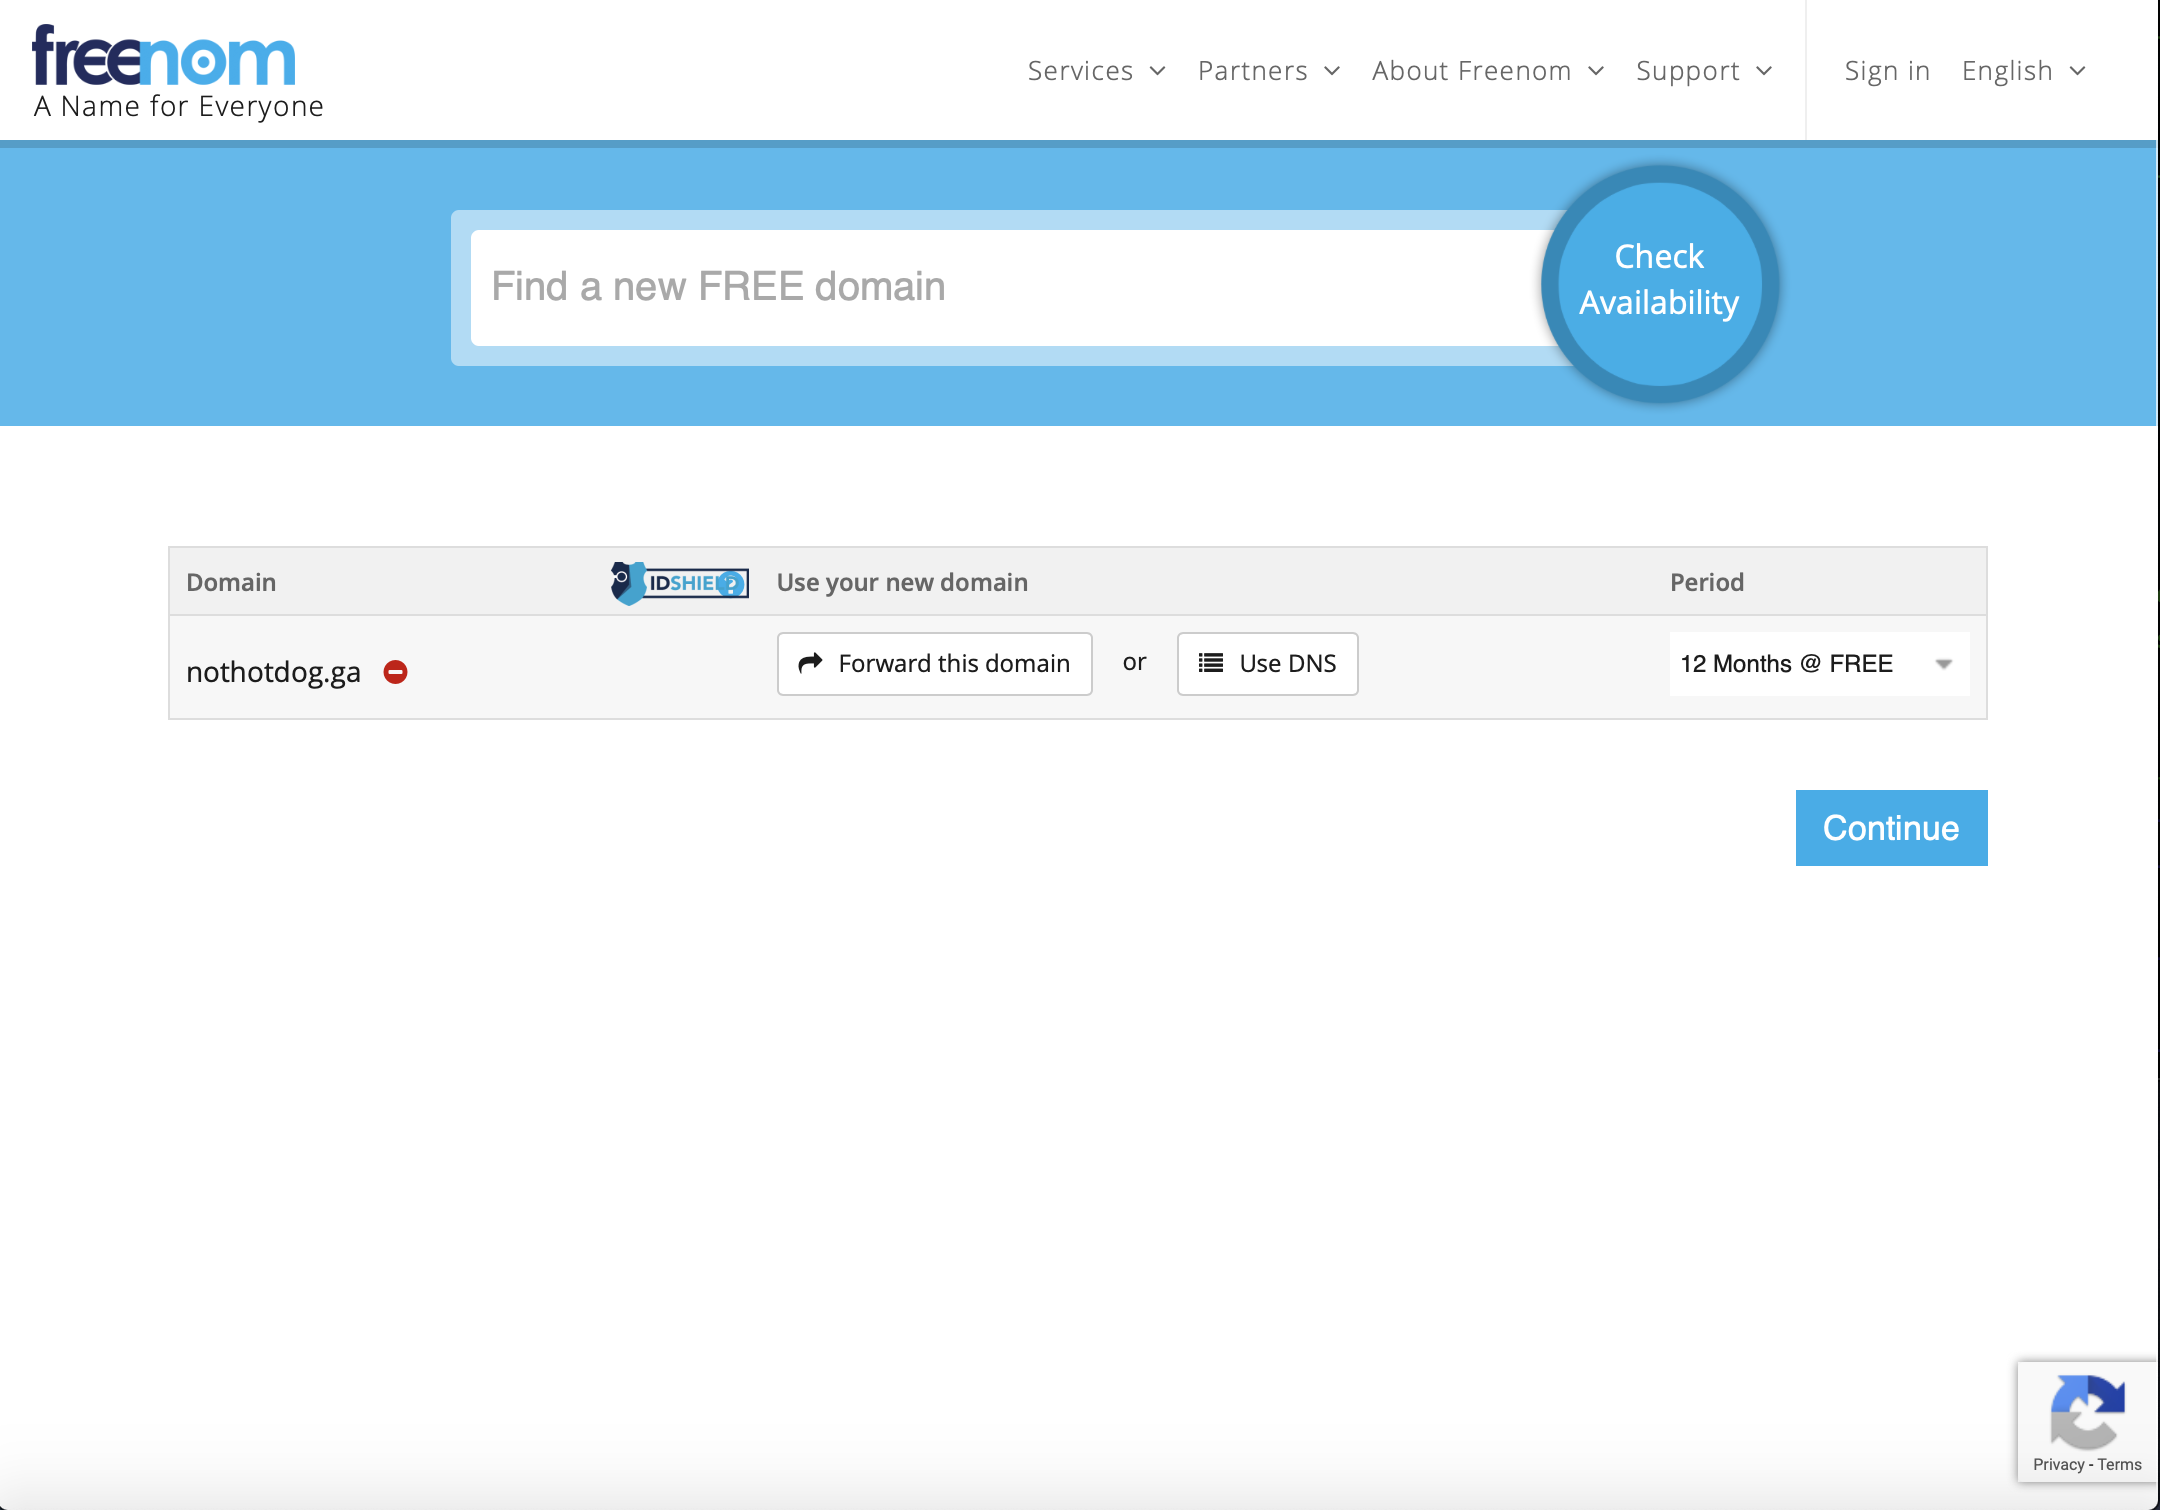
Click My Domains under the Services tab and click Manage domain. We will now open a new separate tab and go into AWS Route 53 to create a host zone and get our nameservers.
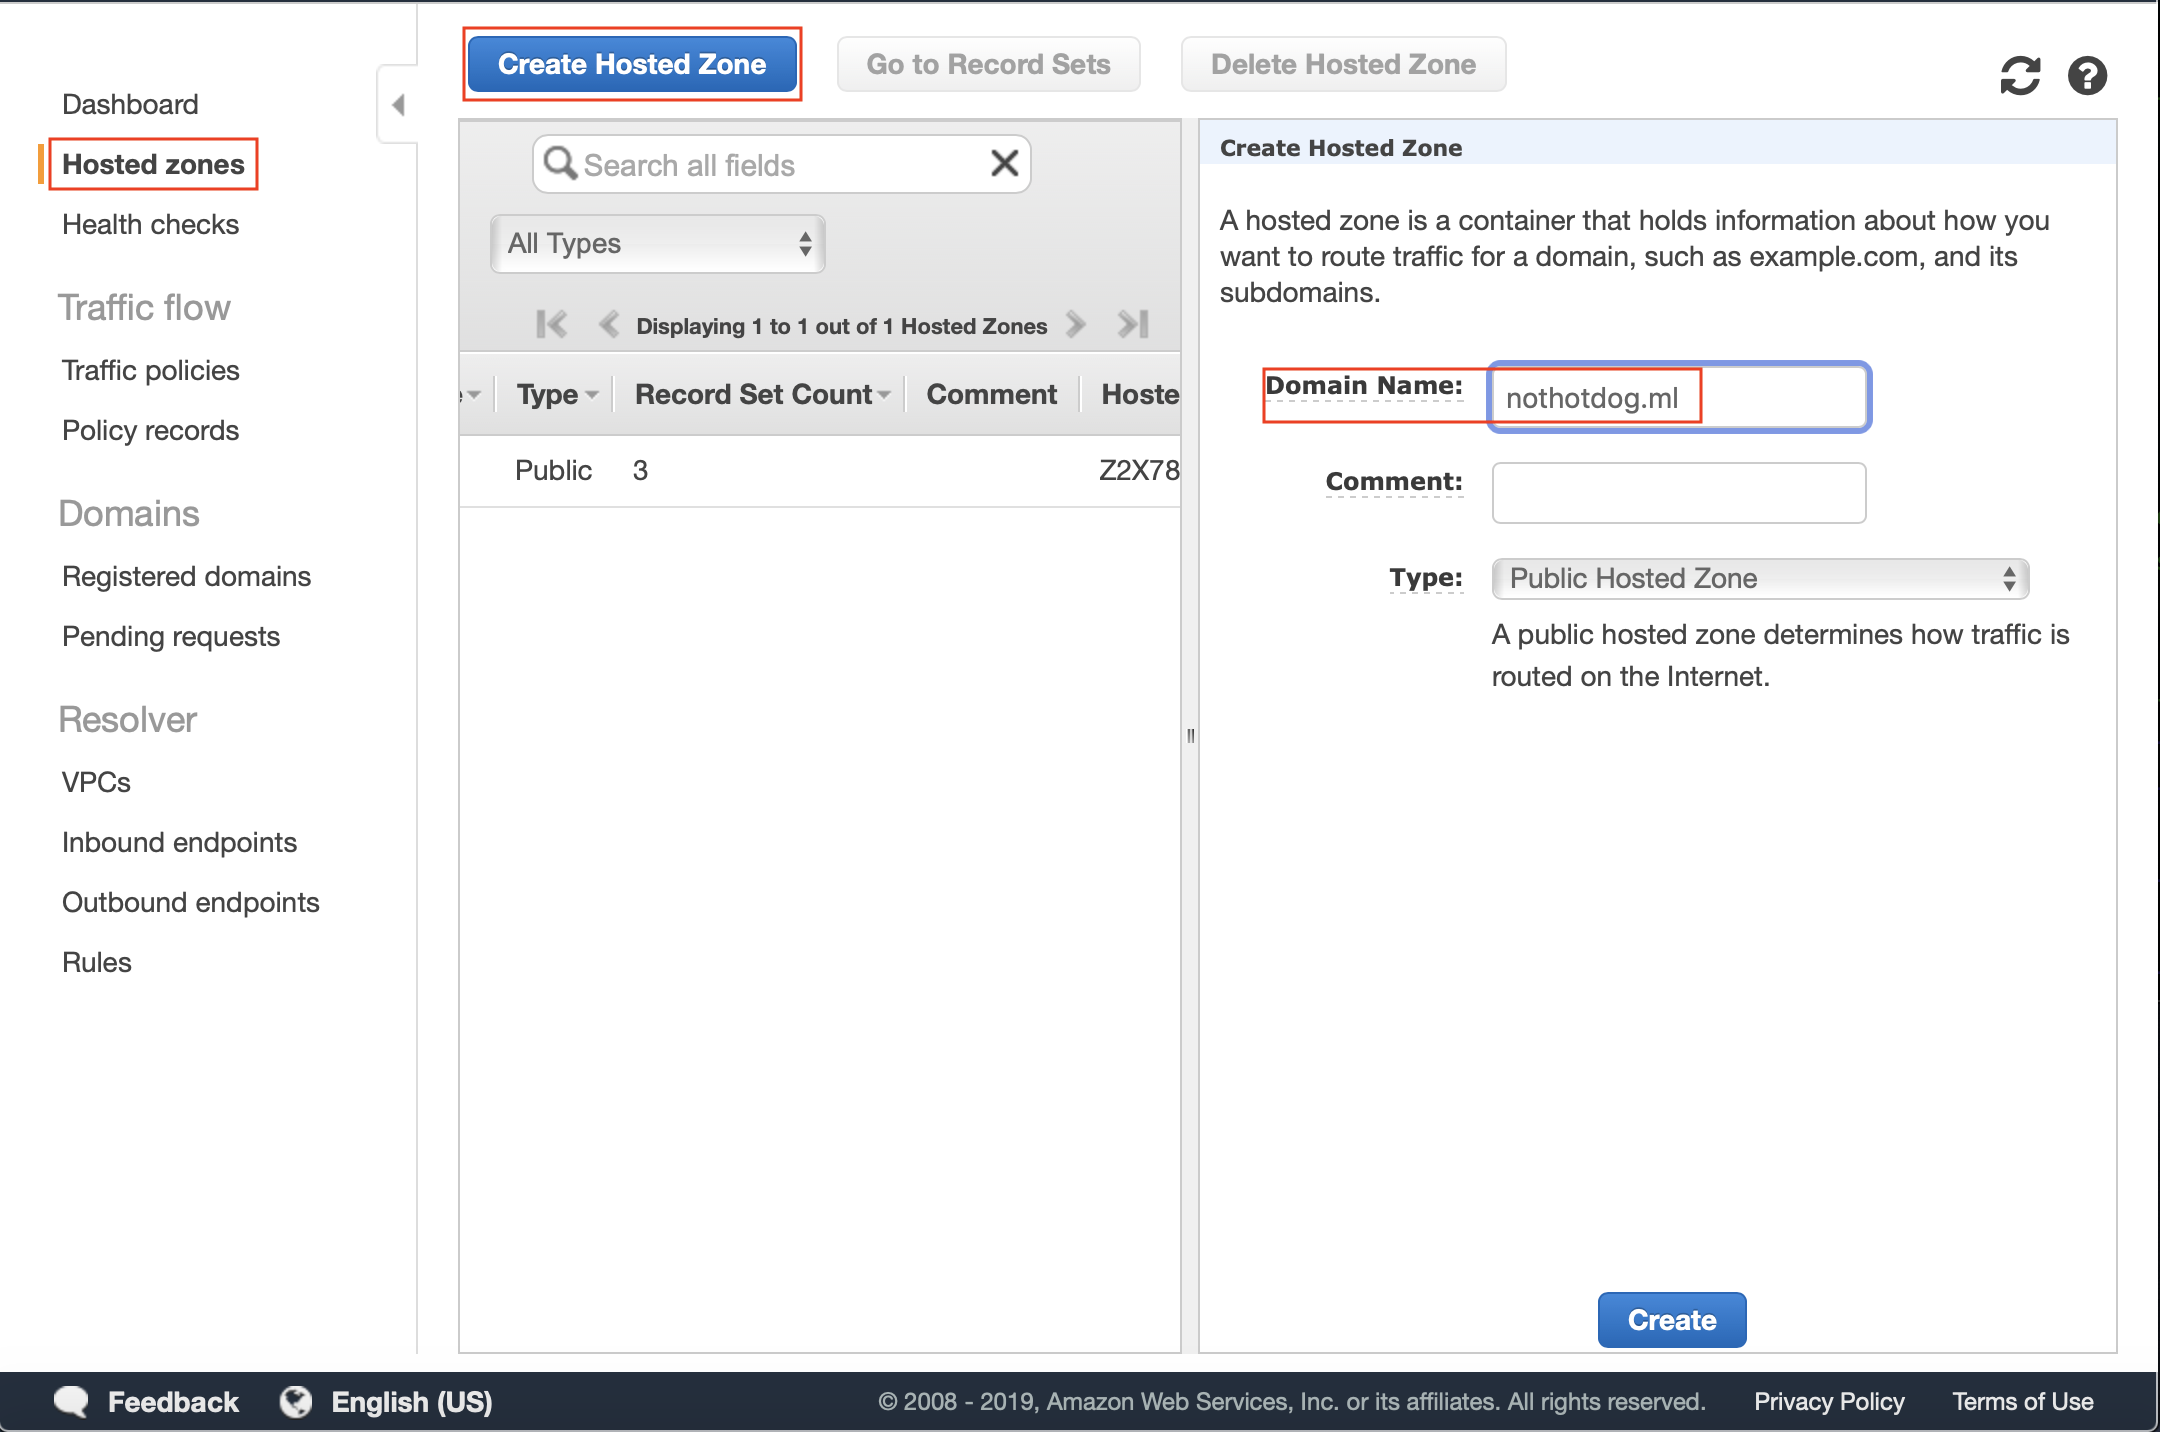
Route 53
Create your hosted zone
I know in the above screenshots I have selected “nothotdog.ga” and in the below screenshots, you will see “nothotdog.ml”. This is because I tried to replicate the domain selection process as closely as I could (I already selected .ml before this write up).
Copy the 4 nameservers
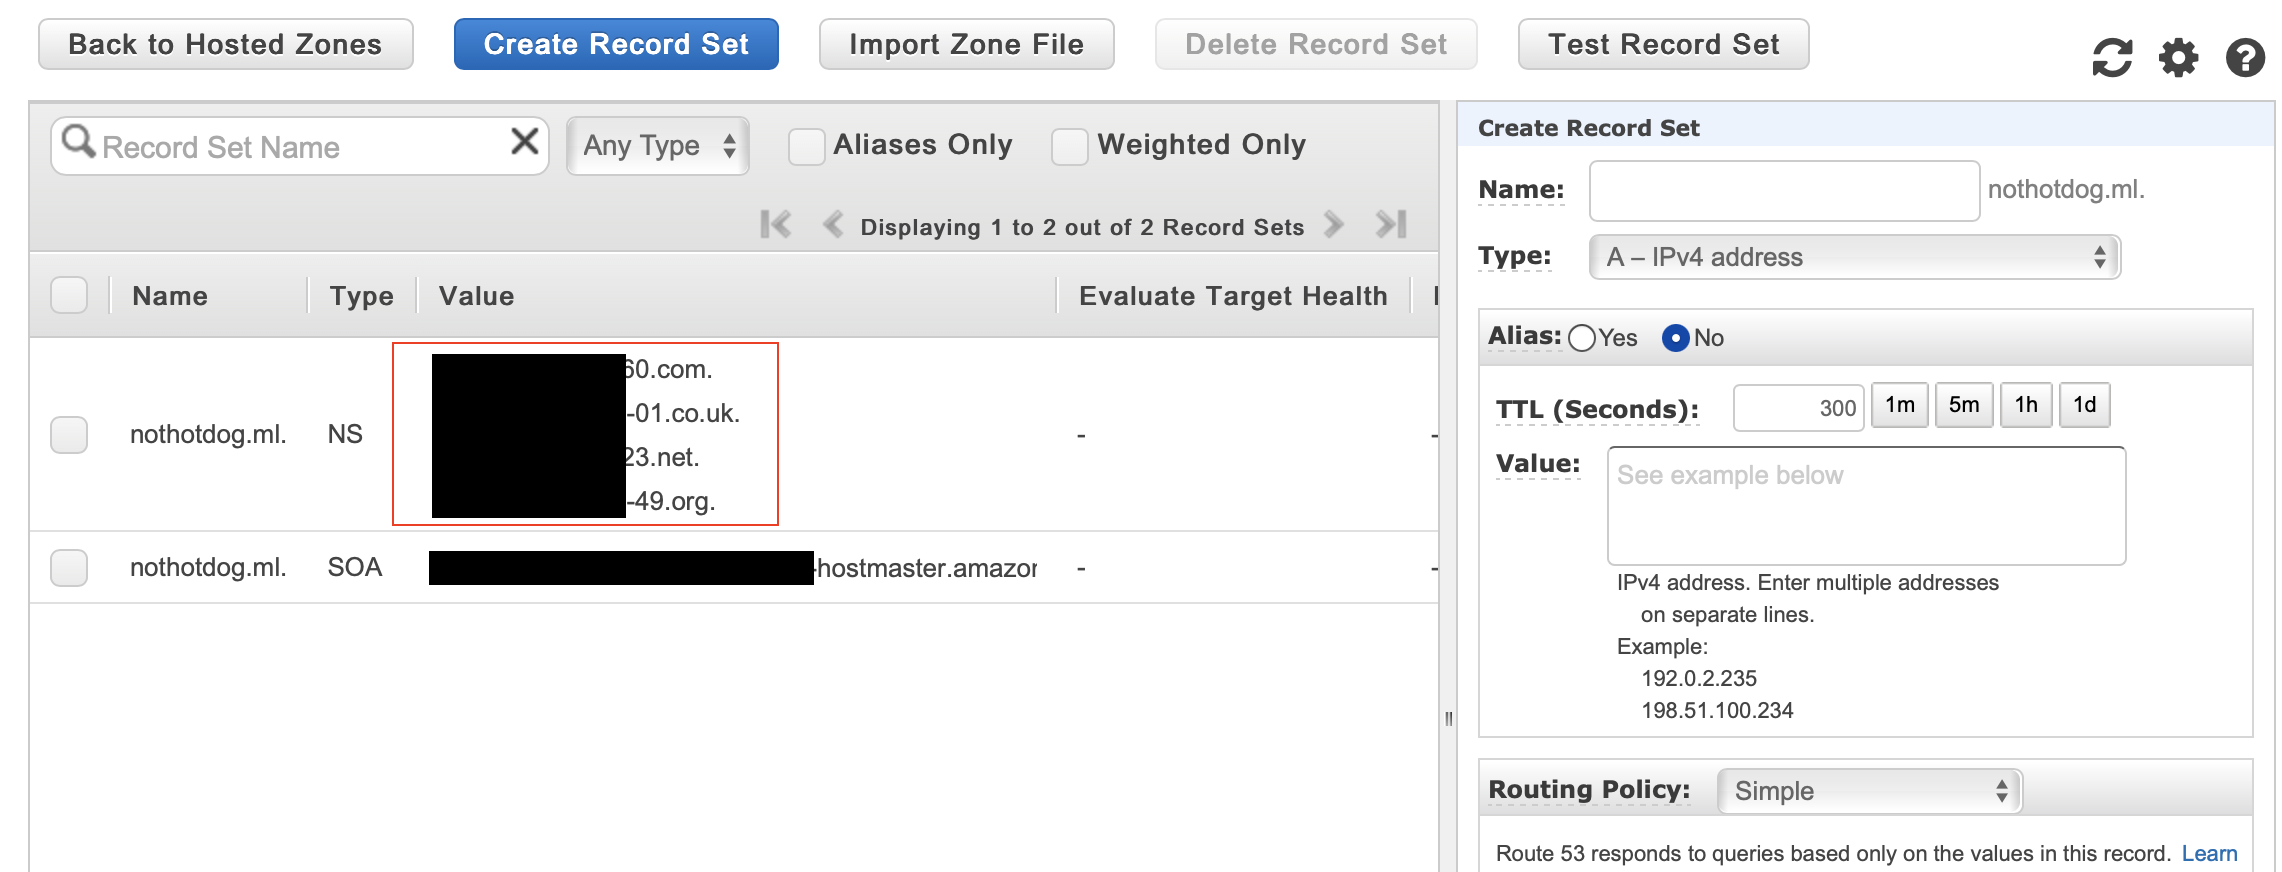
Sorry for nasty censorship, wasn’t too sure what is sensitive and what isnt as far as the hosted zones.
Paste the 4 nameservers into freenom.

Your domain is now all set on freenom! Let’s make an Elastic IP so we can have the same IP when our instances stop and start.
Elastic IP
I highly suggest creating an Elastic IP before we continue, so our IPv4 address doesn’t change each time we reboot our instance. Elastic IP’s are free when attached to a running instance (charges will incur if you stop your instance, so just release the IP if you don’t want to incur charges). If you already have one, then please associate it with your EC2 instance. If you do not have one, see below on how to create one.
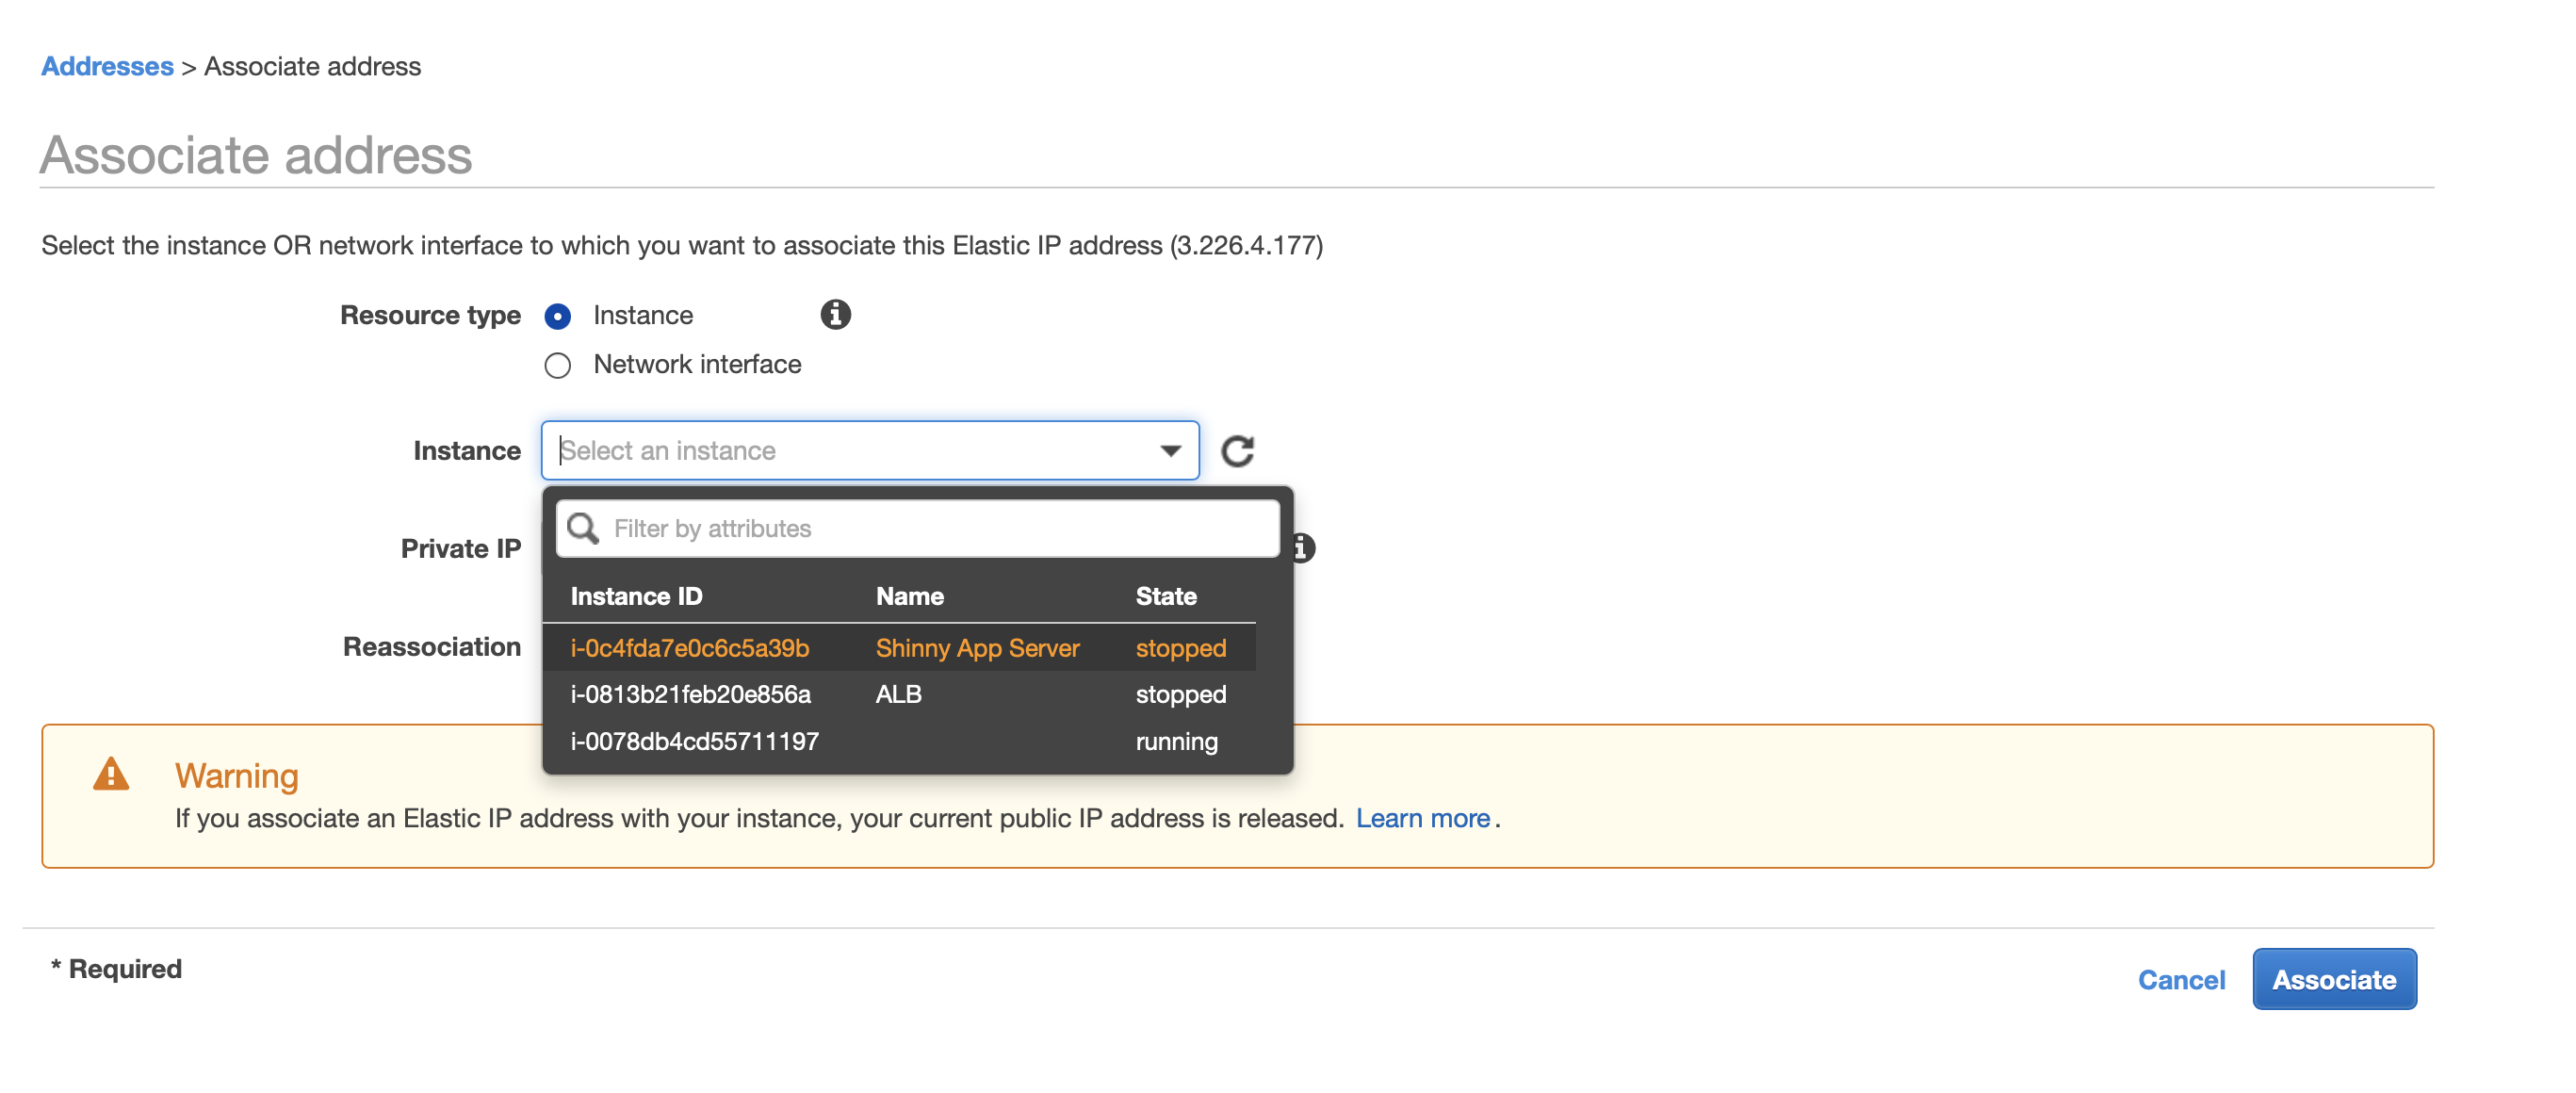
- In the EC2 services tab, go to the left nav bar and under Network & Security select Elastic IP. Then, choose Allocate new address on the top left, and select Amazon Pool and click “Allocate”.
- After, select the Elastic IP and click “Actions” and choose Associate Addresses. On the Instances dropdown, select the instance that is hosting your apps and click “Associate”.
AWS Certificate Manager for HTTPS / SSL
I went over a little about how HTTPS is secured but how? SSL certificates are small data files that digitally bind a cryptographic key to an organization’s details. When you install these keys and register it to your domain, it activates the padlock (little lock next to URL) and the https protocol that allows secure connections from a server to a browser.
We can self-sign these keys to ourselves in non-production environments (for practice purposes) by running a command like sudo openssl ... but you would still receive a pretty nasty warning from your browser asking if you’d like to trust.
The preferred option is to buy the certificate, or we can use another AWS service called Amazon Certificate Manager to register public certificates that are verified by Amazon for free (Private certificates are not free). This is the preferred way since we will most likely be using a live-production environment. See below on how to get verified public certificates from AWS Certificate Manager.
Under the services tab, search for “Certificate Manager” then click “Request a certificate” to request your Public certificate which you will then complete the four following steps.
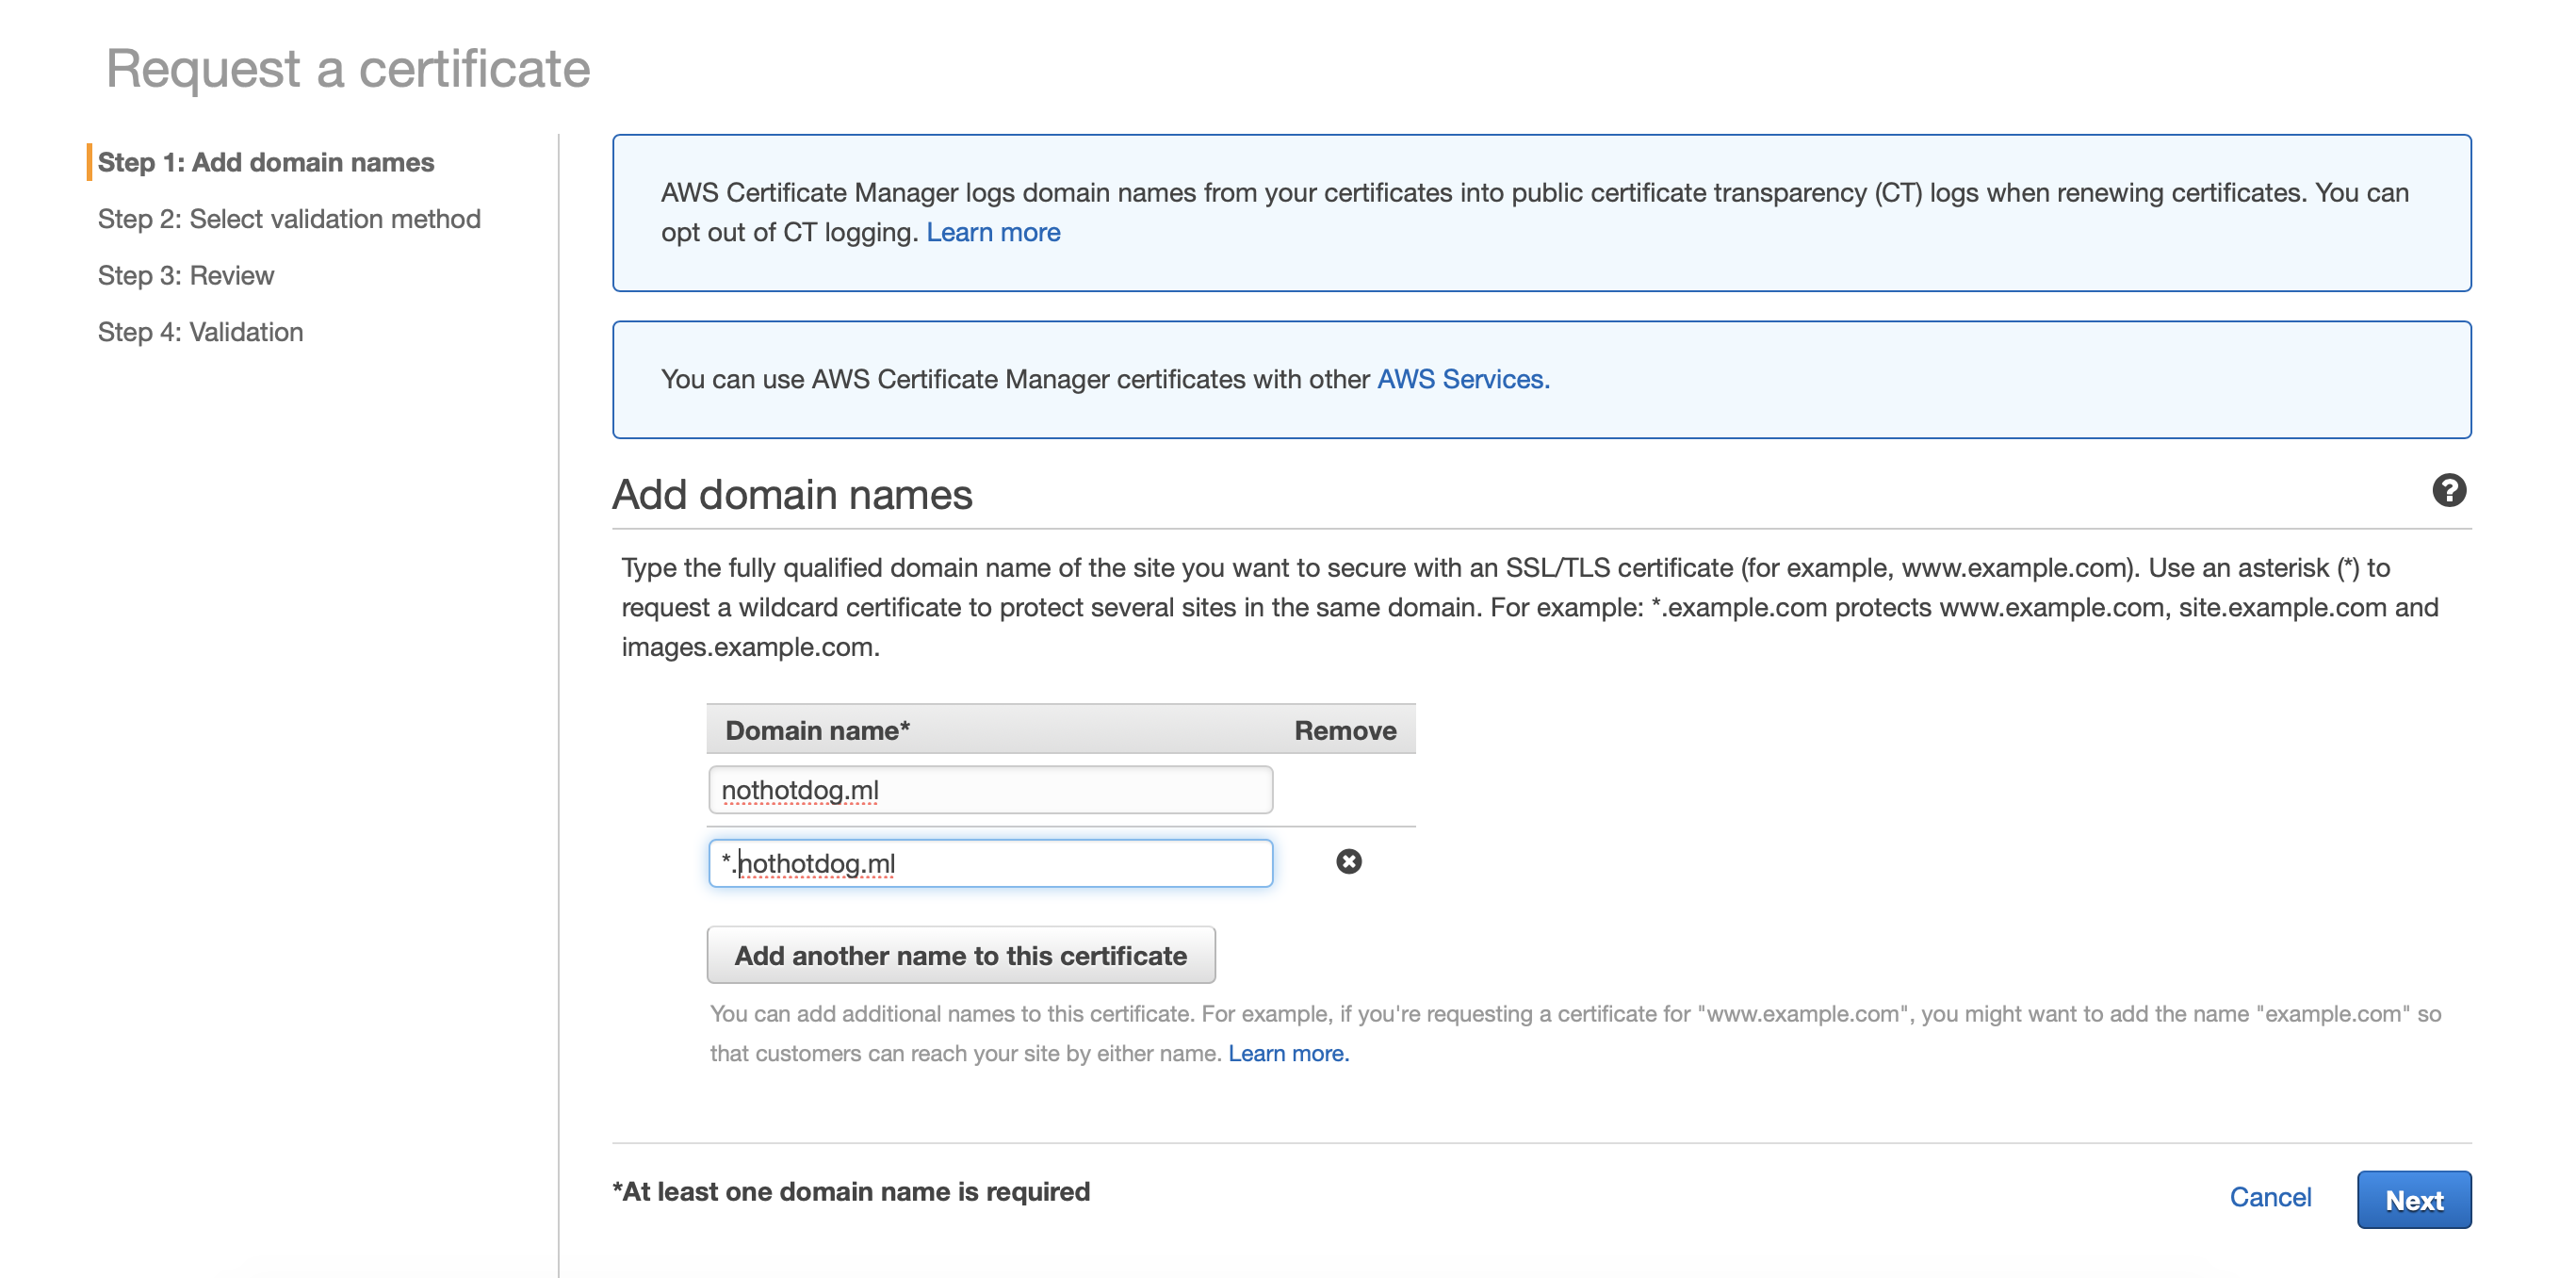
Adding our domains
Since I will be using subdomains, I will add the wildcard character * before my domain to represent any subdomains. First, I will add nothotdog.ml and then another with the wildcard *.nothotdog.ml so I can use the “rstudio” and “app” subdomains. Once you’ve added your domains, click Next.
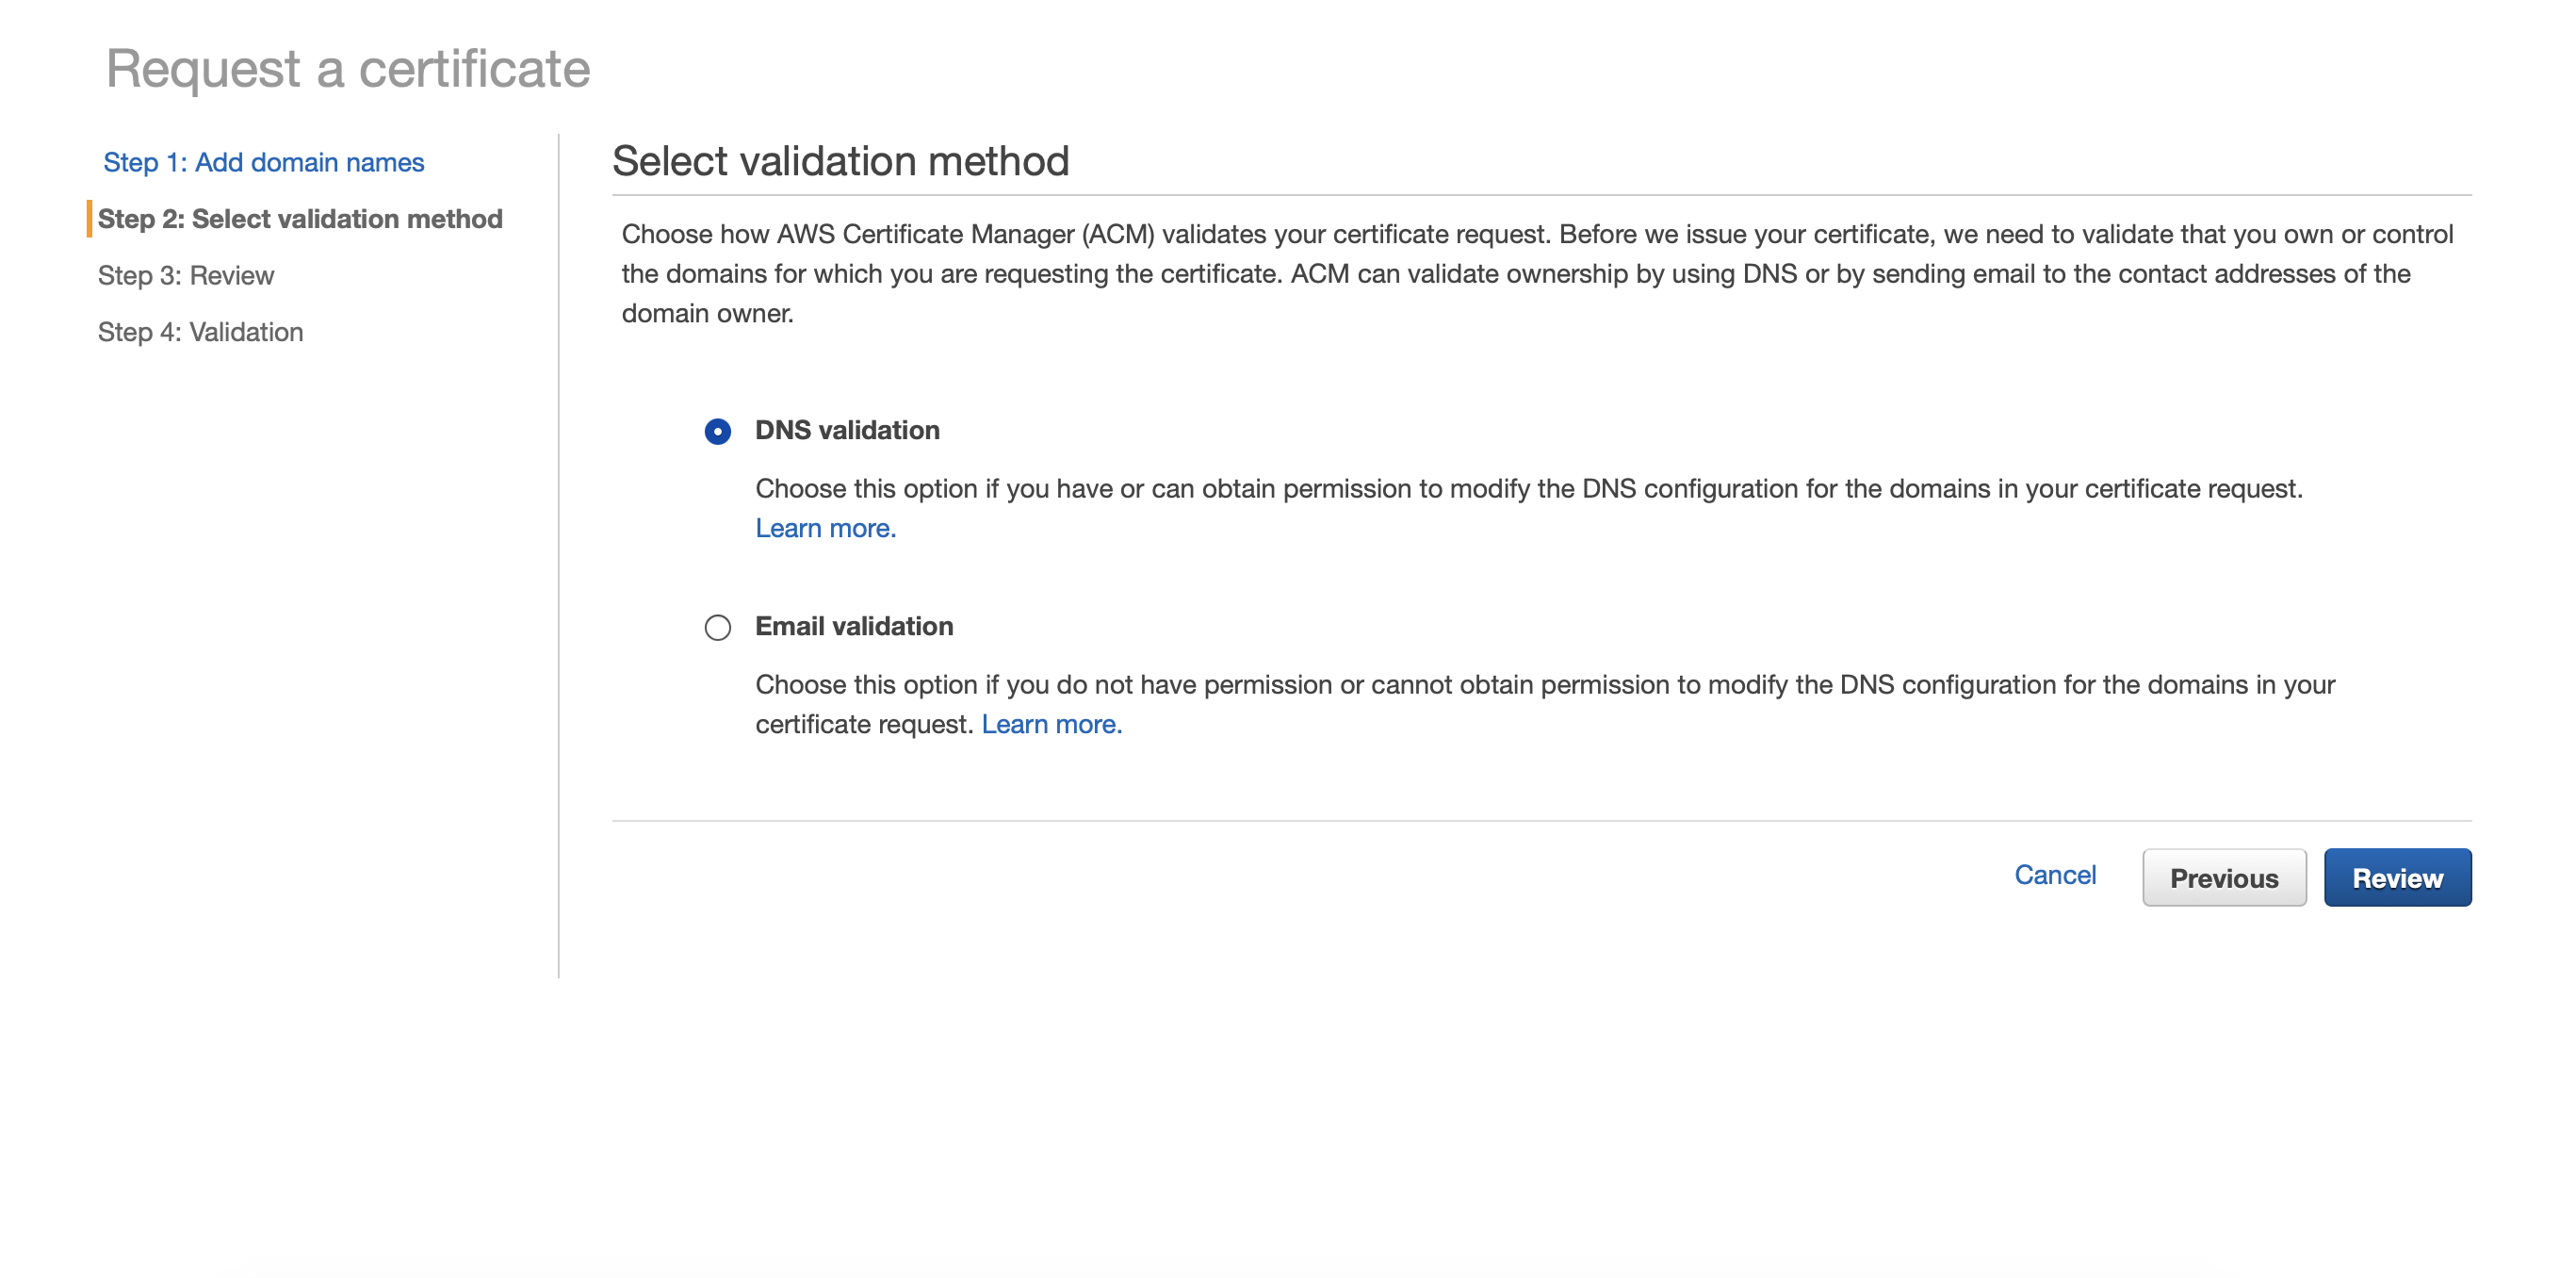
Selecting Validation Method
Select DNS Validation and then click Review. Move forward to step 4.
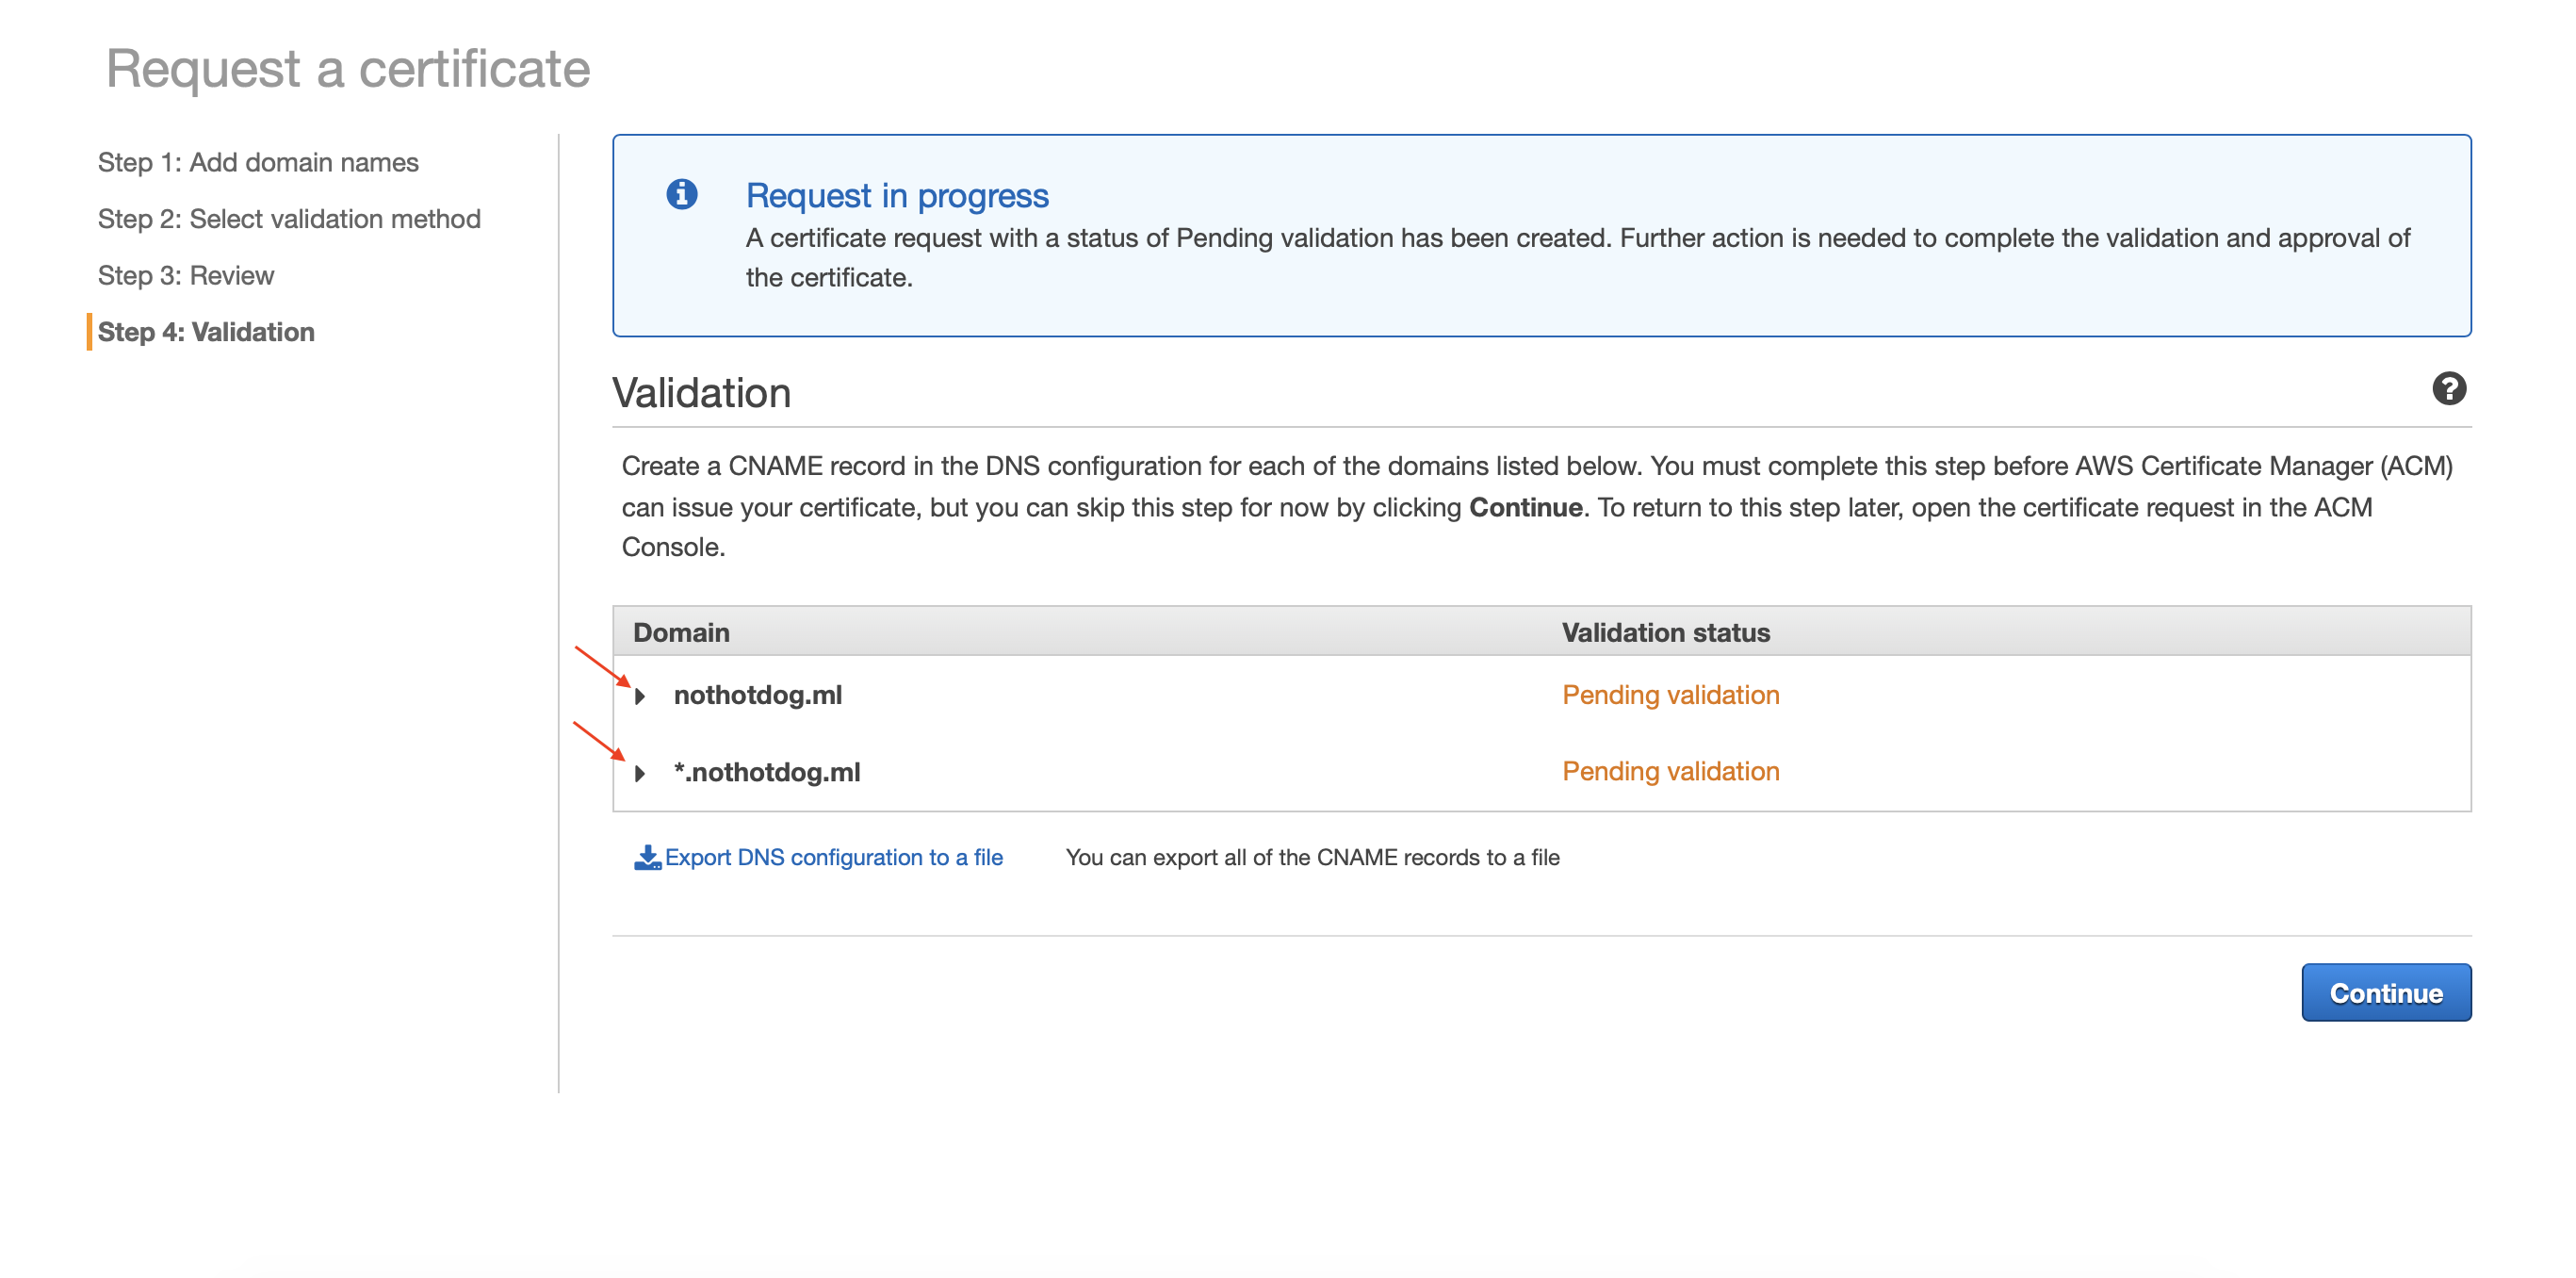
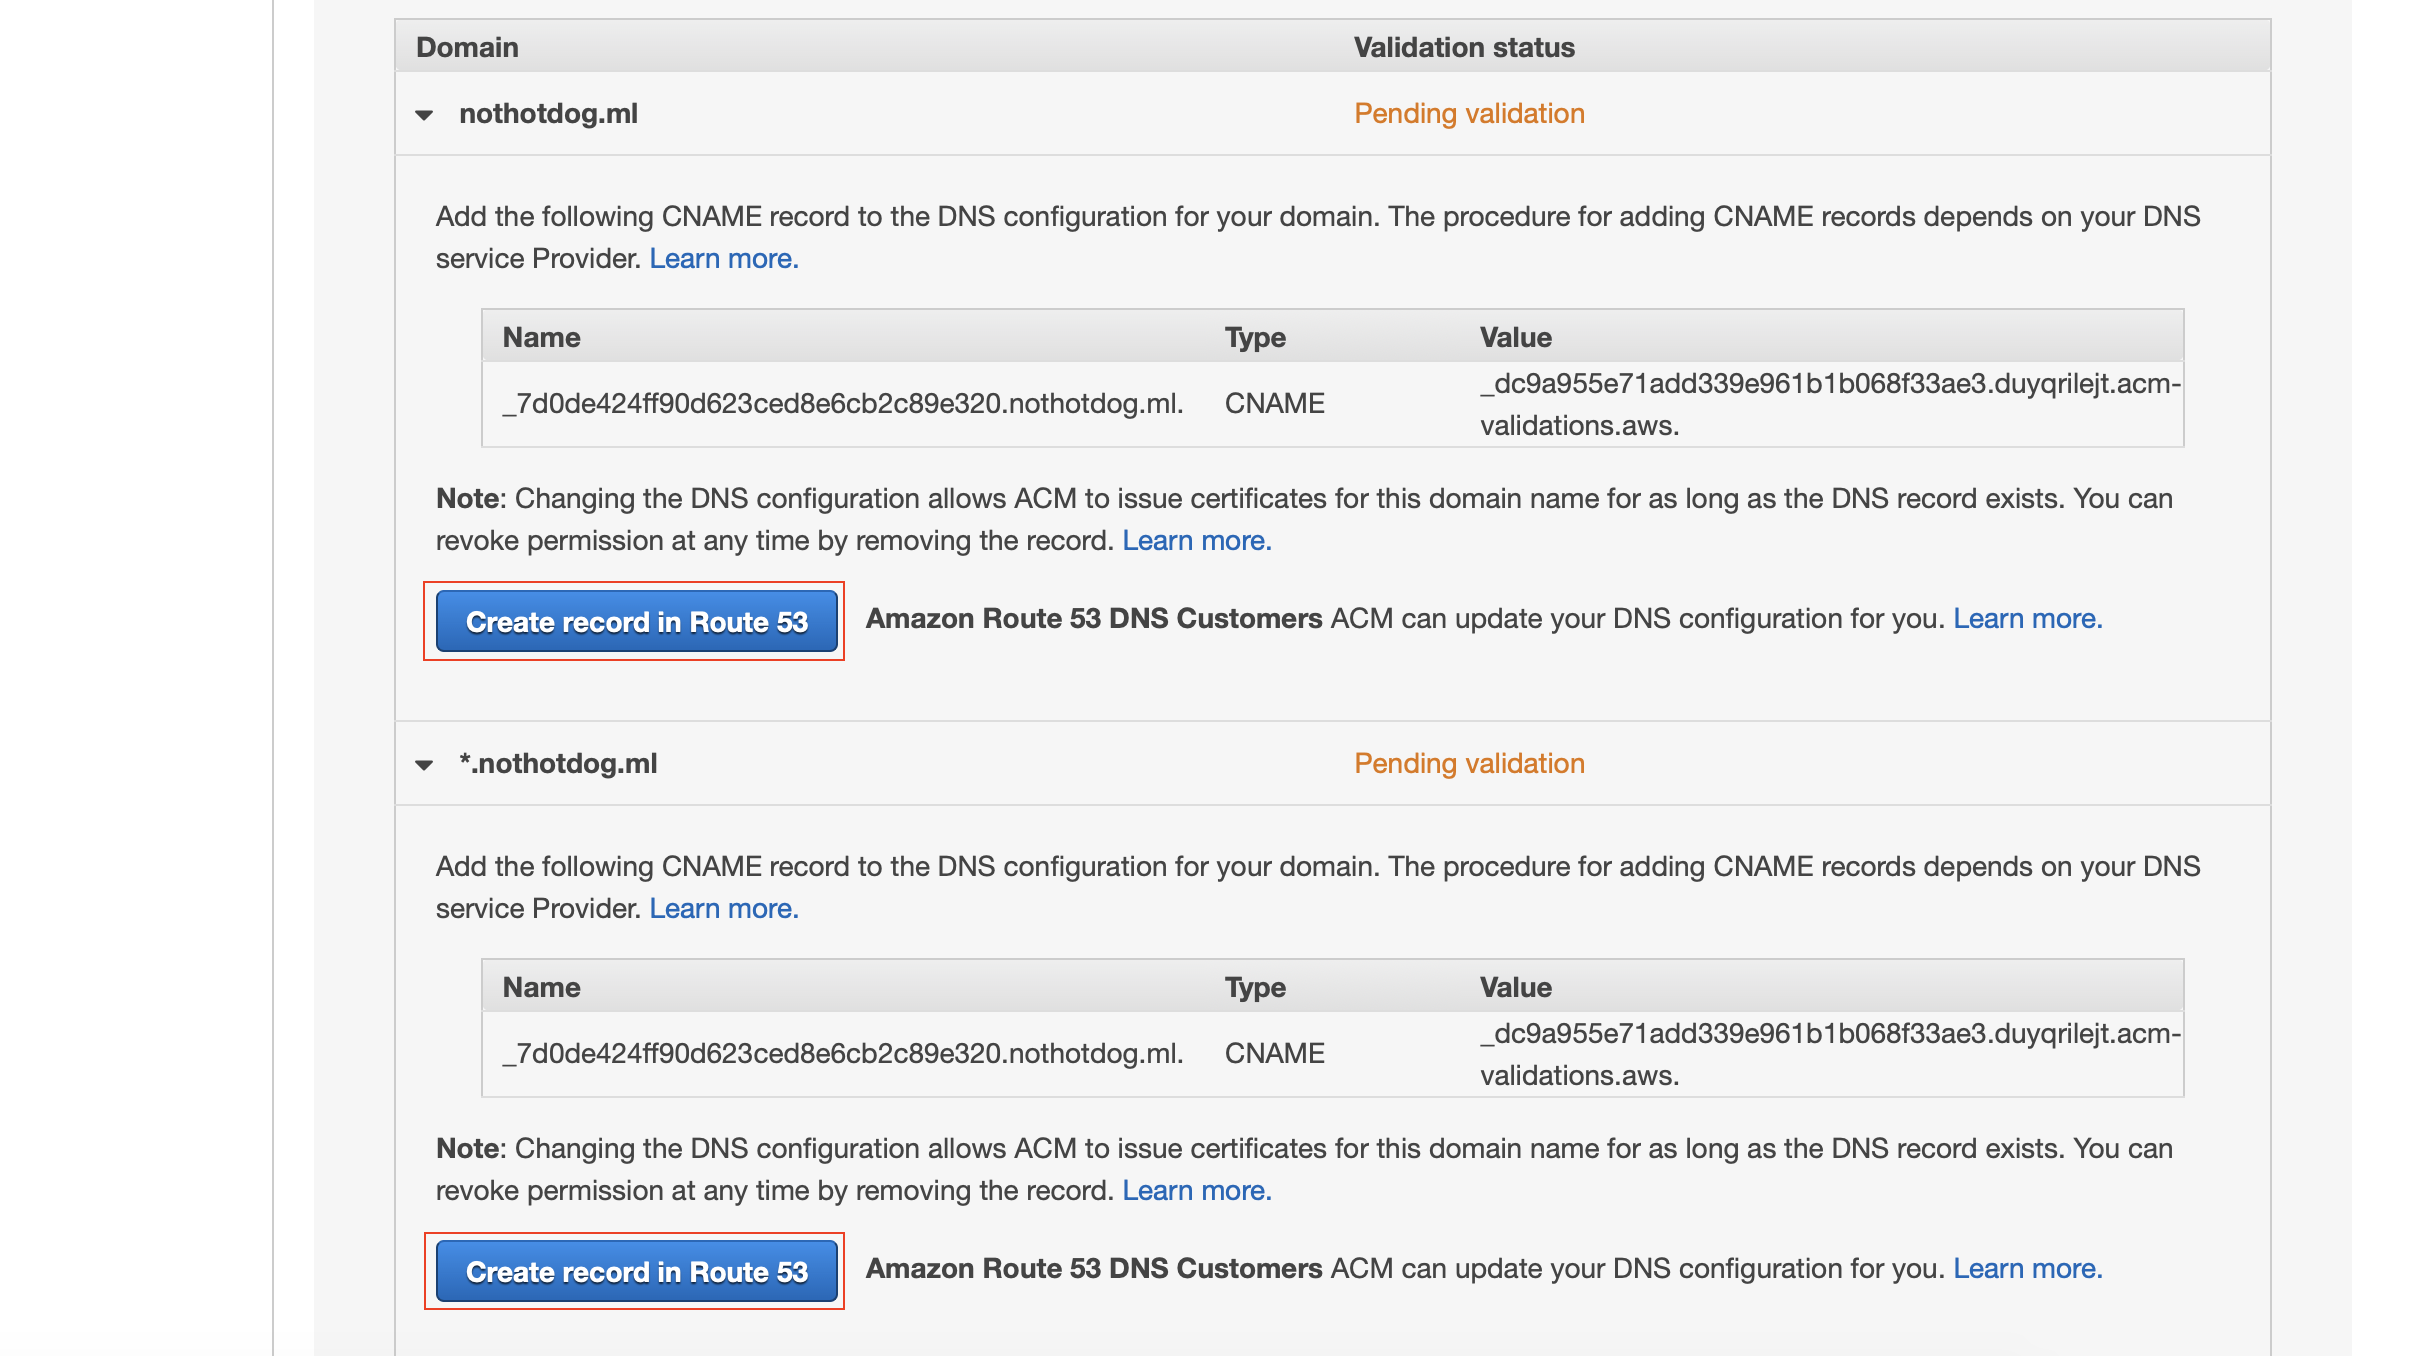
Validating Domains
This part is easy since we already set up the hosted zone for our domain. Select the arrow drop-downs and click “Create record in Route 53” for each domain set. Click Continue while it validates itself, usually takes just a couple minutes.
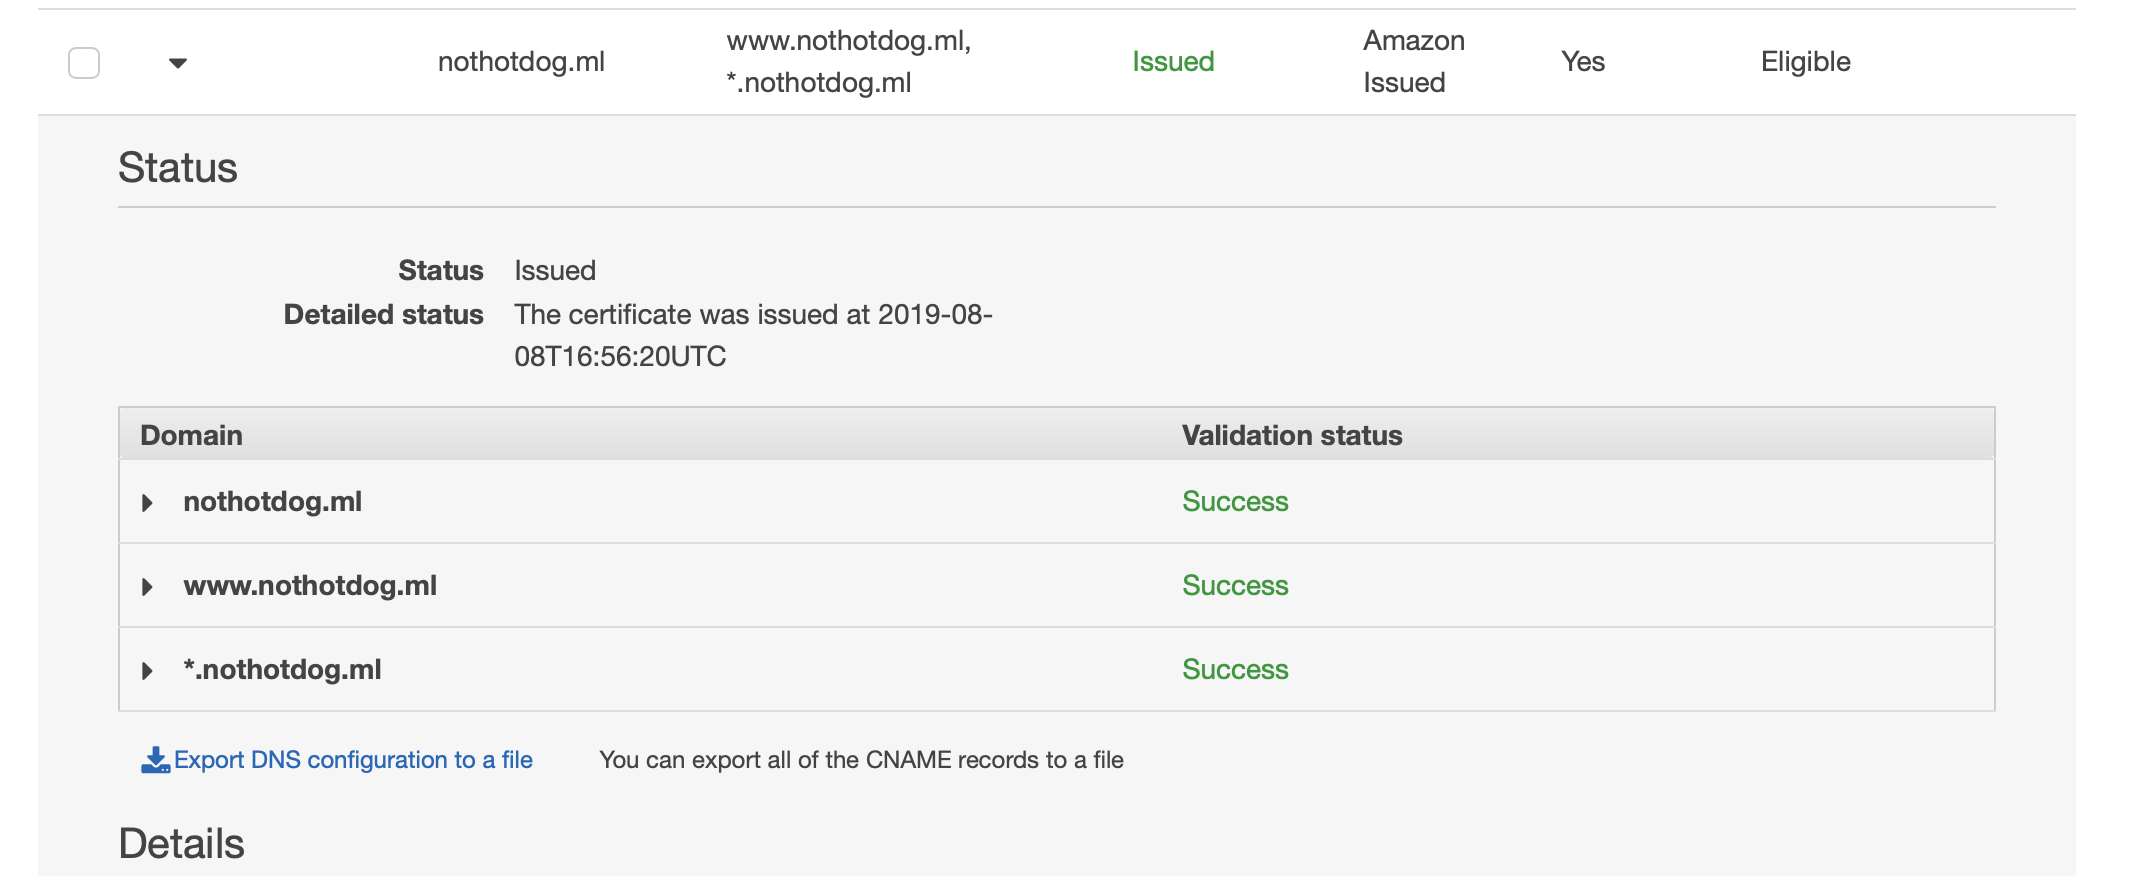
You should see “Success” for each domain set once it is complete. Also, you’ll notice the status of your certificate now reads “Issued” in green.
Elastic Load Balancer: Redirect All HTTP to HTTPS
Elastic Load Balancing automatically distributes incoming application traffic across multiple targets, such as Amazon EC2 instances, containers, IP addresses, and Lambda functions. I’ll save the details for a future post, but we will utilize a load balancer to set a rule of redirecting all HTTP traffic to HTTPS. In the future, we will use this load balancer to help distribute the workloads among multiple EC2 instances.
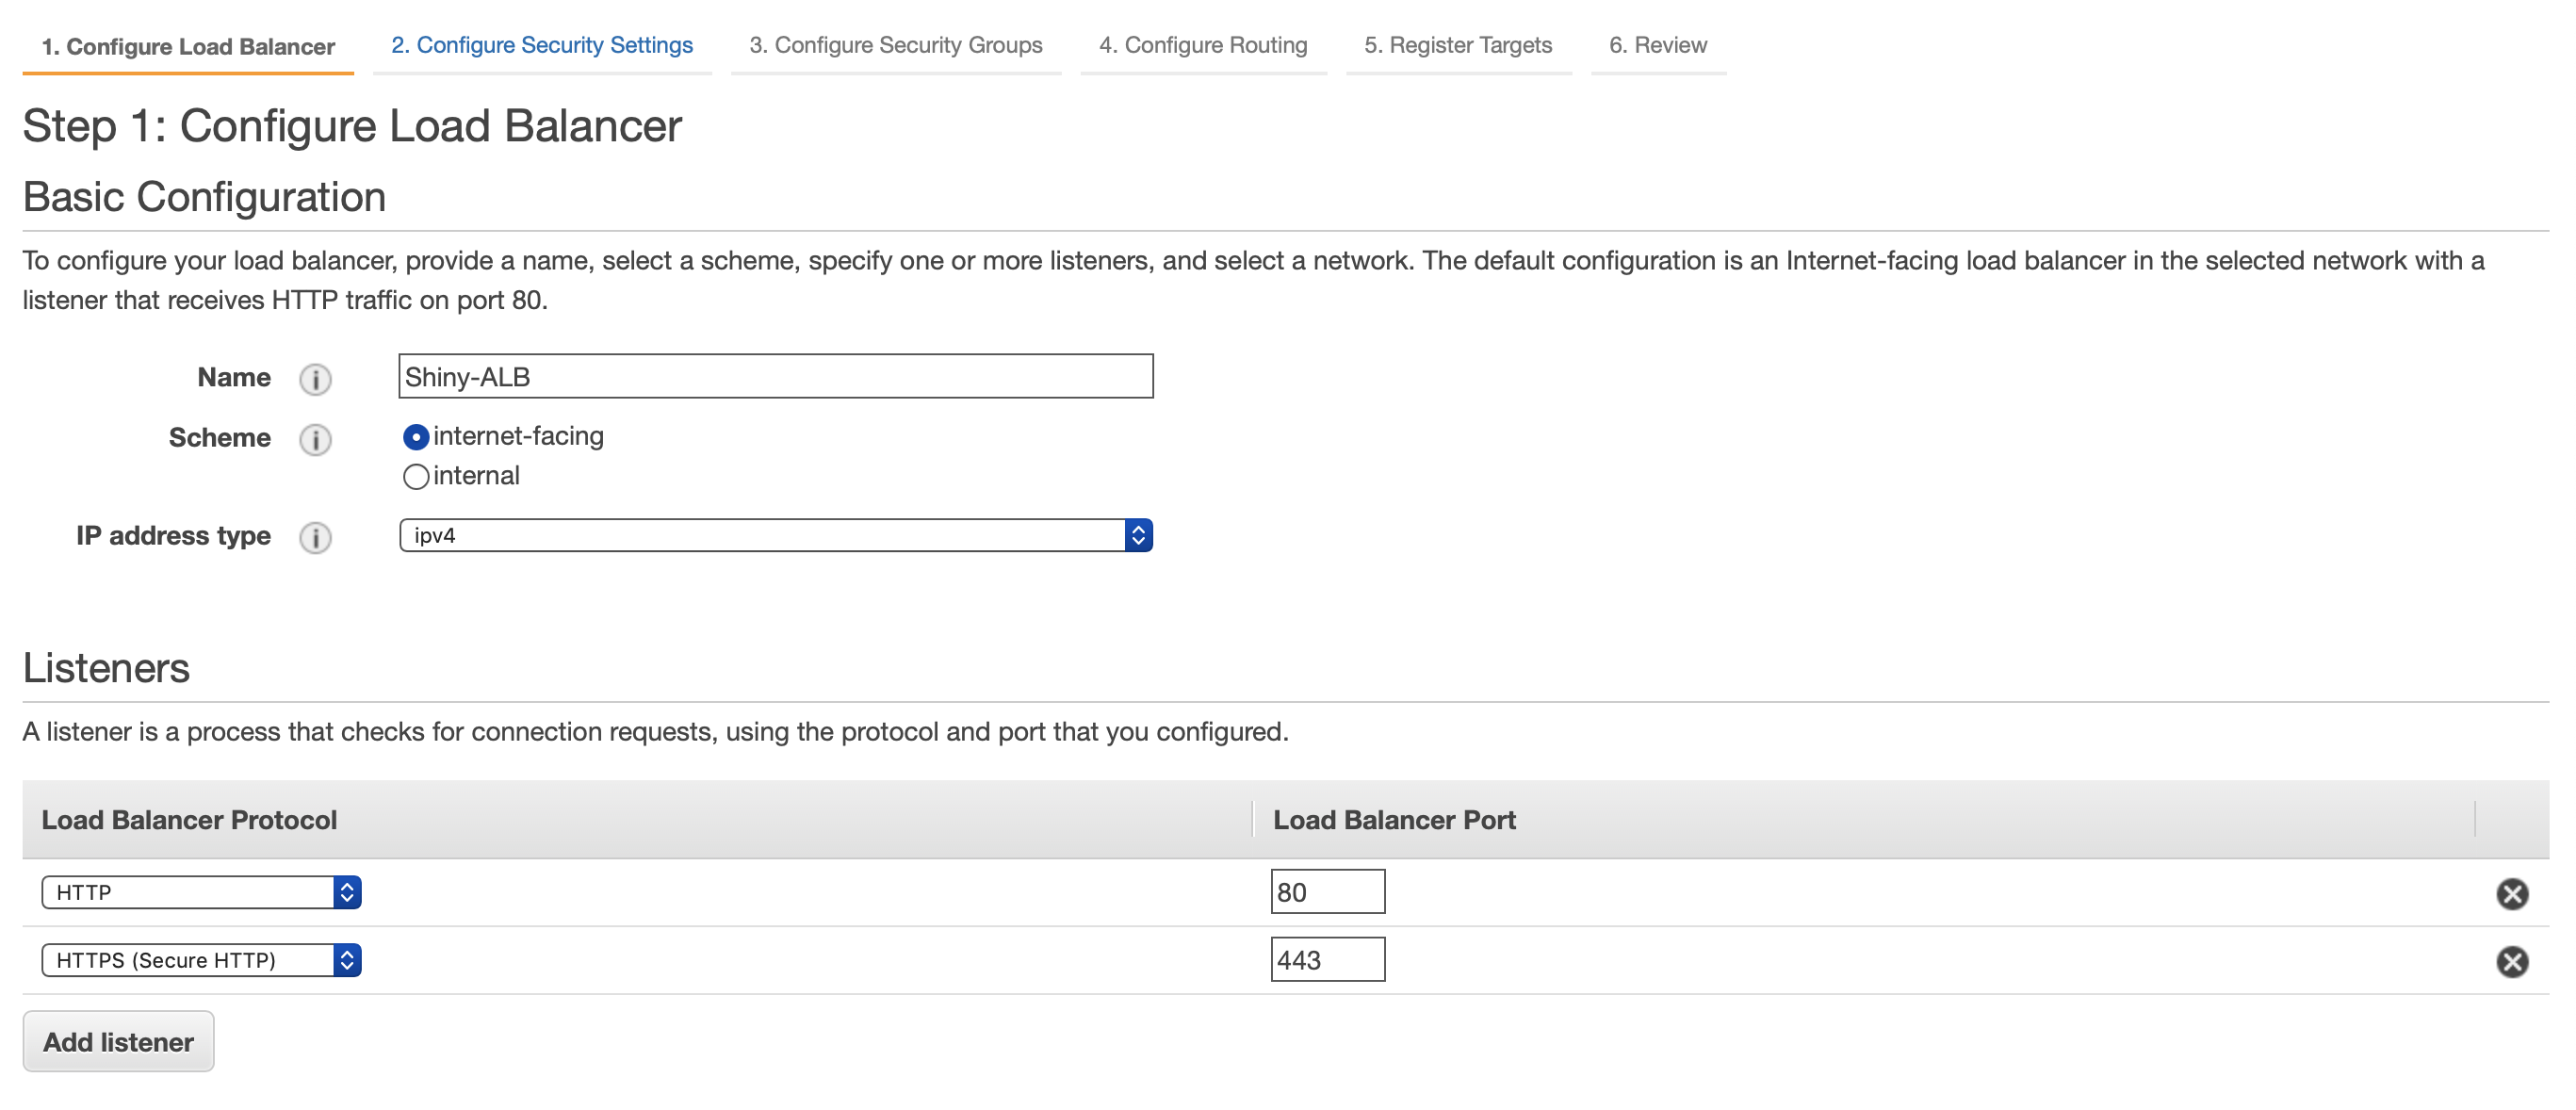
Under the EC2 services tab, navigate to Load Balancing and select “Load Balancers”. Click “Create Create Load Balancer” and select Application Load Balancer.
If you’d like to learn the difference between the types of load balancers, then visit the aws documentation here as it is better explained there.
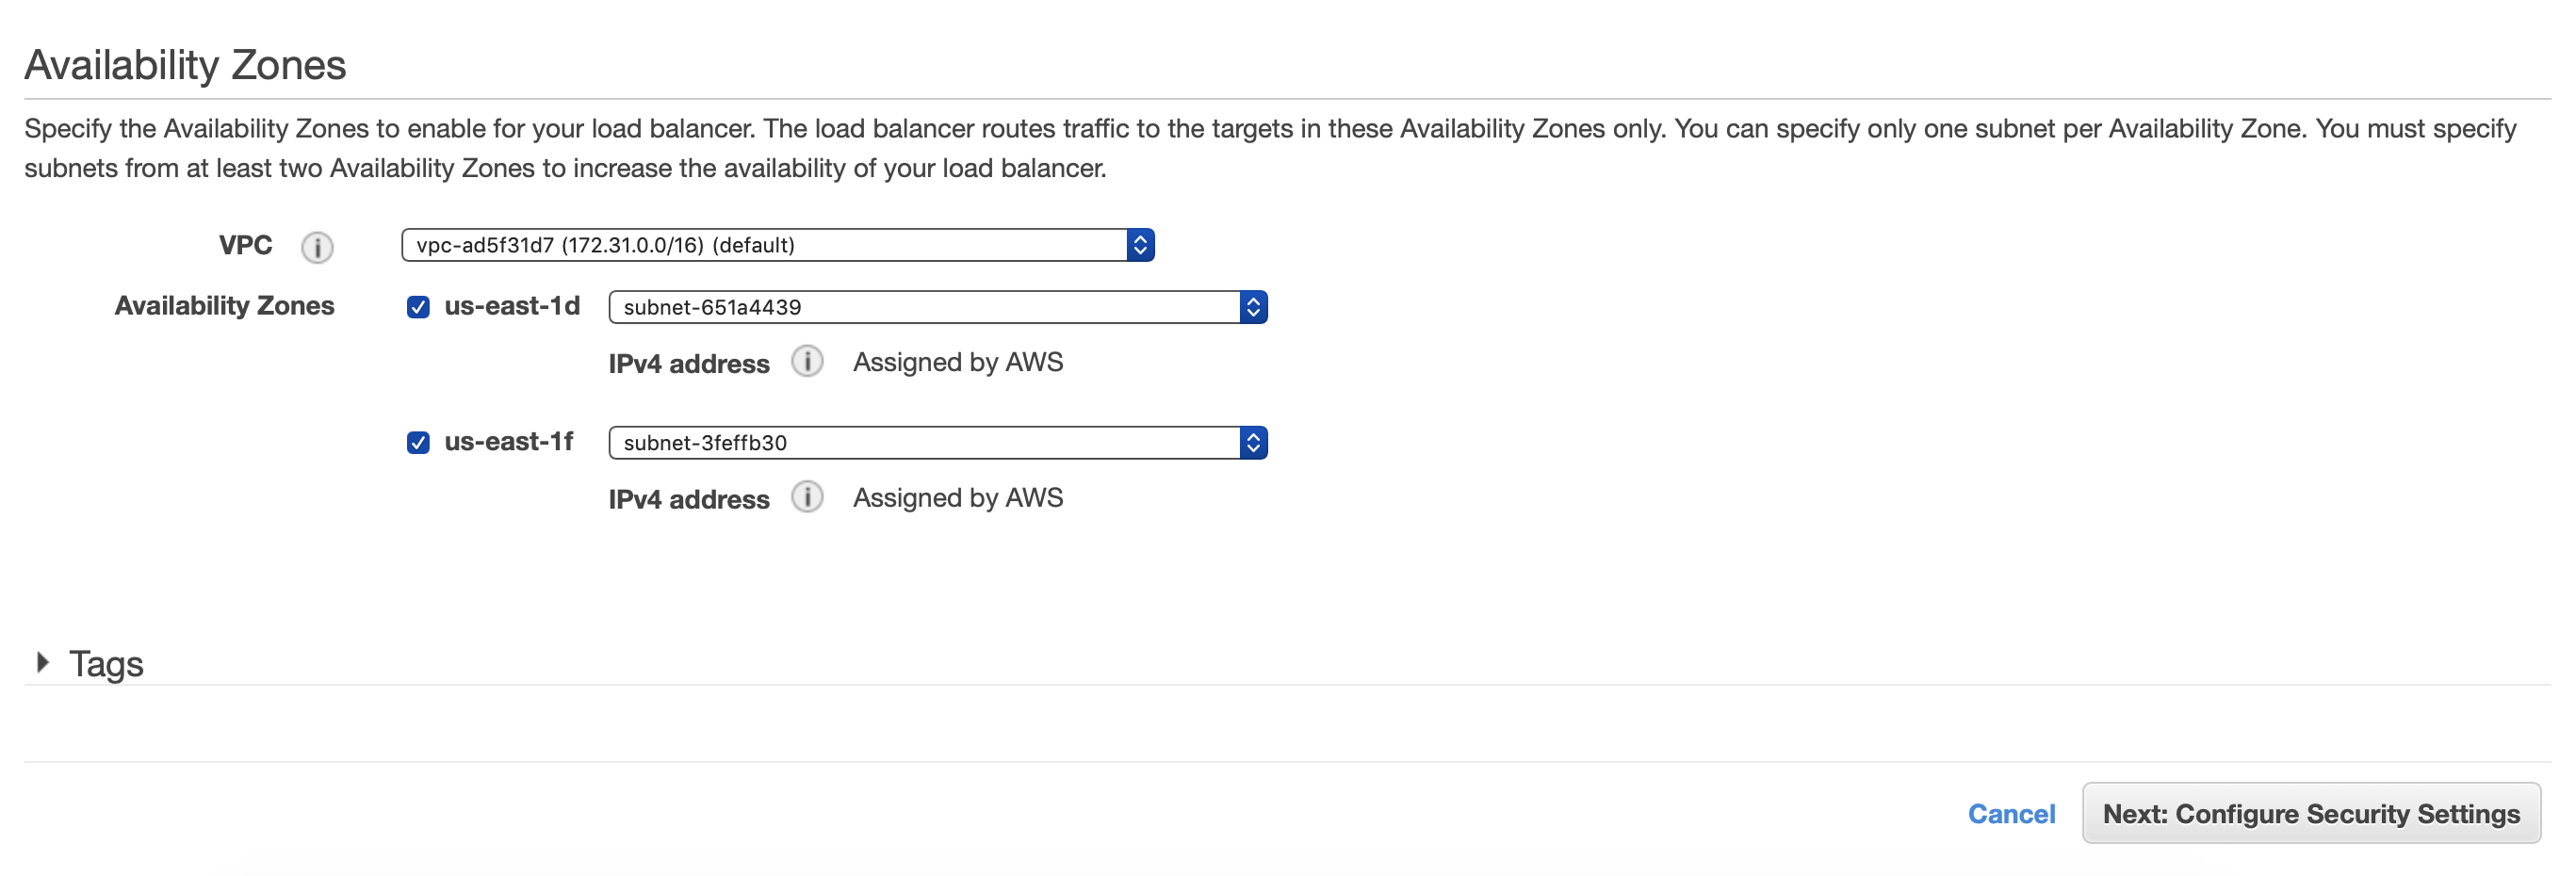
Here we would like to name our Load Balancer as well as add HTTPS on port 443 as one of our listeners. We need to also select two availability zones. Click next once your screen looks similar to the below.
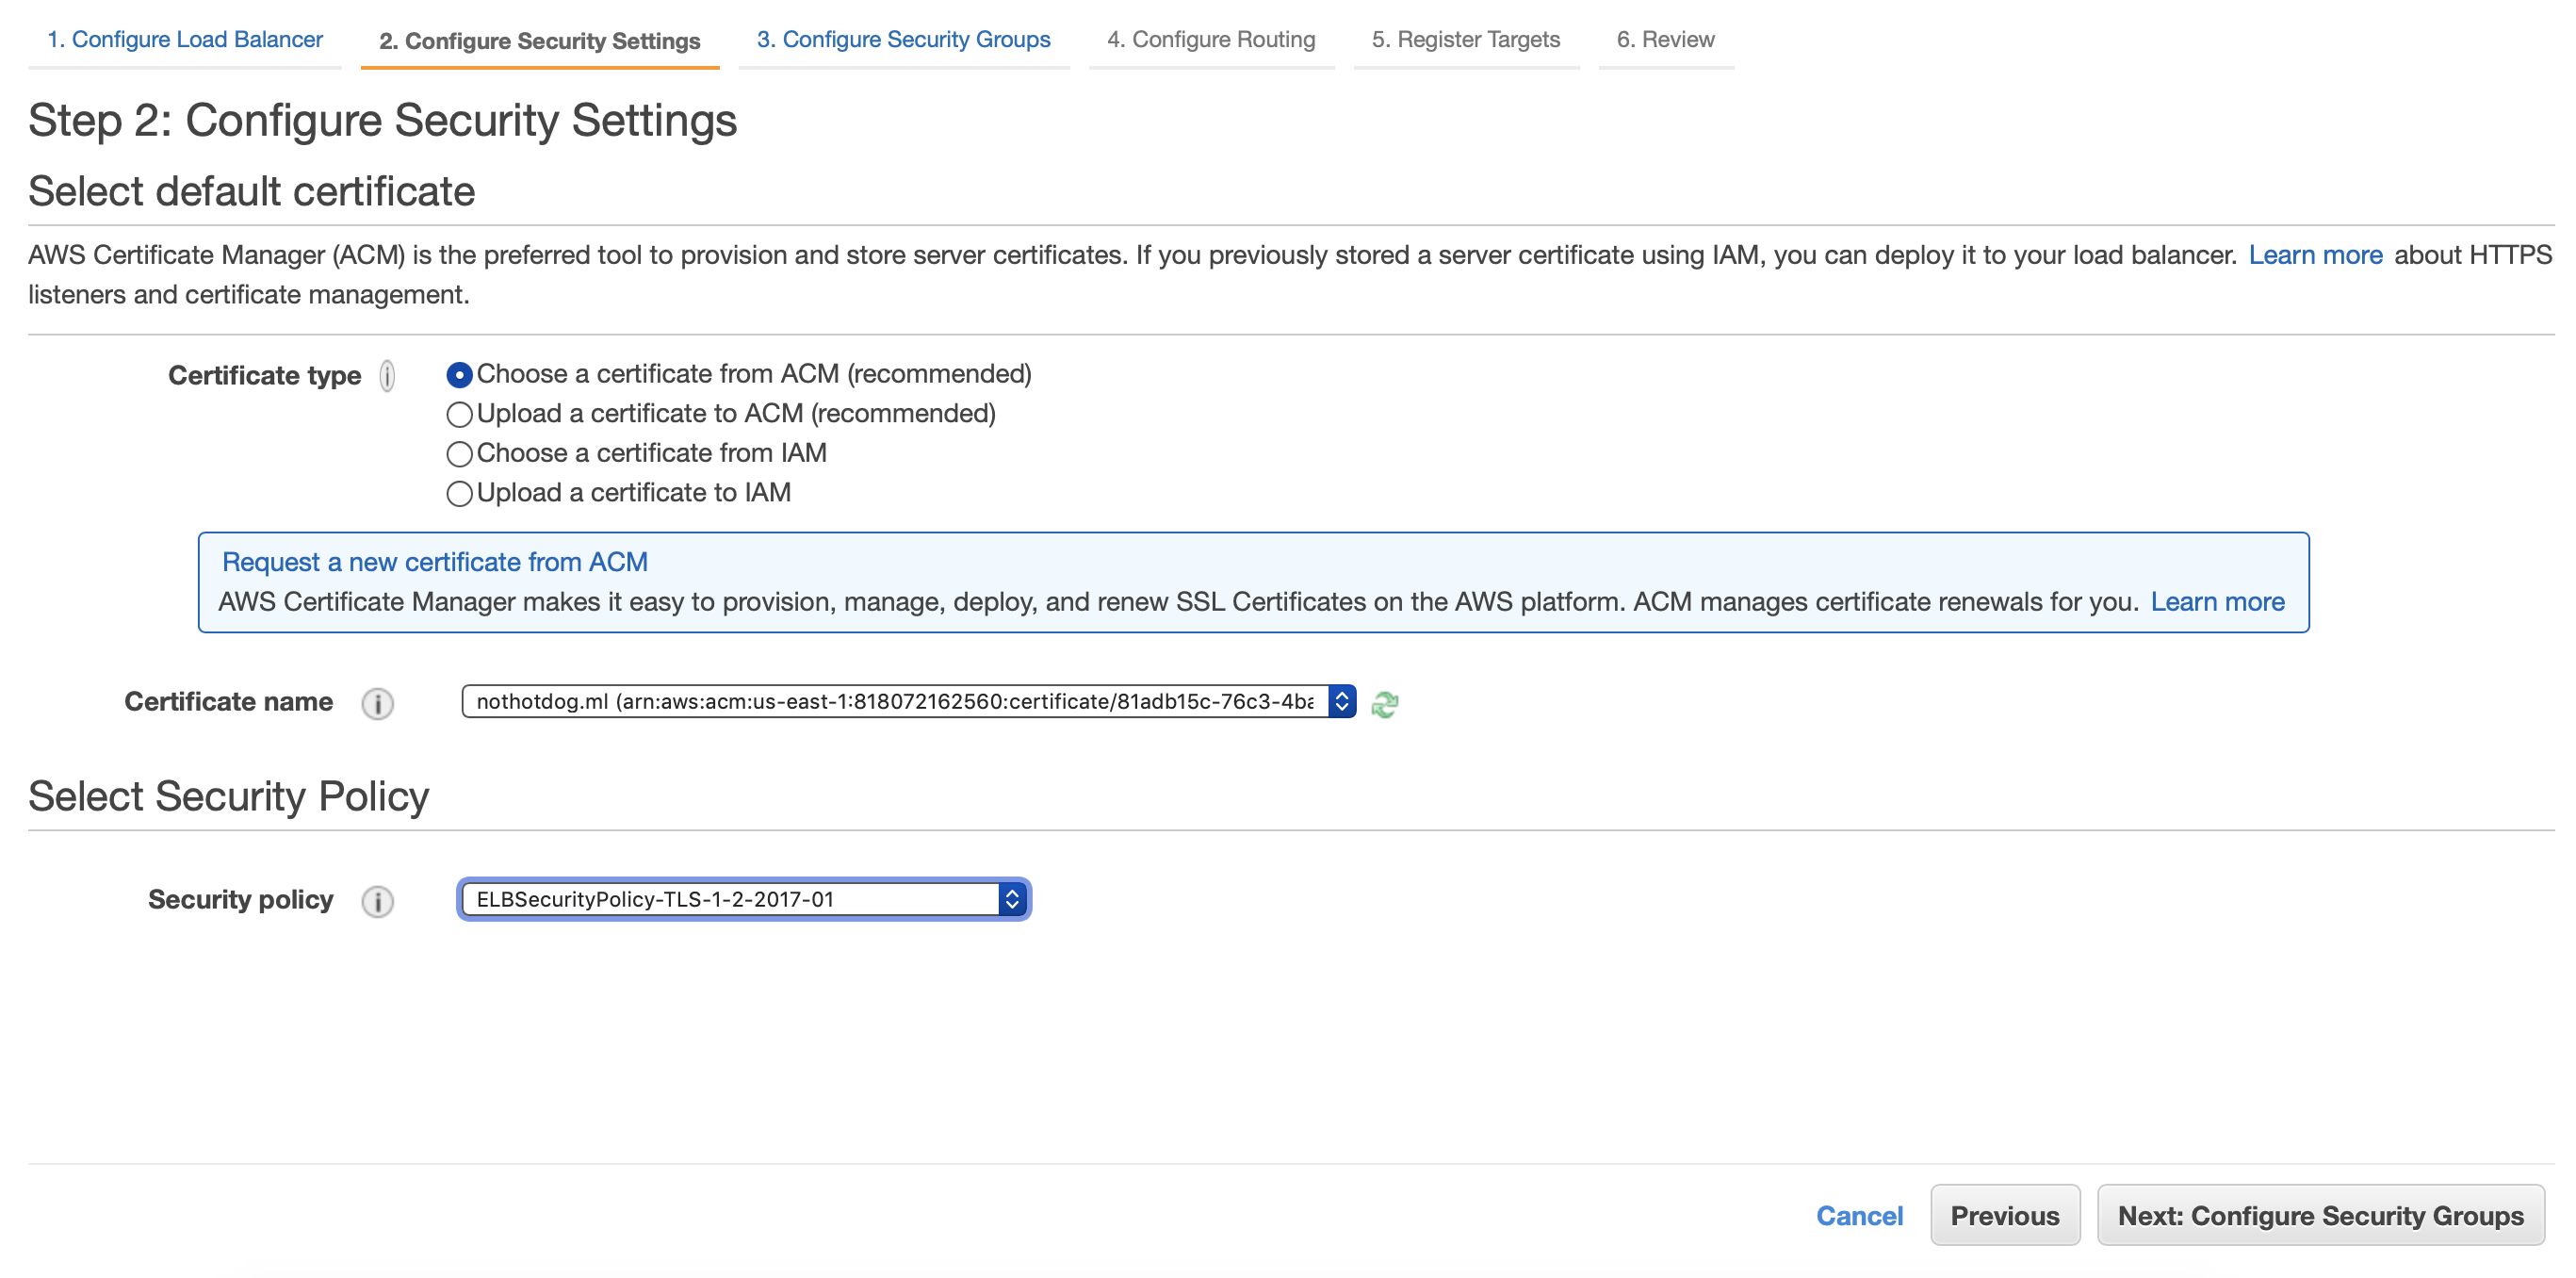
Now for this step, we want to use the certificates that we created in the AWS Certificate Manager. Select “Choose a certificate from ACM” and then select your certificate from the dropdown. Set your security policy to the newest TLS policy, which in my case was “ELBSecurityPolicy-TLS-1-2-2017-01” and click Next.
Select the Security Group you set for your EC2 Instance for step 3 and move on to step 4 seen below.
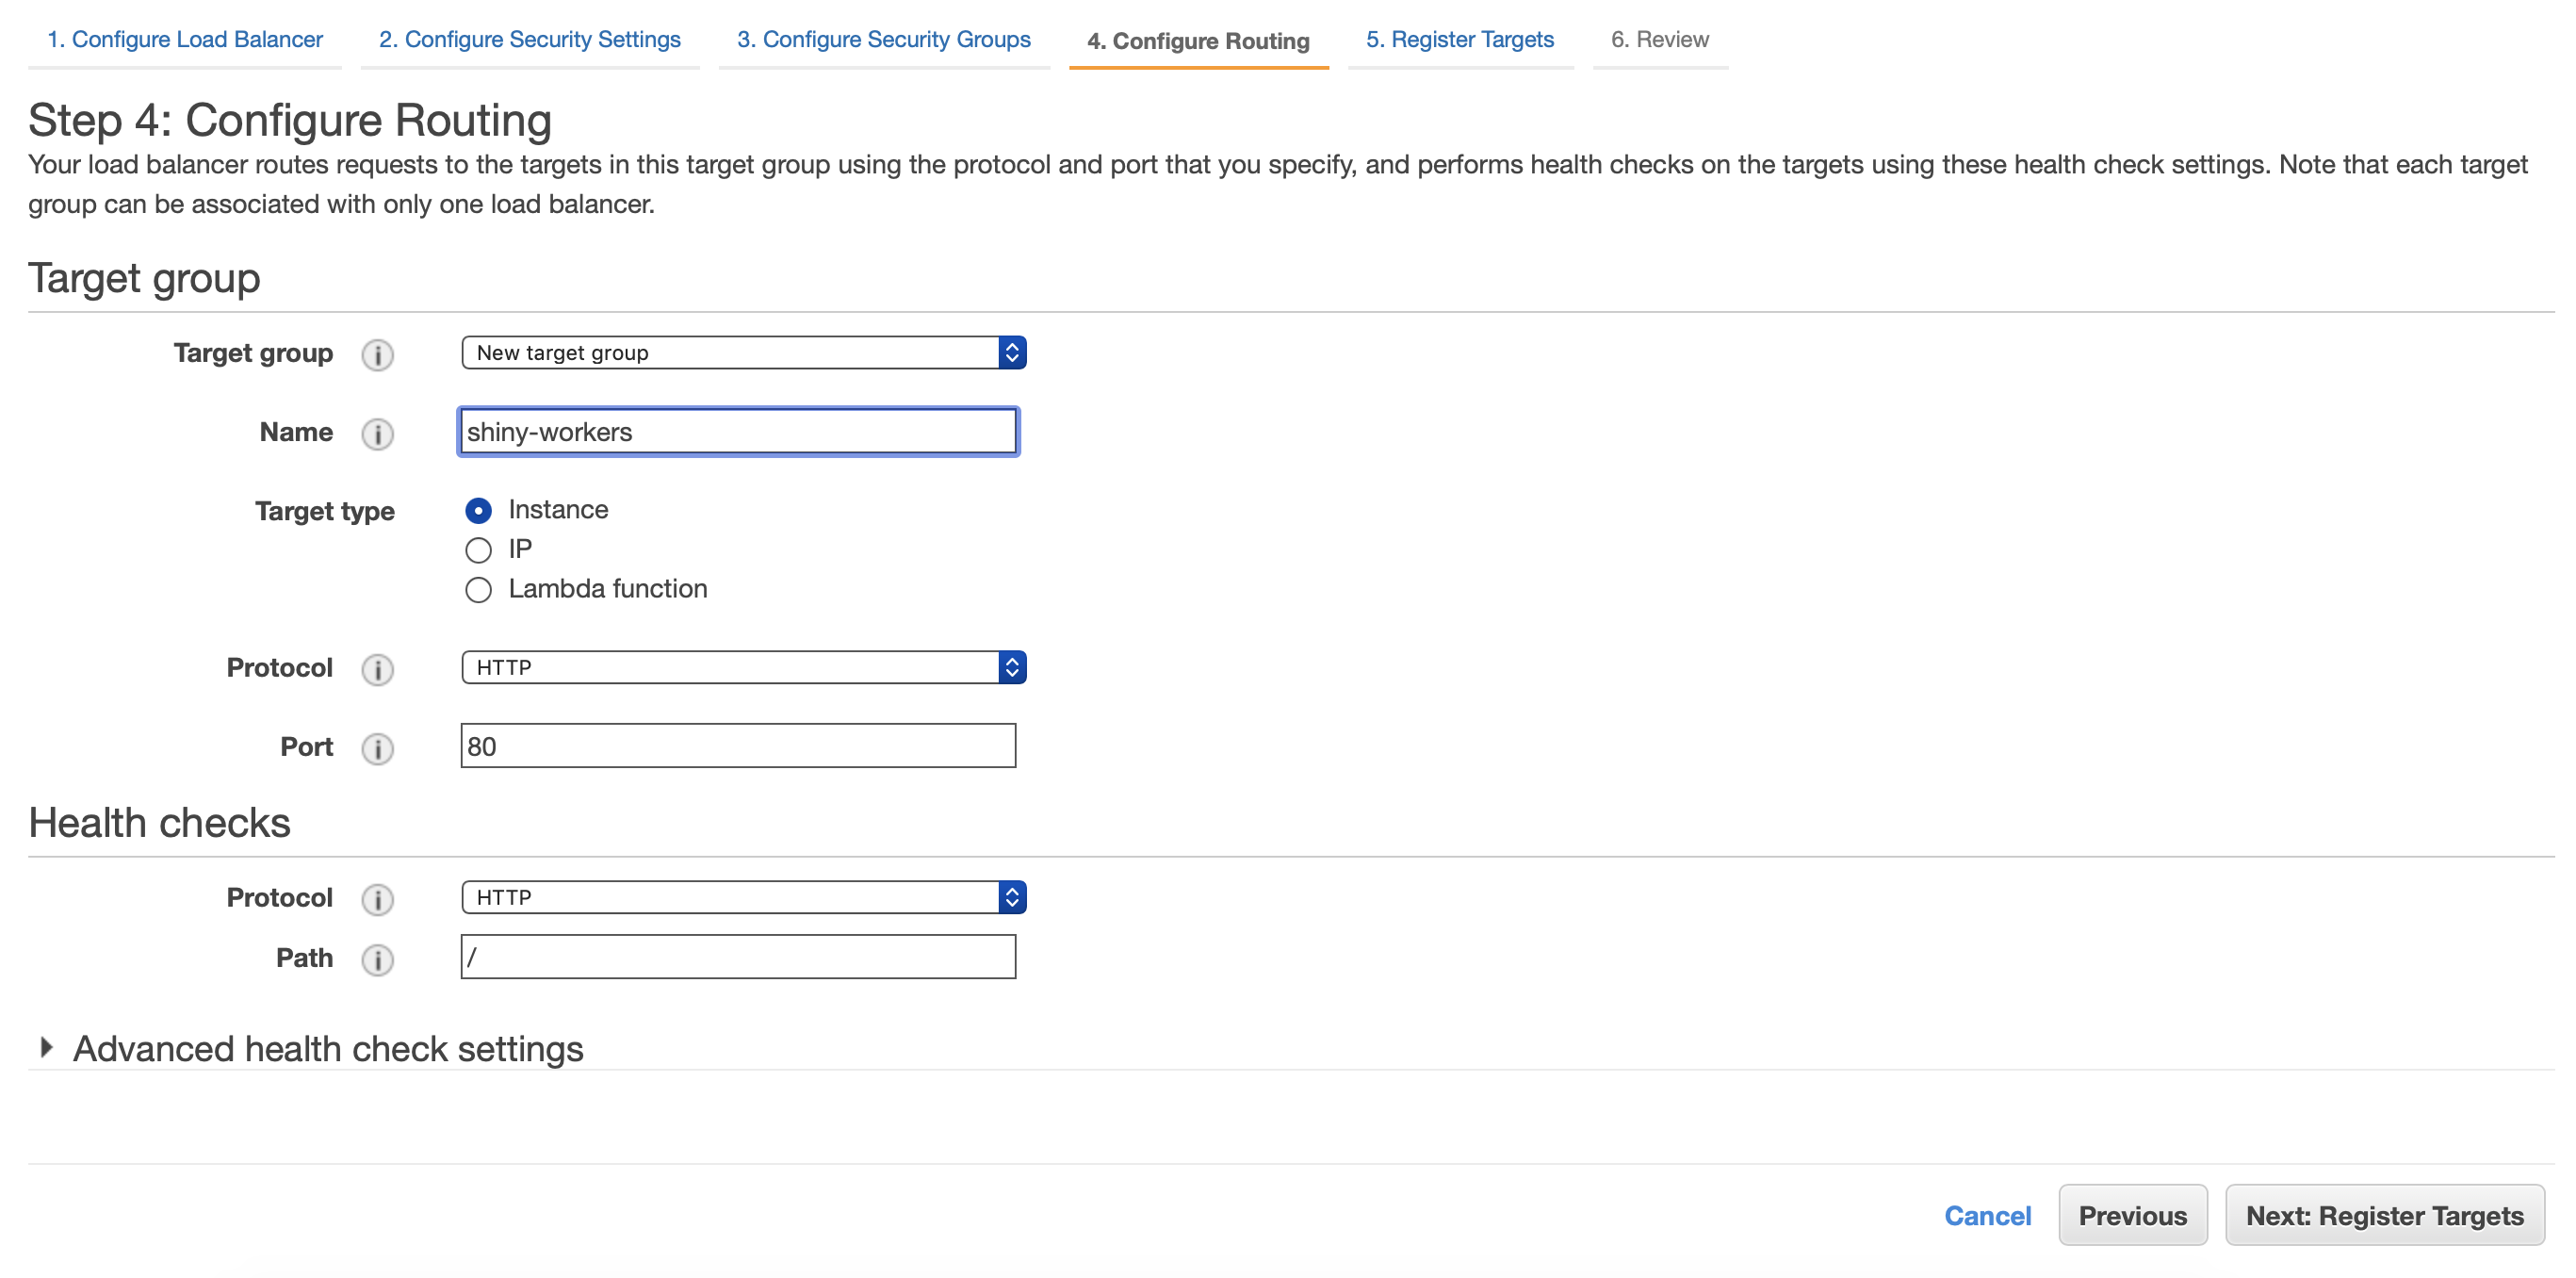
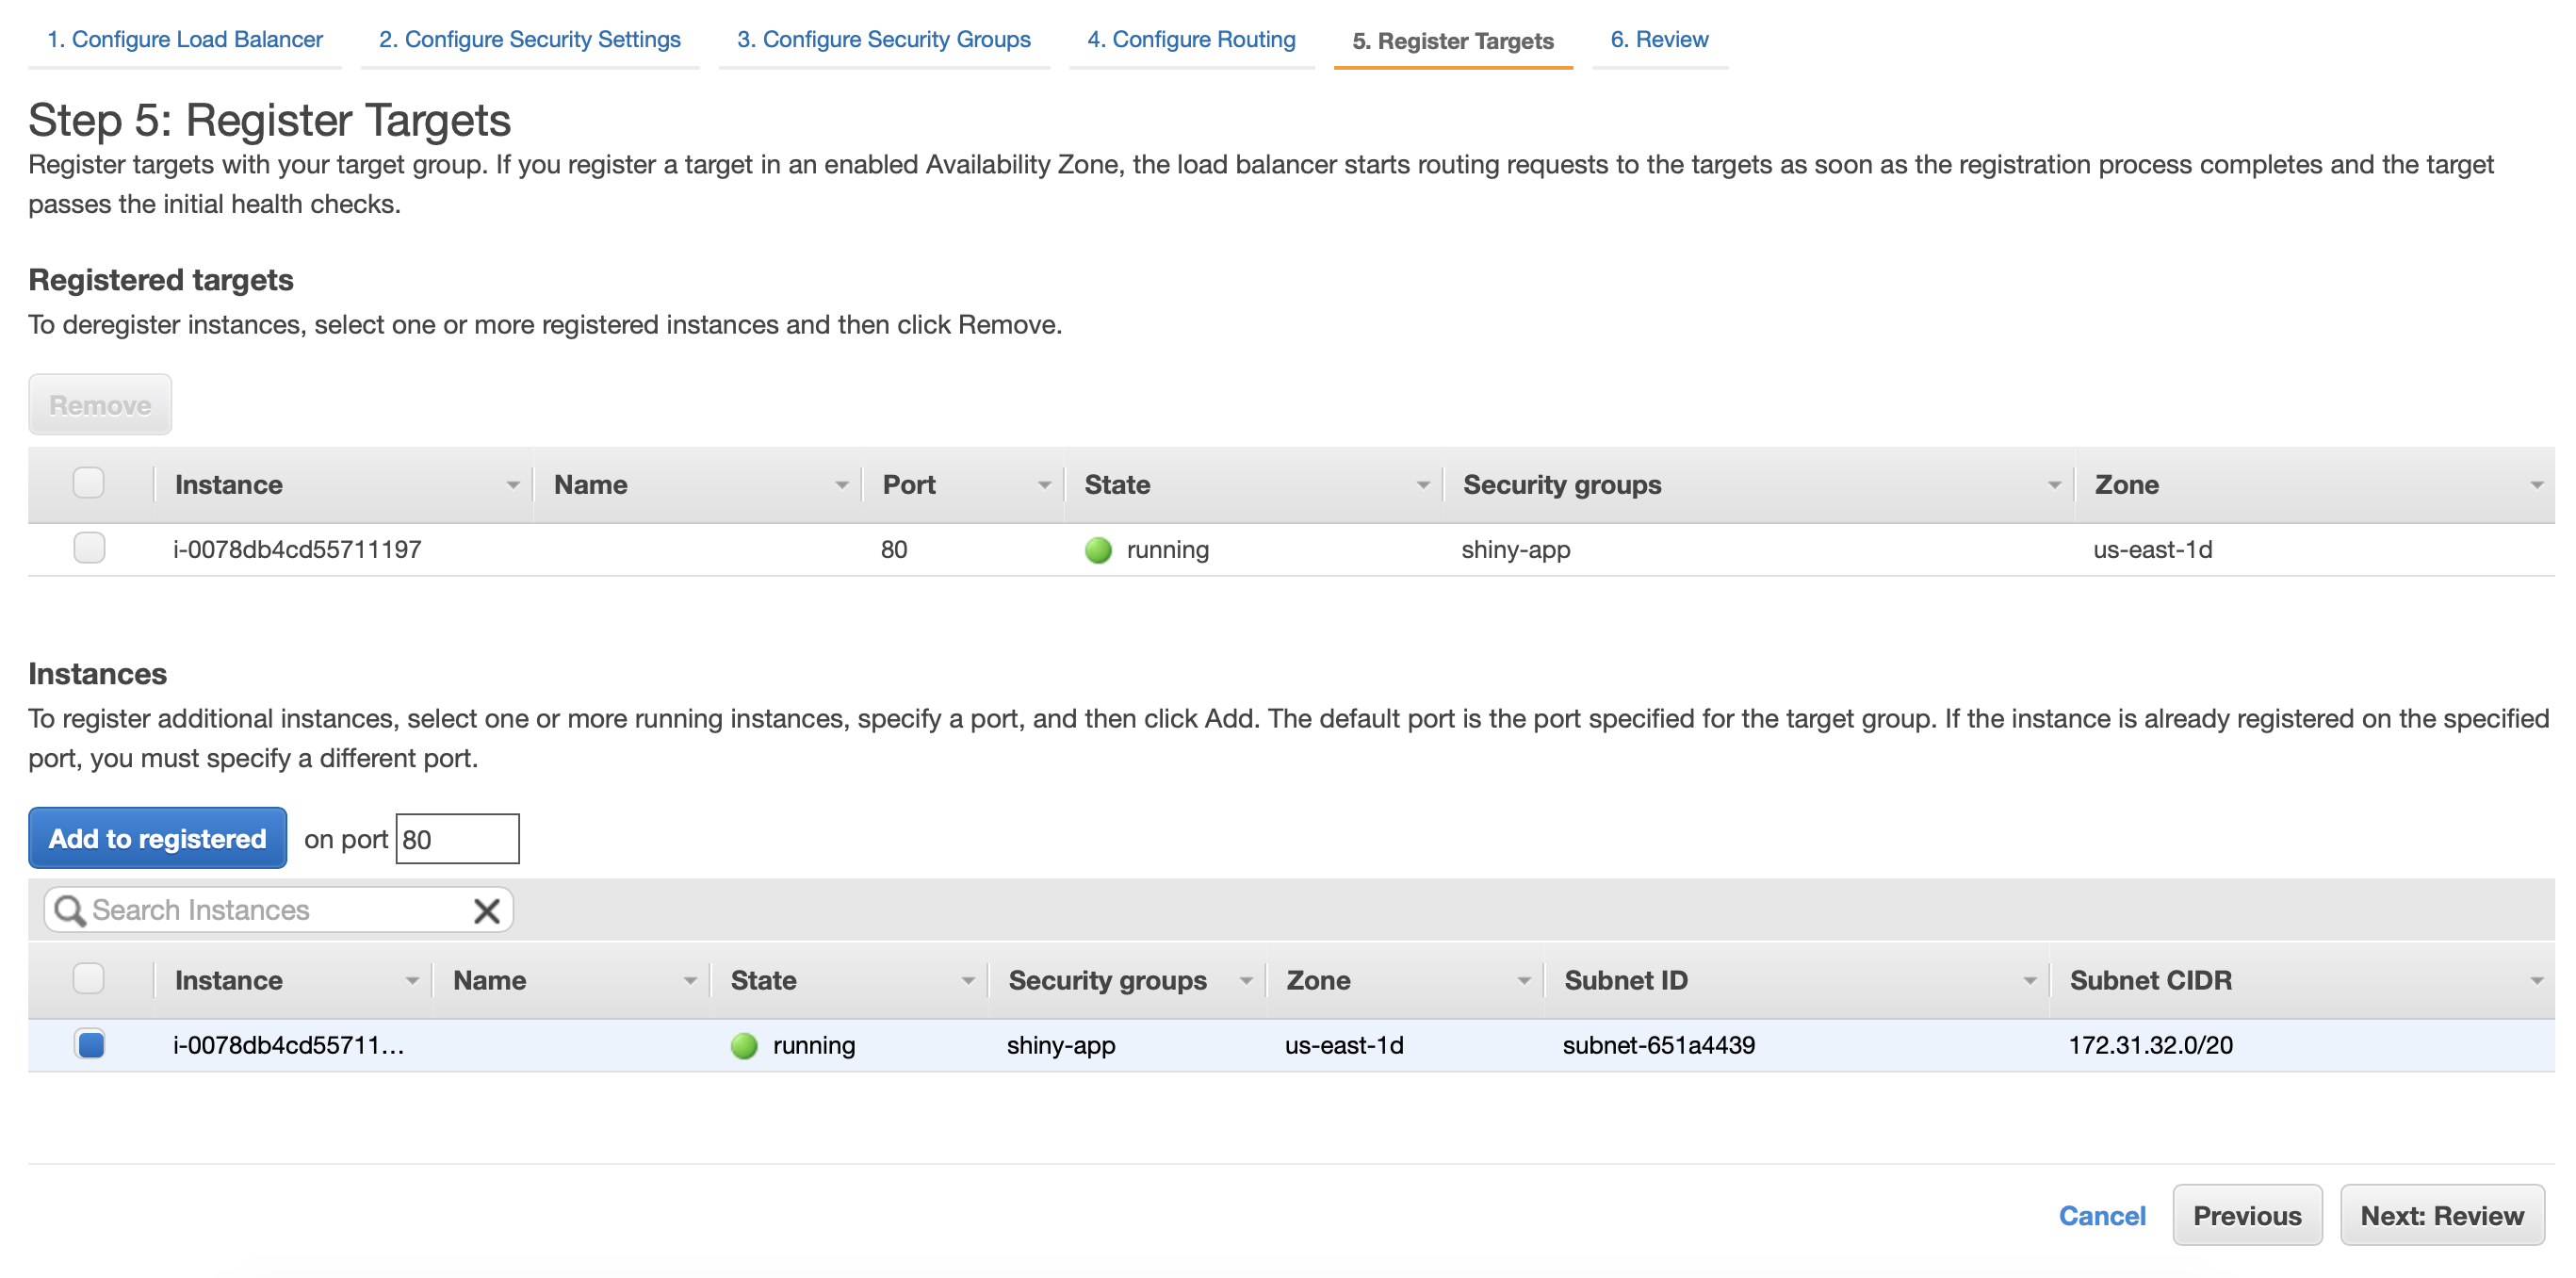
Name your target group and click next. We will come back to this later.
Now add your target or instances that will be registered to the ELB. Click Review and launch your Load Balancer.
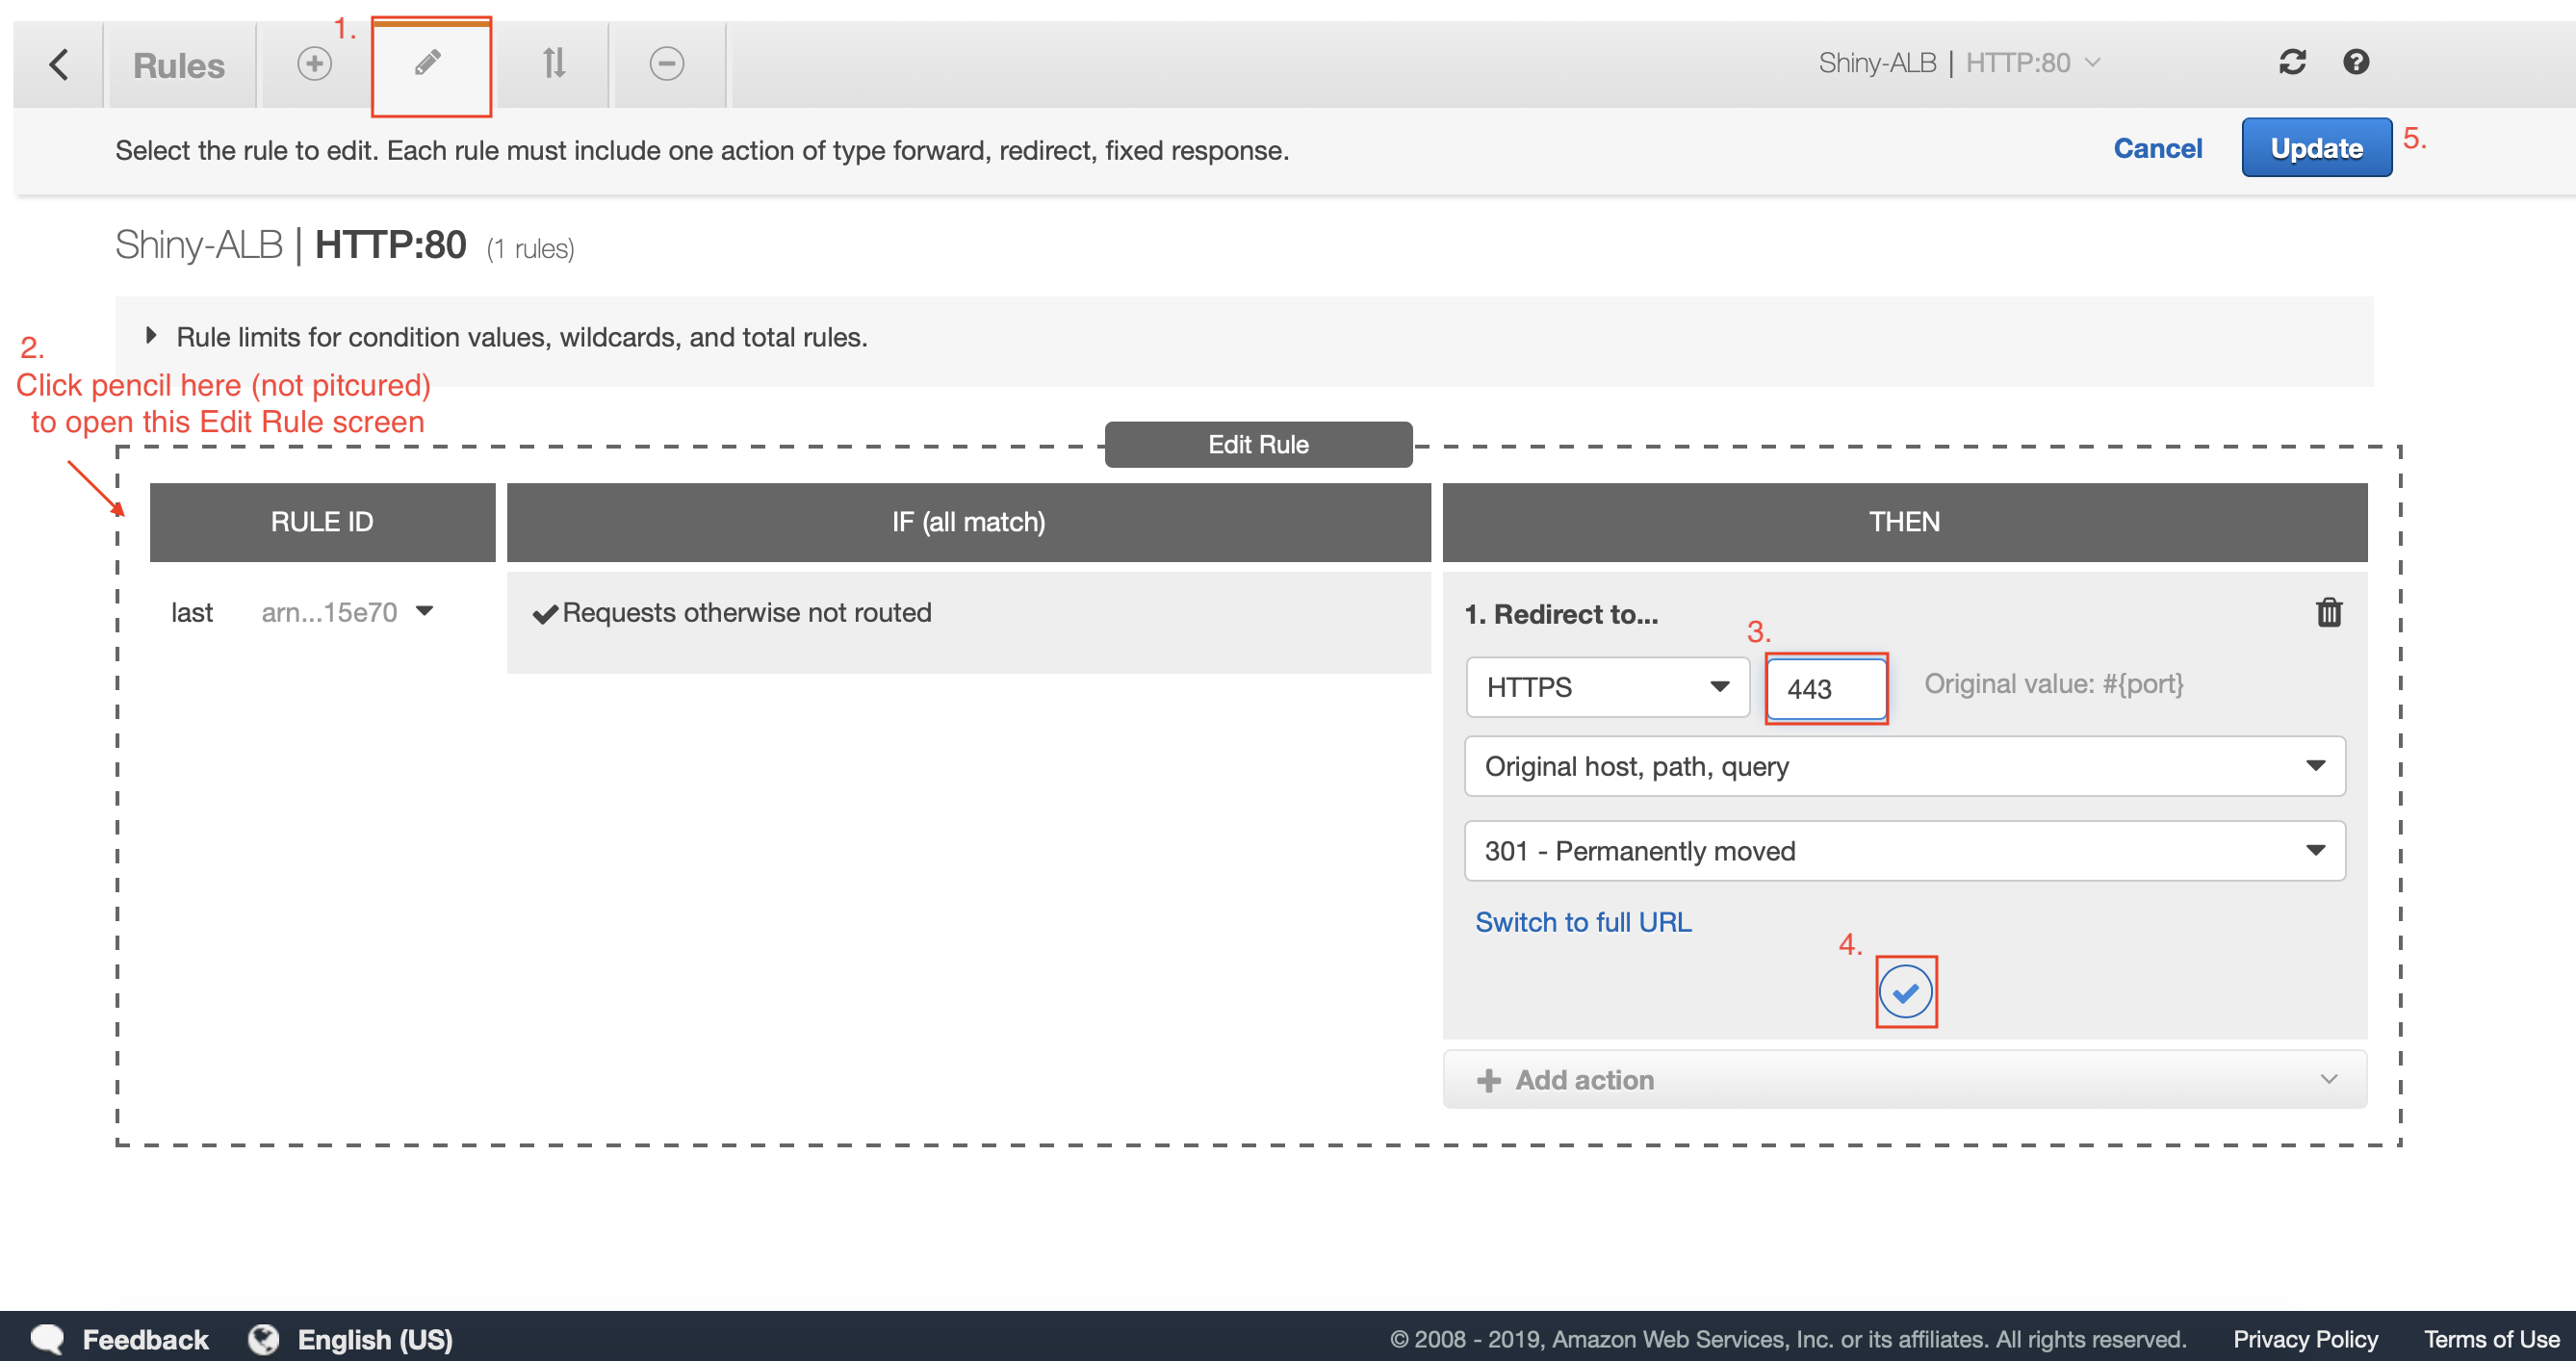
Before moving on, we need to add a rule to our load balancer that redirects all HTTP traffic on port 80 to HTTPS on port 443.
Add the rule to redirect HTTP to HTTPS
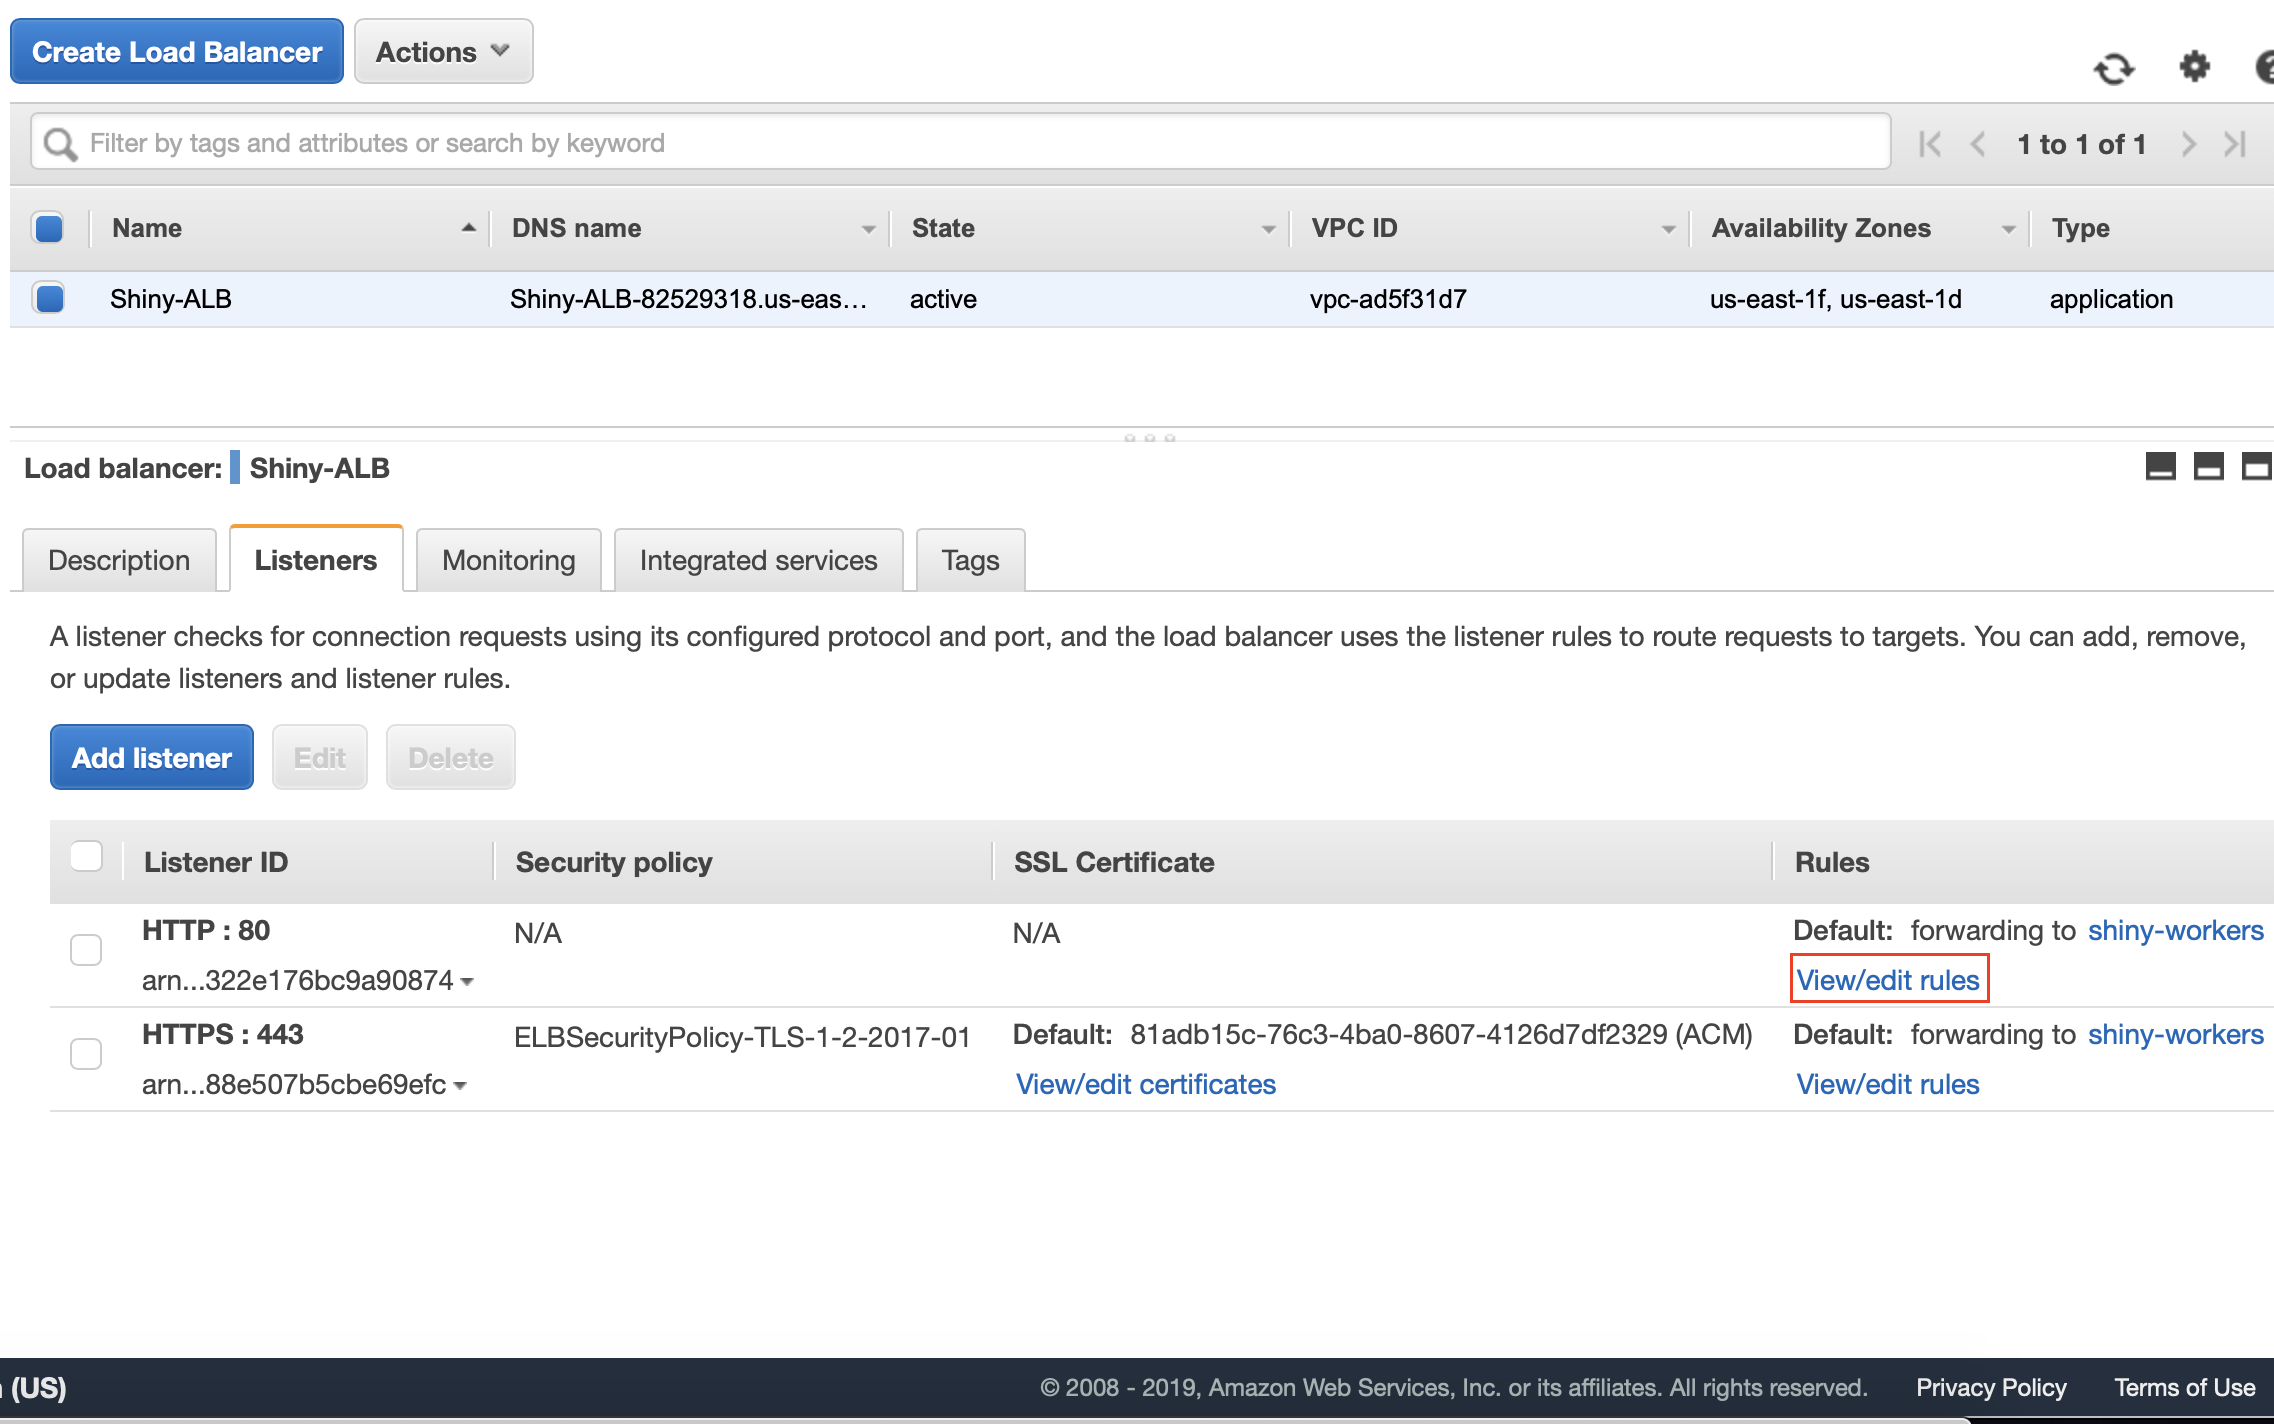
Once your Load Balancer is finished launching, select it and click the “Listeners” tab. Click View/Edit rules on your HTTP : 80 listener.
Click the Pencil on the top screen, then the smaller pencil next to the word “last”. Delete the current rule and add a new “redirect rule” which defaults to HTTPS and add port 443. Click the blue check and then click Update.
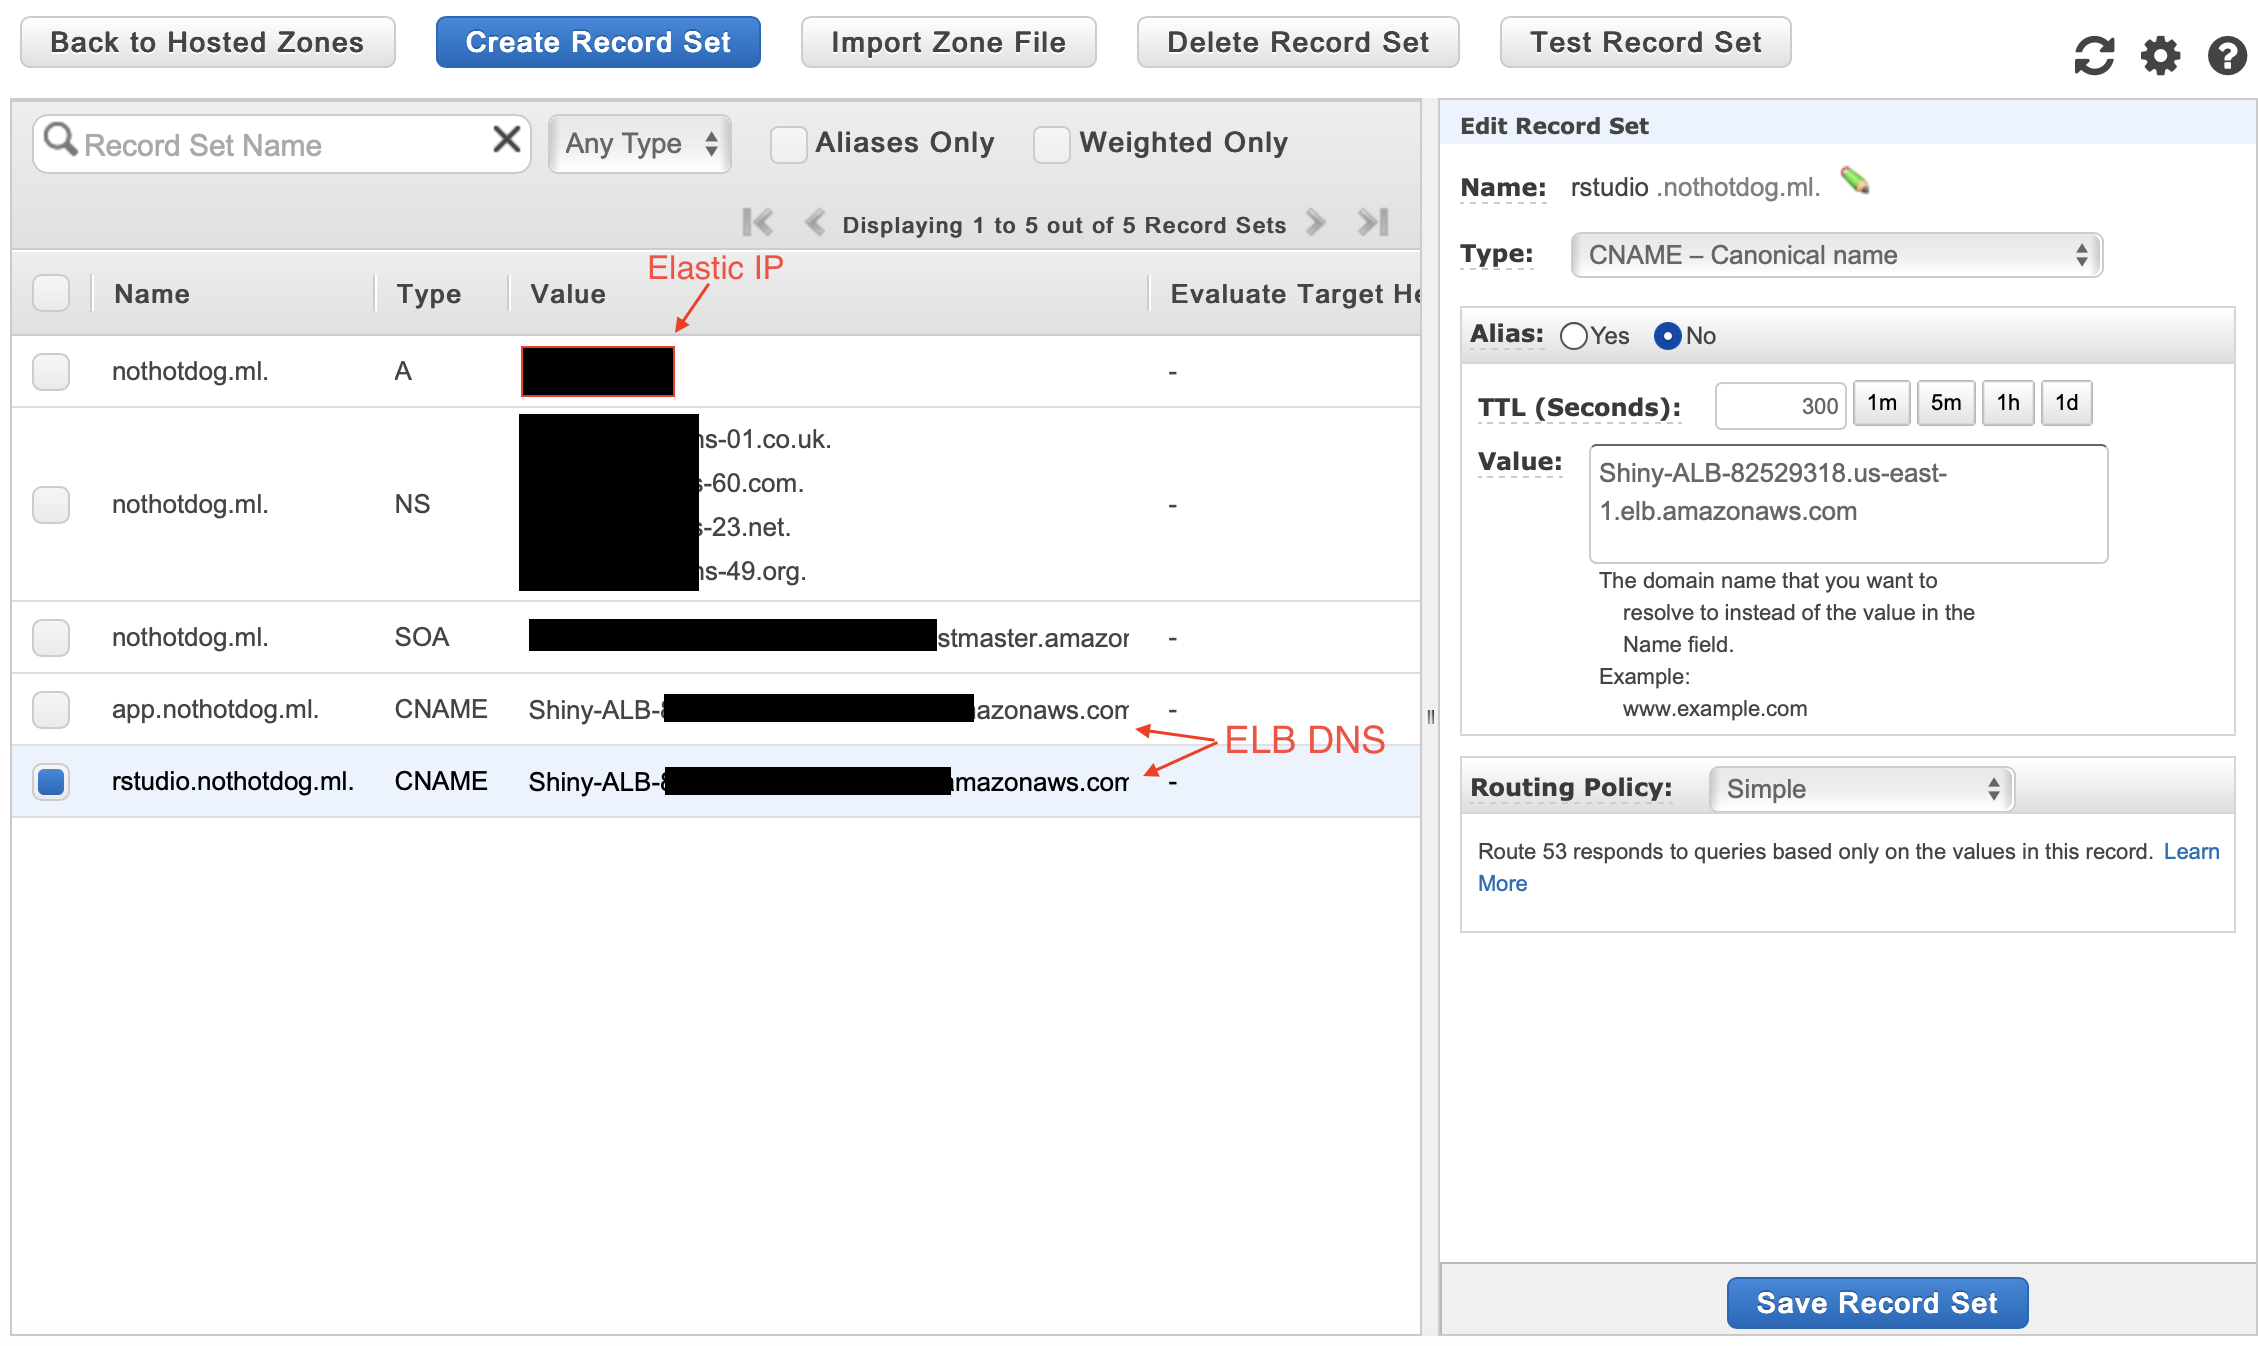
Going back to Route 53
First, copy your Elastic IP and your new ELB DNS as we will now enter it into a new Route 53 record sets. Click your new host zone and select “Create new record set”. Select type A, and enter the Elastic IP as a reference then click create. Create two more record sets, one for each of our subdomains (rstudio + app), enter your subdomain names and select the type as CNAME referencing to your load balancer DNS.
Testing the Friendlier URL
Now let’s open a browser and see if yourwebsite.ml:port is available to the public internet. You should see your shiny app or rstudio server running on your friendly URL!
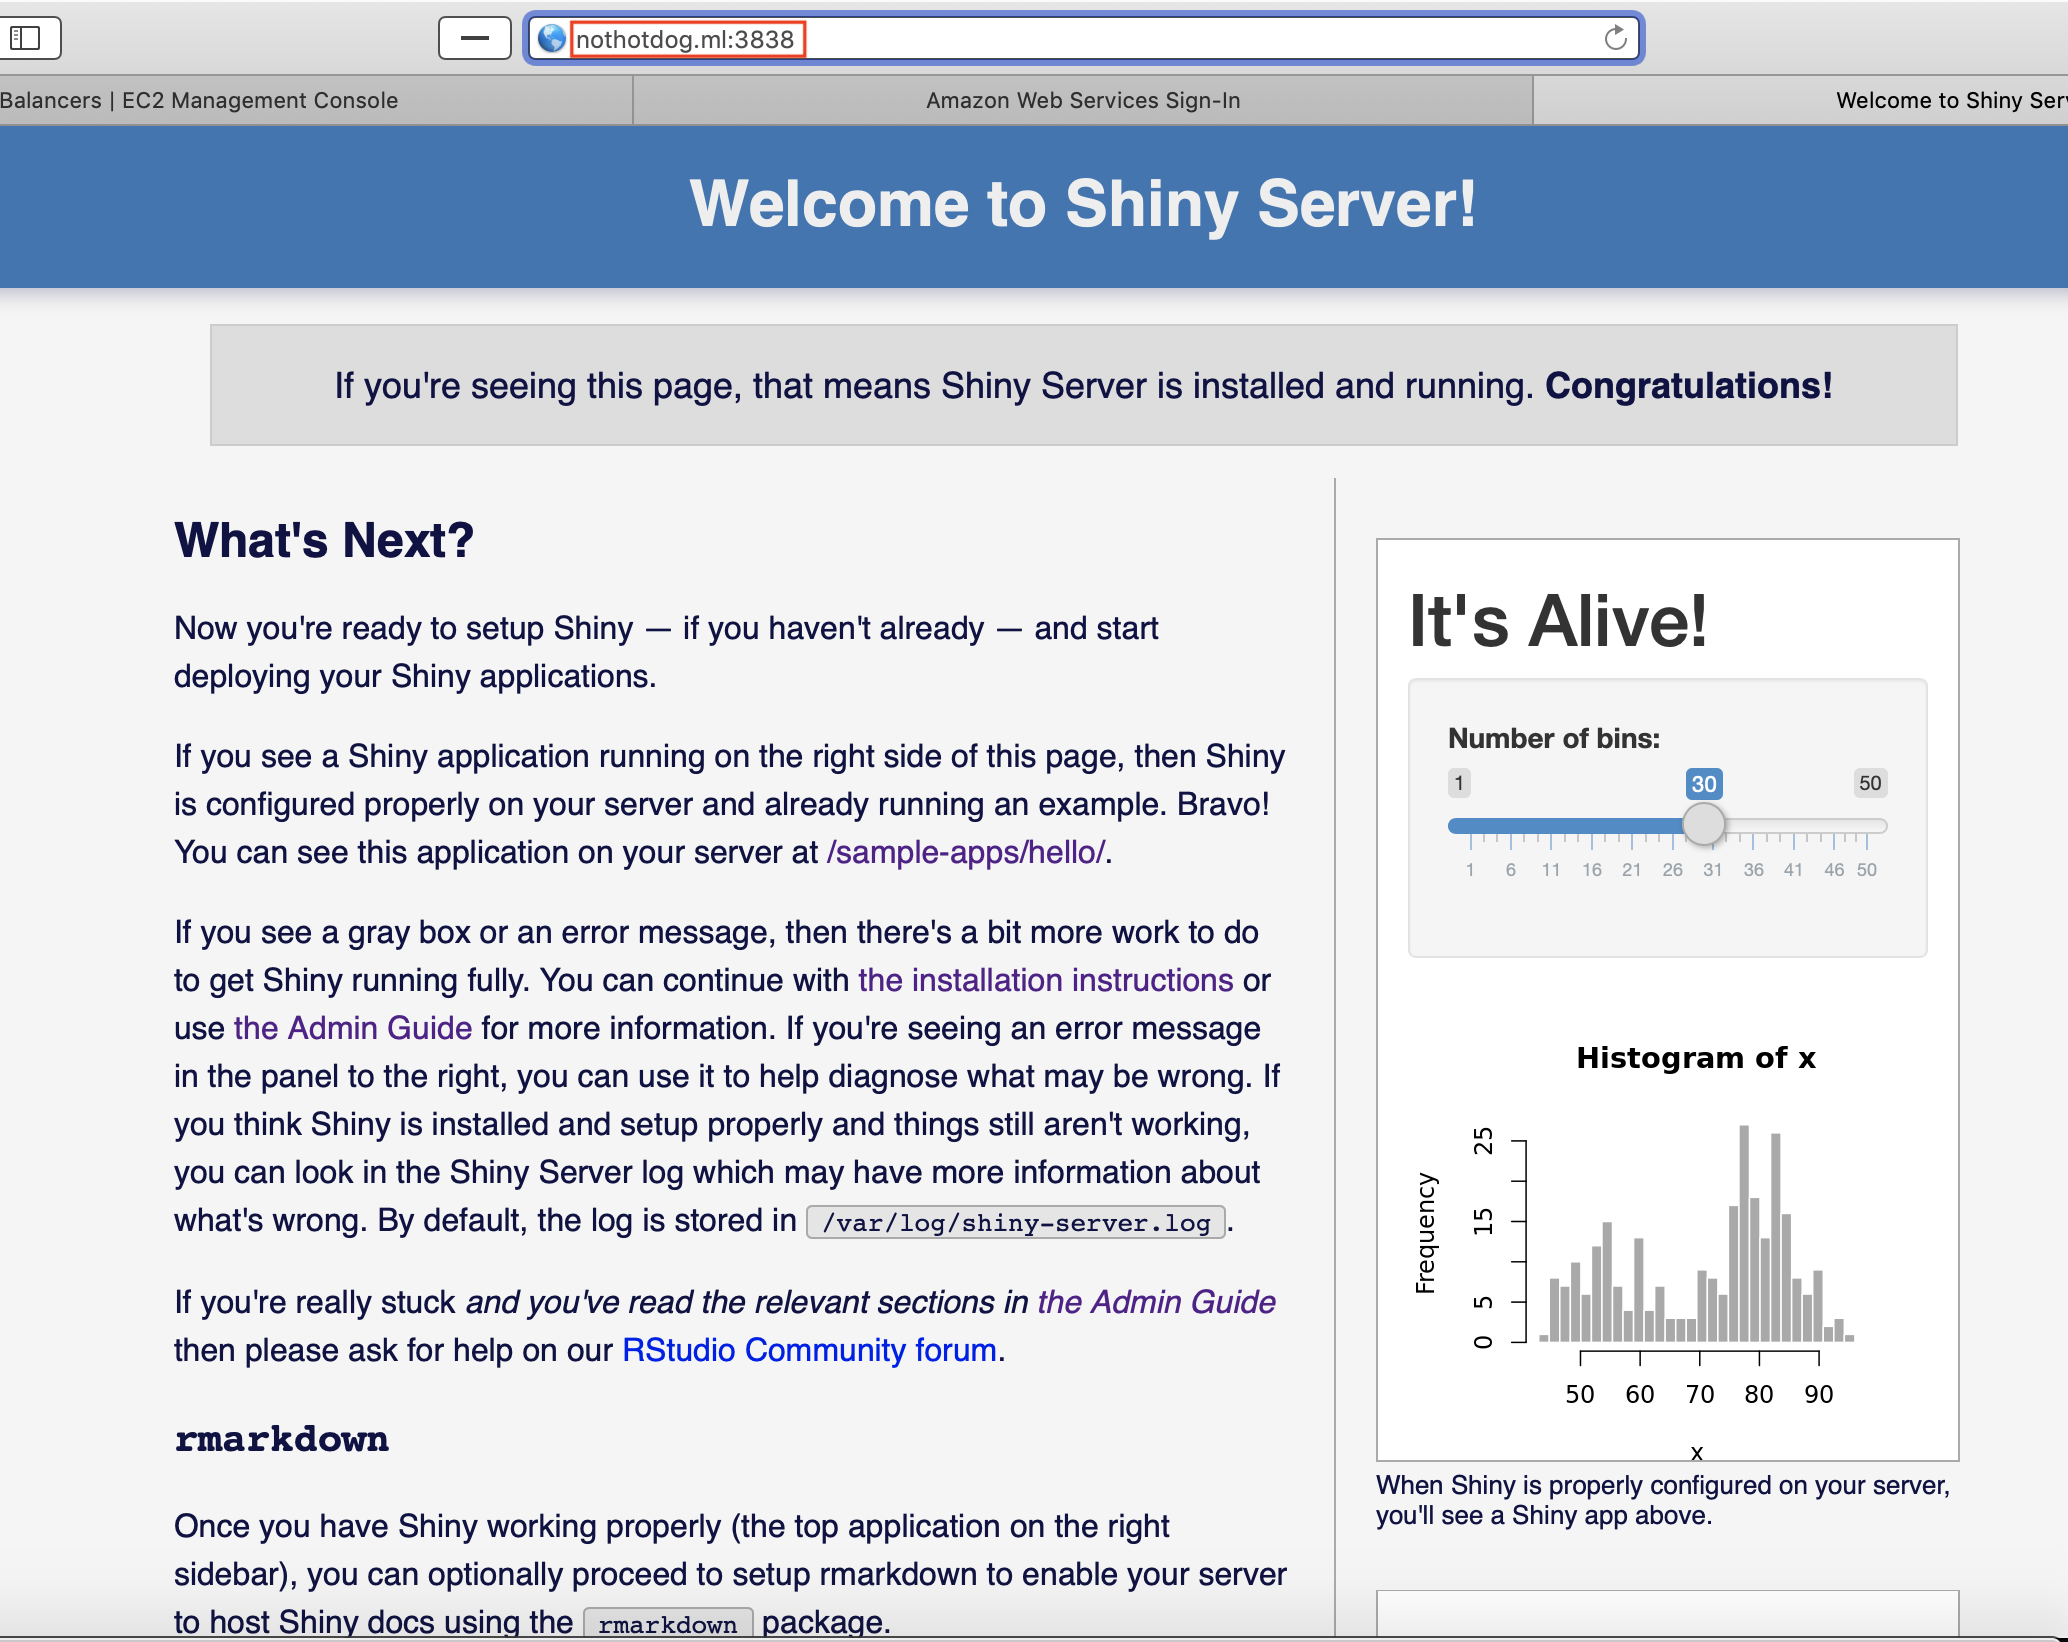
Although, if you tried to navigate to a subdomain URL, you would receive an error since we have not installed our reverse proxy yet.
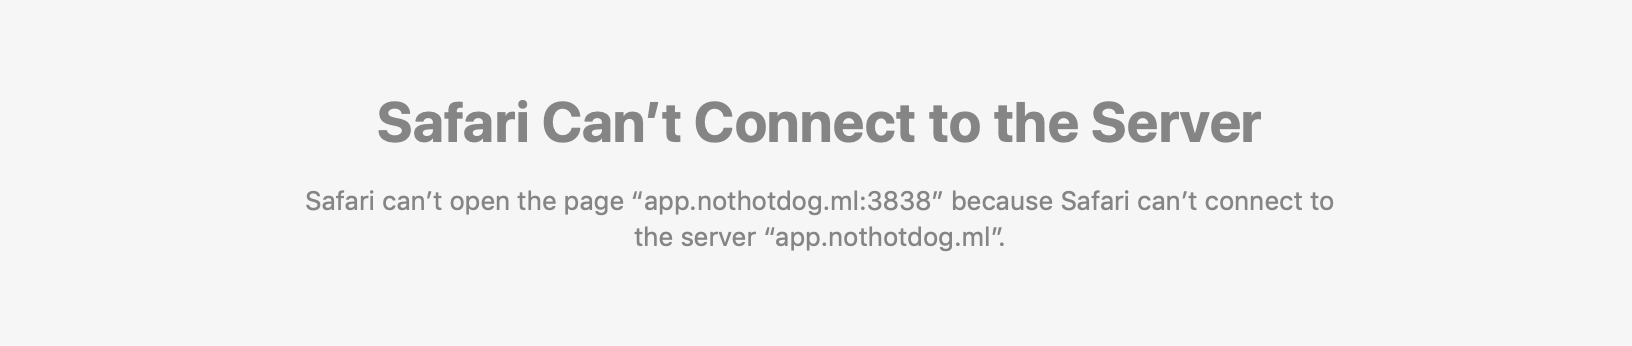
Lets install nginx to fix this and configure our reverse proxy correctly.
Install nginx
Let’s install nginx and begin configuring our reverse proxy server. We can do this by creating .conf files for each server, or in one big .conf file. First, install nginx.
sudo apt update
sudo apt install nginx
Creating your config files
RStudio sign-in / sign-out errors
I had everything running pretty quickly but ran into some trouble with the rstudio subdomain. Every time I entered my user credentials, I would always be redirected to the localhost of the server, which did not exist under the HTTPS URL. After plenty of time searching around, it turned out the error was coming from the HTTP to HTTPS header conversion. I was finally able to patch together a config file that worked perfectly for RStudio without any errors. This also works for the shiny .conf file that we’ll be creating as well. See below on how to create your .conf files for the nginx, shiny, and rstudio server combination.
Navigate to the sites-available folder inside nginx where you will find a default file. This is where we will create our rstudio and shiny .conf files so it’s safe to remove the default file before we create ours.
cd /etc/nginx/sites-available
sudo rm default
Create shiny.conf
sudo nano shiny.conf
- Copy-paste the below code as it is, but replace
with your public IP or website name like “website.com or subdomain.website.com”.
server {
        listen 80;
        listen [::]:80;

    server_name <HOSTNAME>;

    location / {
        proxy_http_version 1.1;
        proxy_set_header Upgrade $http_upgrade;
        proxy_set_header Connection "upgrade";
        proxy_set_header Host $host;
        proxy_set_header X-Real-IP $remote_addr;
        proxy_set_header X-Forwarded-For $proxy_add_x_forwarded_for;
        proxy_set_header X-Forwarded-Proto $scheme;
        proxy_read_timeout 90s;

        # Connect to local port
        proxy_pass http://127.0.0.1:3838;
    }
}
Create rstudio.conf
sudo nano rstudio.conf
- Copy-paste the below code as it is, but replace
with your public IP or website name like “website.com or subdomain.website.com”.
server {
        listen 80;
        listen [::]:80;

    server_name <HOSTNAME>;

    location / {
        proxy_http_version 1.1;
        proxy_set_header Upgrade $http_upgrade;
        proxy_set_header Connection "upgrade";
        proxy_set_header Host $host;
        proxy_set_header X-Real-IP $remote_addr;
        proxy_set_header X-Forwarded-For $proxy_add_x_forwarded_for;
        proxy_set_header X-Forwarded-Proto $scheme;
        proxy_read_timeout 90s;

        # Connect to local port
        proxy_pass http://127.0.0.1:8787;
    }
}
Add to nginx .conf
You have to add this into your nginx .conf file, or you will have errors with the headers in your rstudio & shiny .conf files.
sudo nano ../nginx.conf
http {
       # All you other settings up here...

       server_names_hash_bucket_size 128;

       map $http_upgrade $connection_upgrade {
              default upgrade;
              ''      close;
                  }
}
Now let’s go into the sites-enabled directory which is where nginx reads from in production. Make a soft copy of the .conf files we made in the sites-available directory.
cd /etc/nginx/sites-enabled
sudo ln -s /etc/nginx/sites-available/rstudio.conf /etc/nginx/sites-enabled/rstudio.conf
sudo ln -s /etc/nginx/sites-available/shiny.conf /etc/nginx/sites-enabled/shiny.conf
Finally, restart the nginx service. When you alter .conf files, you have to restart the service to implement your new changes.
sudo systemctl restart nginx
Secured New Domain: Success
When we visit any of our subdomains, we should be directed to the correct server! Also, all HTTP request will convert to HTTPS (thanks to the rule we set in our Load Balancer) to stay secured. Try “http://subdomain.yourwebsite.com” and see if it converts to HTTPS. You should see that it does and you’ll always notice the little lock to the left of the URL!

Wrapping it up and staying safe
Perfect! Now we can worry a little less about our app being hacked, altered to a bitcoin mining rig, or even destroyed.
Since I want to be able to share my analysis with anyone, I want to make sure that I don’t leave any backdoor entries open for hackers to gain control of my AWS resources. Adding HTTPS to your site and closing port 22 does not guarantee 100% hack-free instances, although it allows us to sleep a little better at night.
Now that we know how to secure our EC2 instance and protect our app, in a future post I will show you how to integrate everything, plus more to build a robust shiny app and work environment.
